Sign-Up | 1- Go to UpSway website https://upsway.io/login 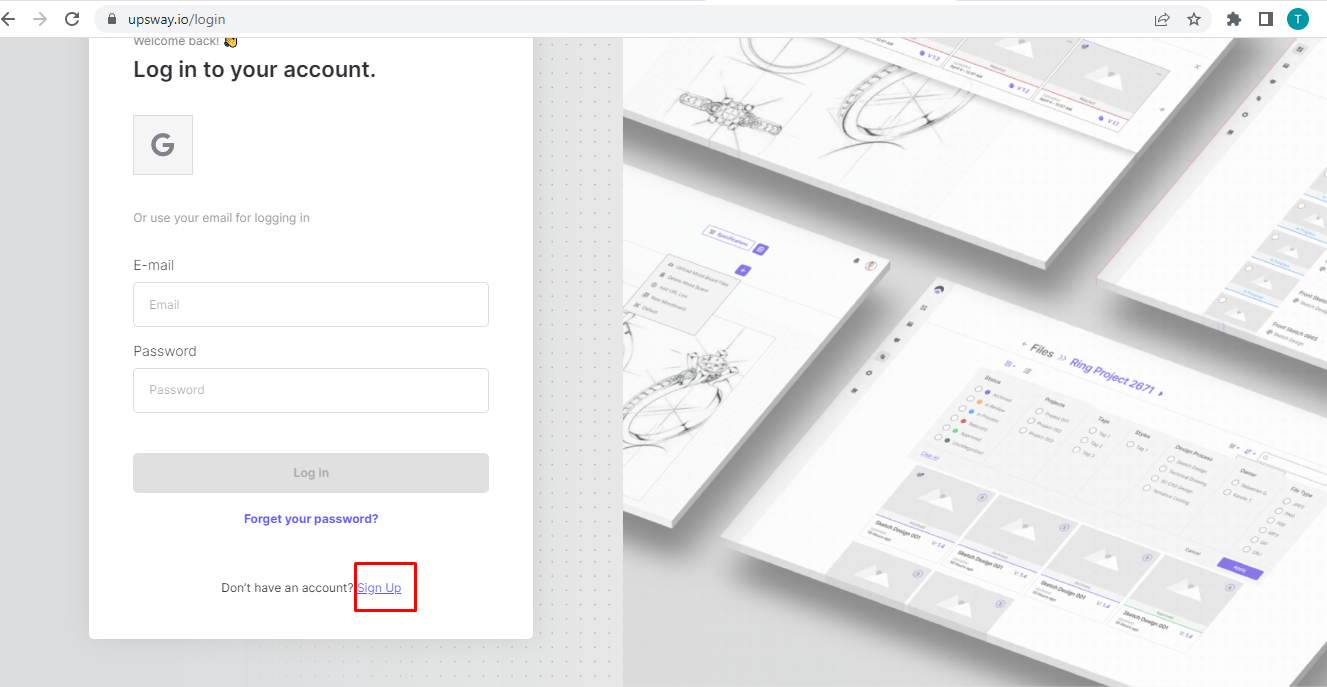 3- Enter name, email, and password 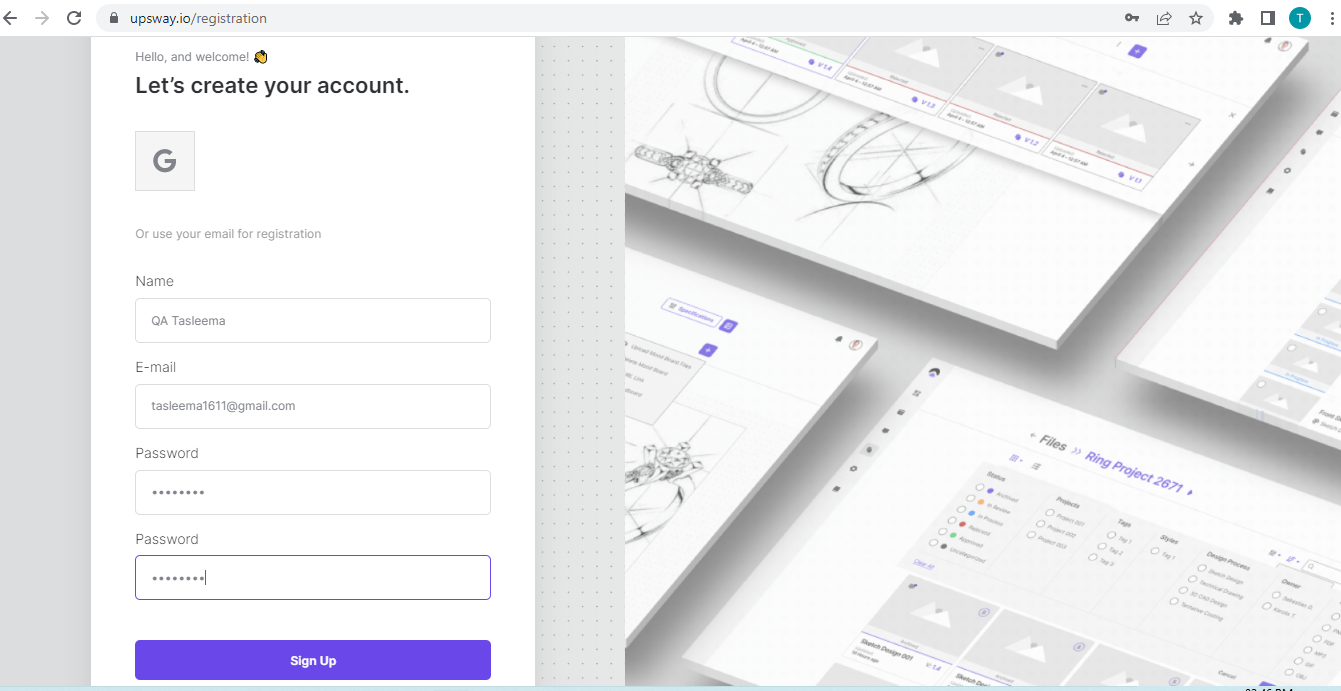 4- Press the button sign up- It will redirect on dashboard page. And user can create project. 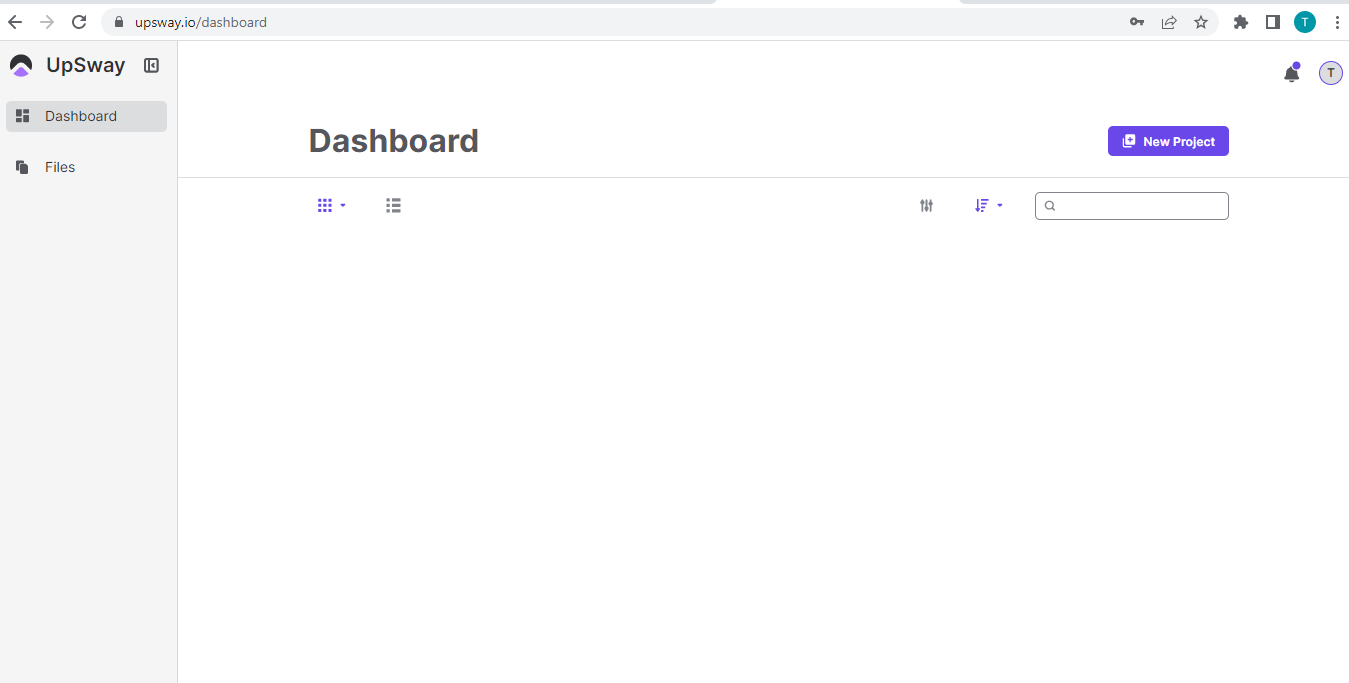 5- User has another possibility to sign up through Google and Facebook account  |
Log In | 1- Go to UpSway website https://upsway.io/login 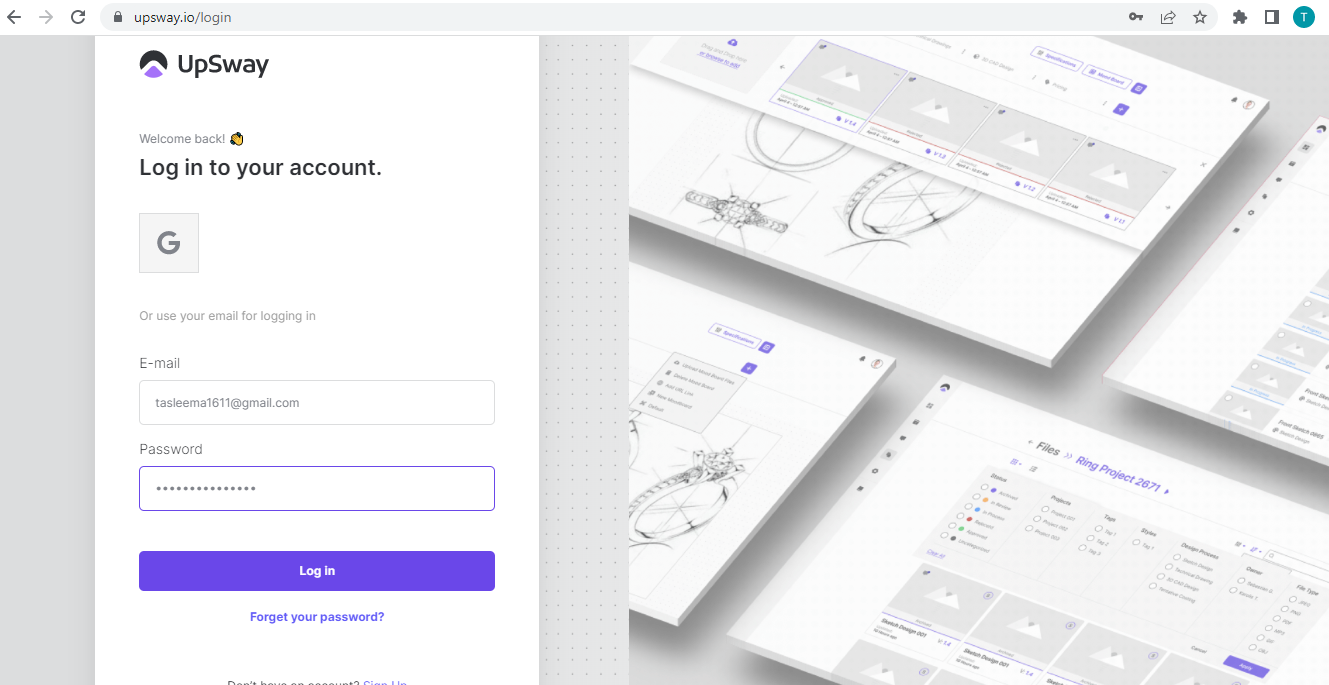 3- Press the button log in- It will redirect on dashboard page. And user can create project. 4- User has another possibility to log in through Google and Facebook account 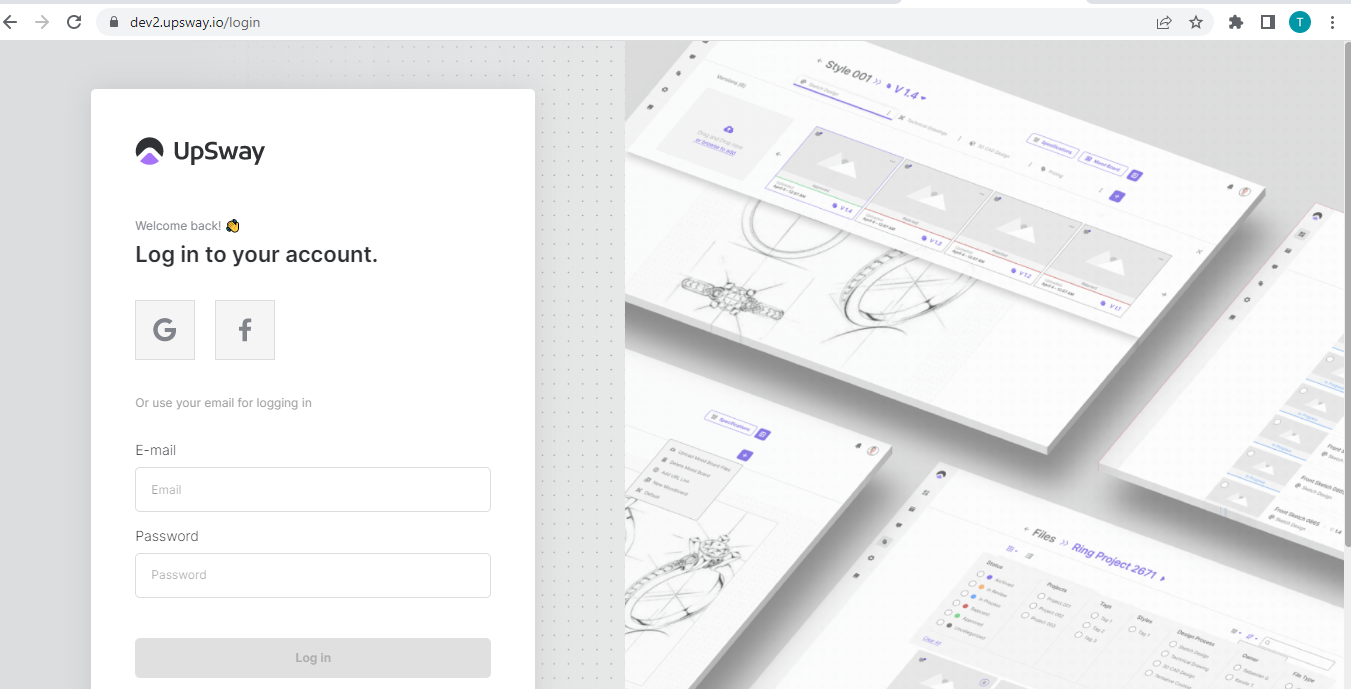 |
Log Out / Sign-Out | 1- Go to UpSway website https://upsway.io/login 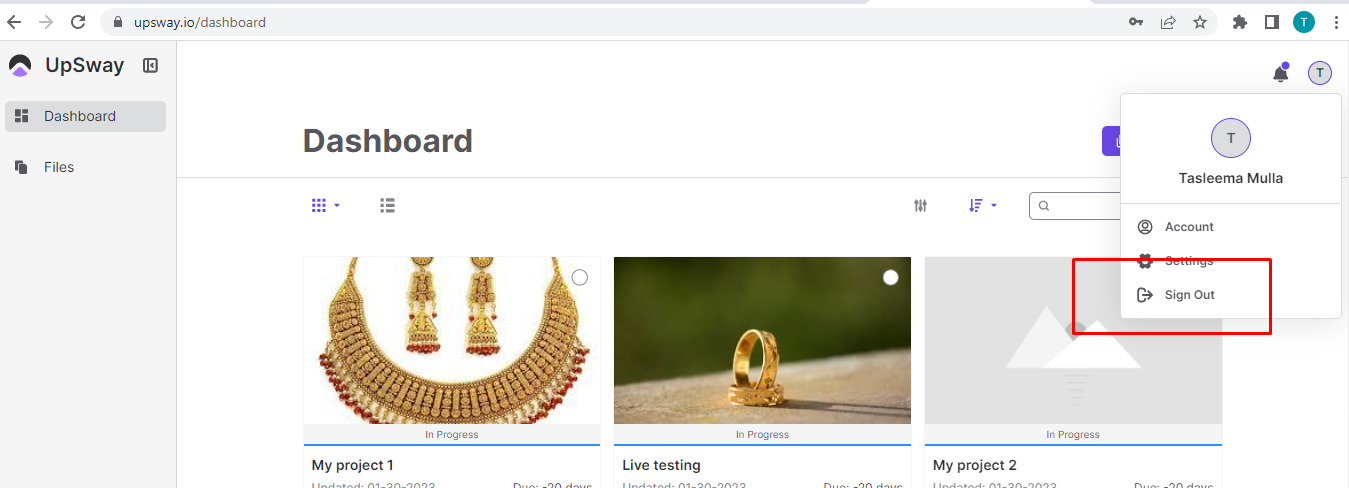 4- Click on the sign-out- User will redirect on login page 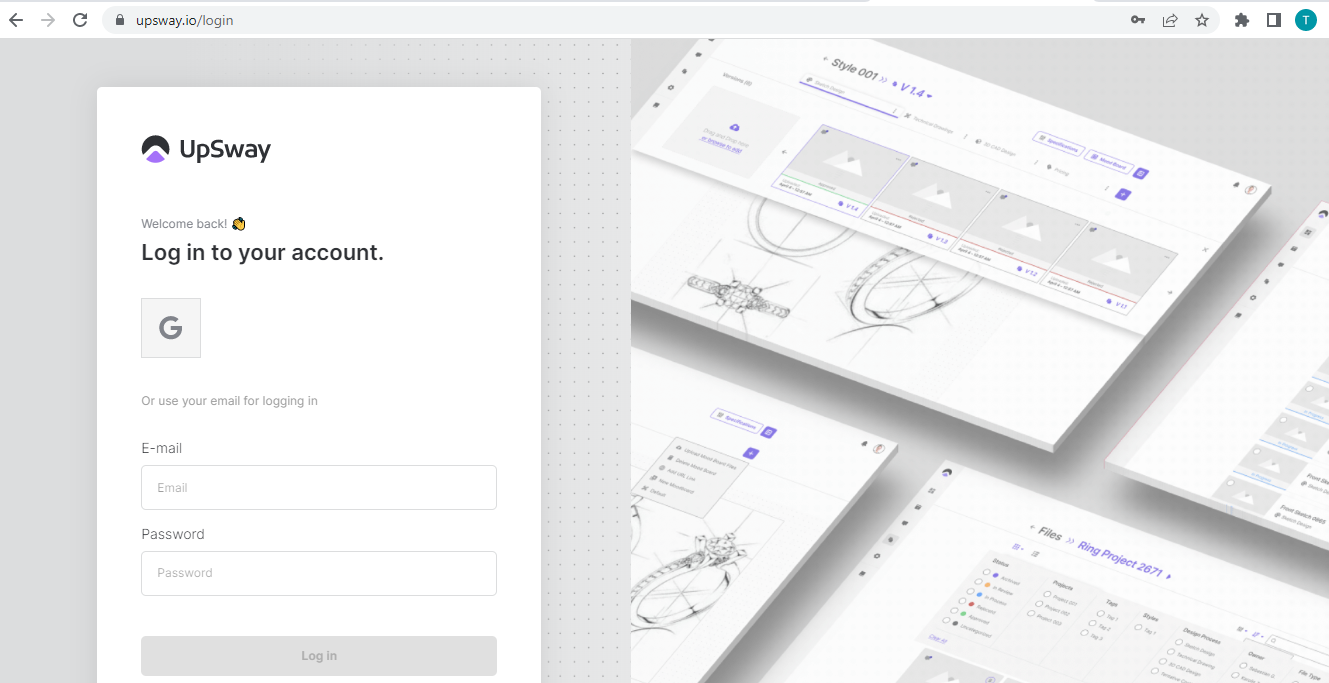 |
Forget Password | 1- Go to UpSway website https://upsway.io/login 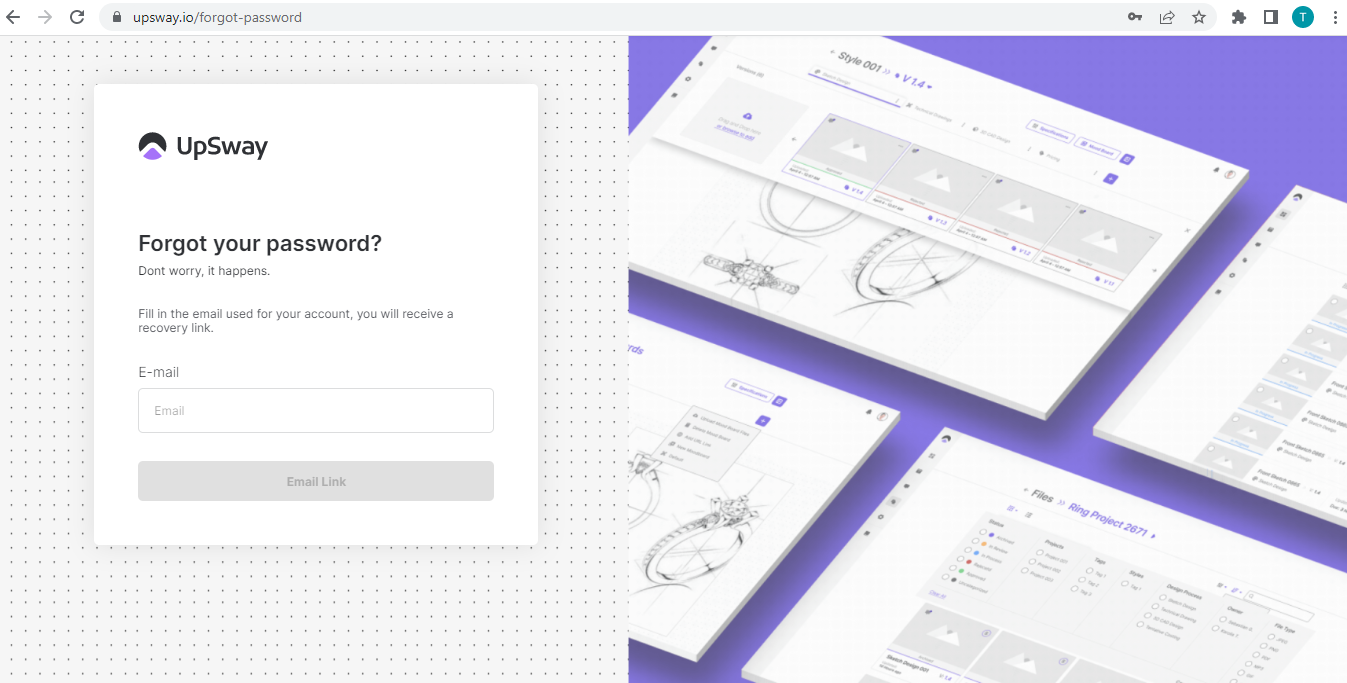 3- Enter your Email and you will receive a recovery link |
View Existing Project | 1- Go to UpSway website https://upsway.io/dashboard  3- All the existing projects are listed  |
Create New Project | 1- Go to UpSway website https://upsway.io/login  4- Click on the New Project button- You will see create new project page 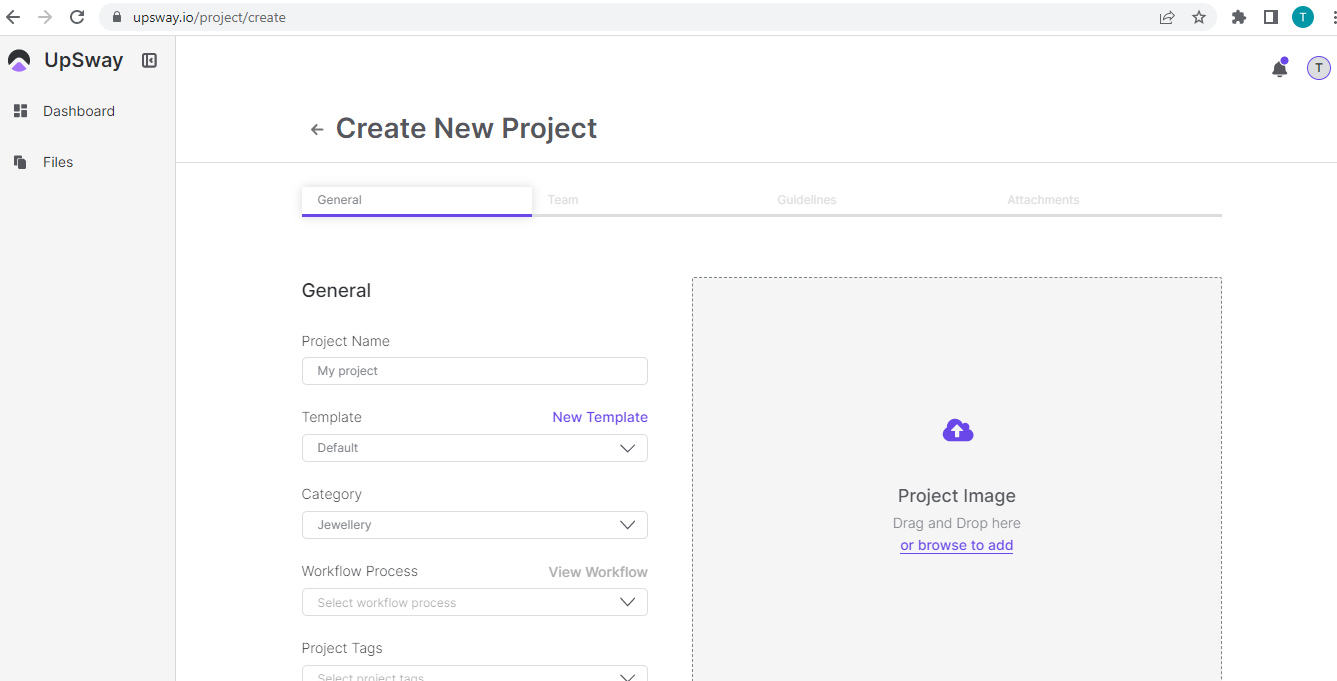 6- Save the General Information or you can simply skip this step & move to the next section Team 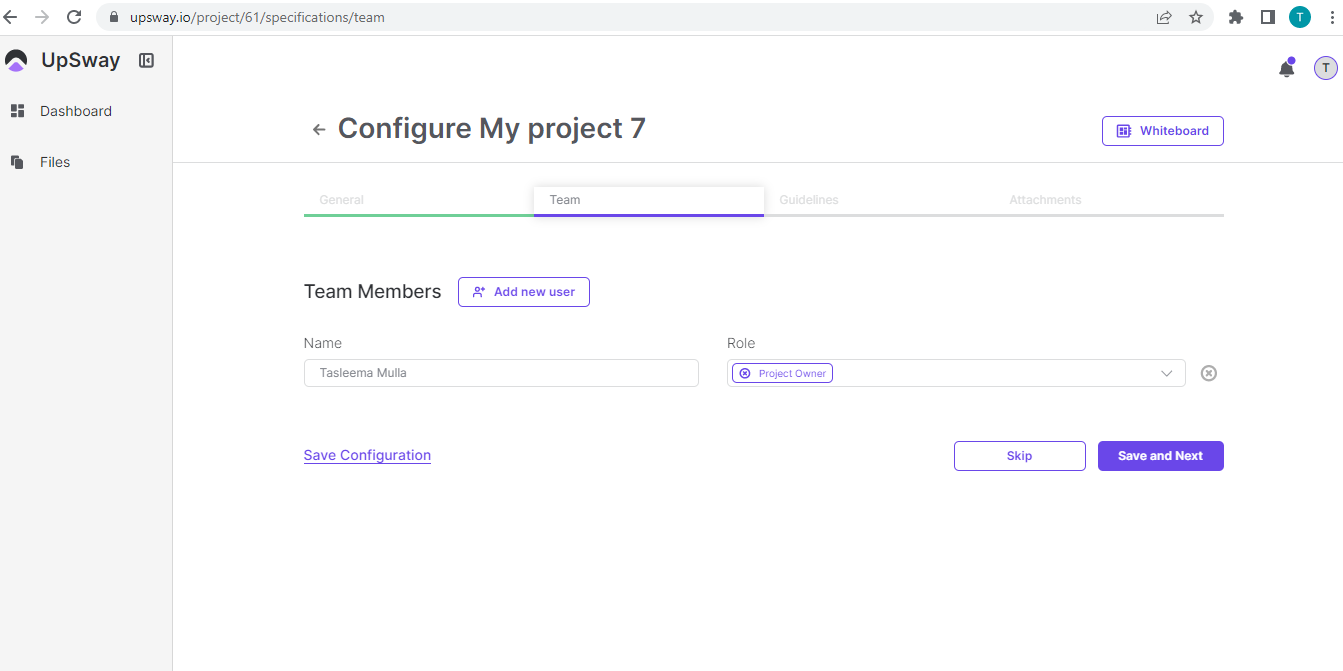 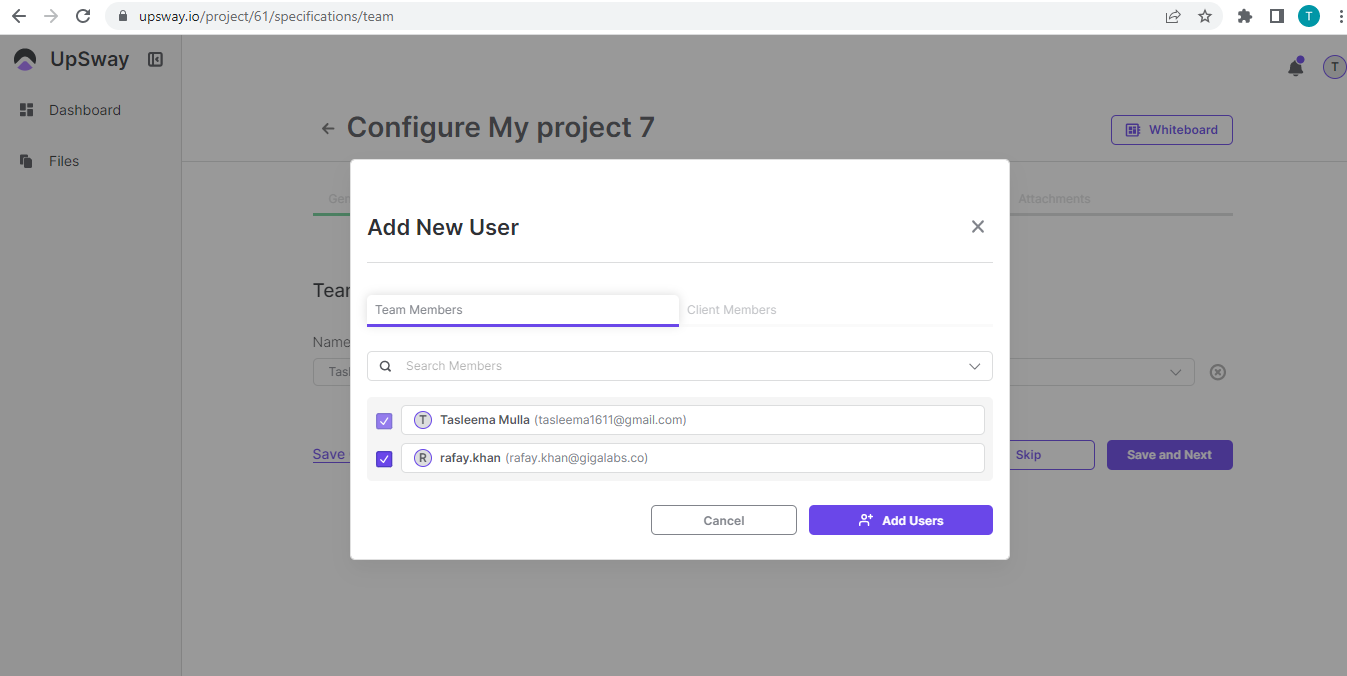 8- The team section shows each team member's Name and role 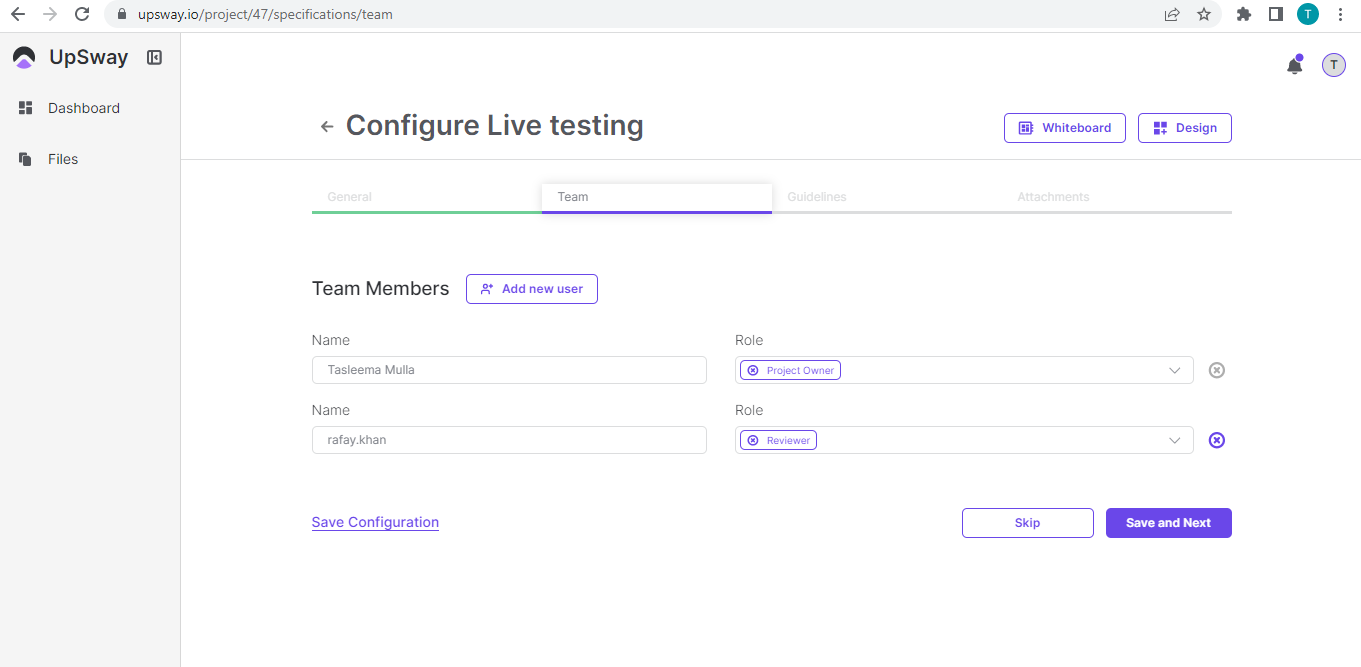 9- Save the Team Information or you can simply skip this step & move to the next section Guidelines 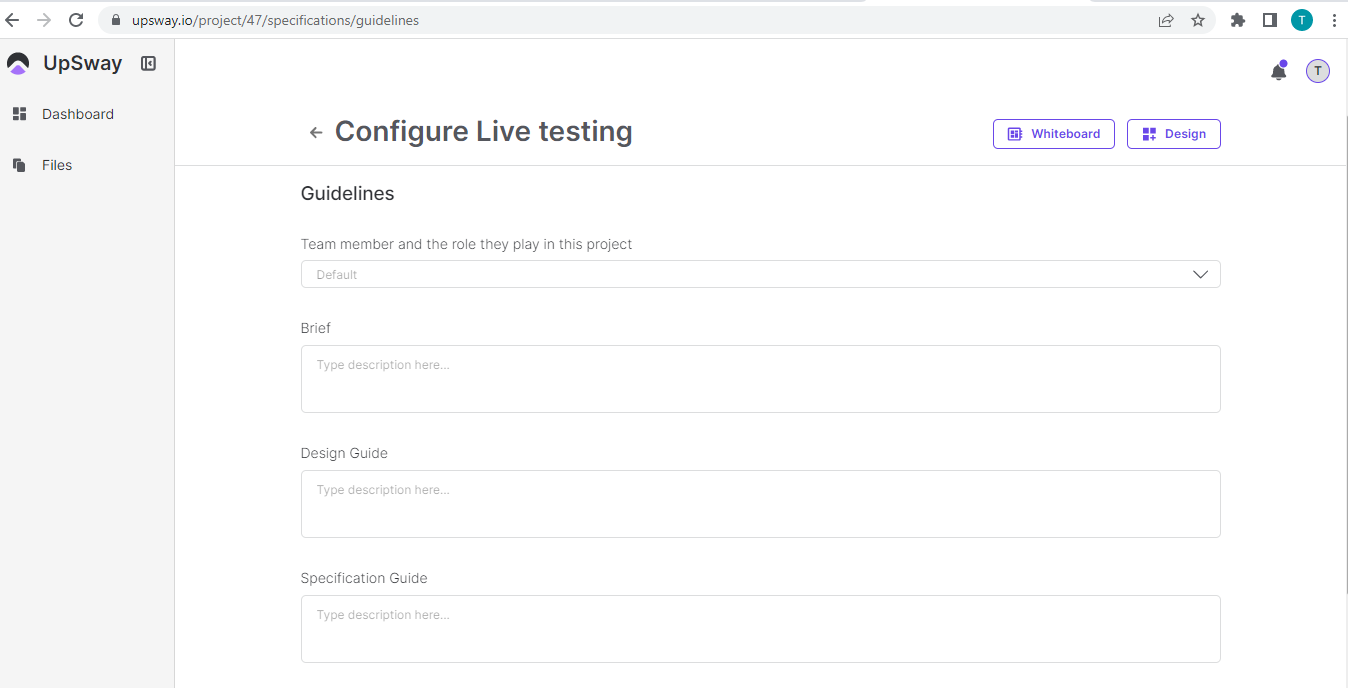 11- Save the Guideline Information or you can simply skip this step & move to the next section Attachment 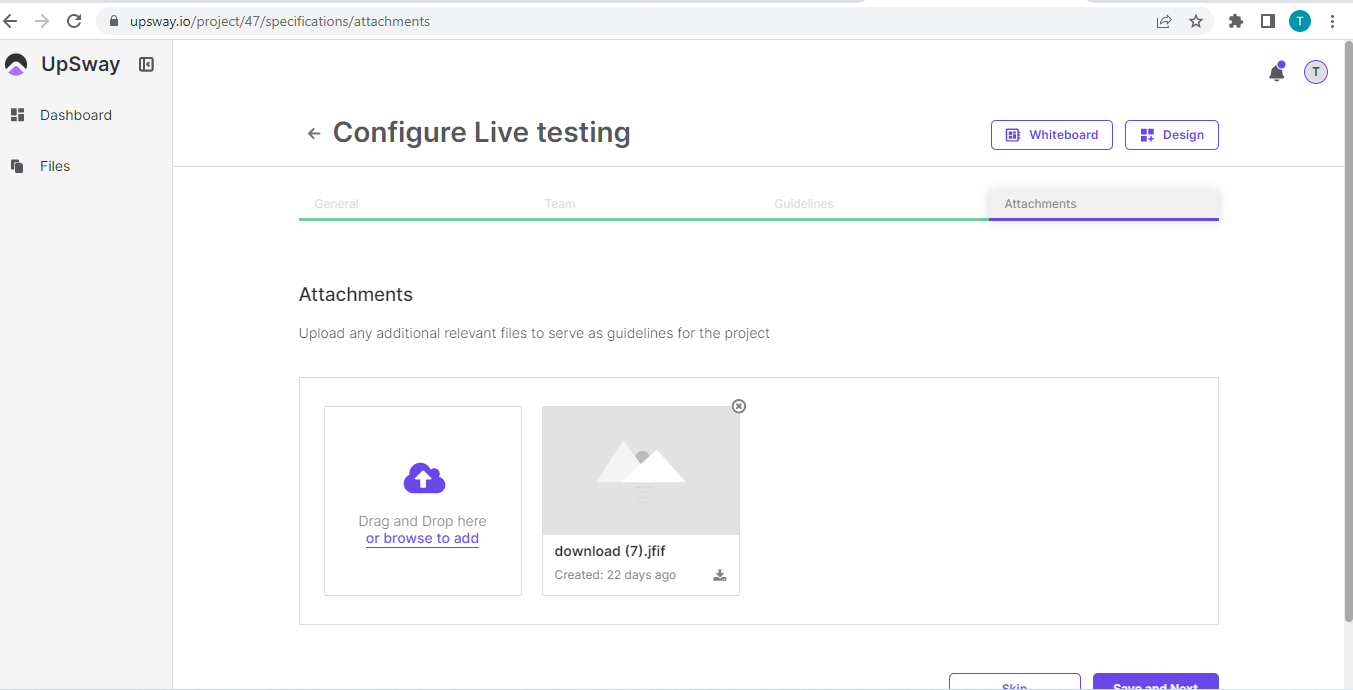 13- The New Project is created successfully and now we can move to the designing part of the project |
Create Styles of Project | 1- Go to UpSway website https://upsway.io/login 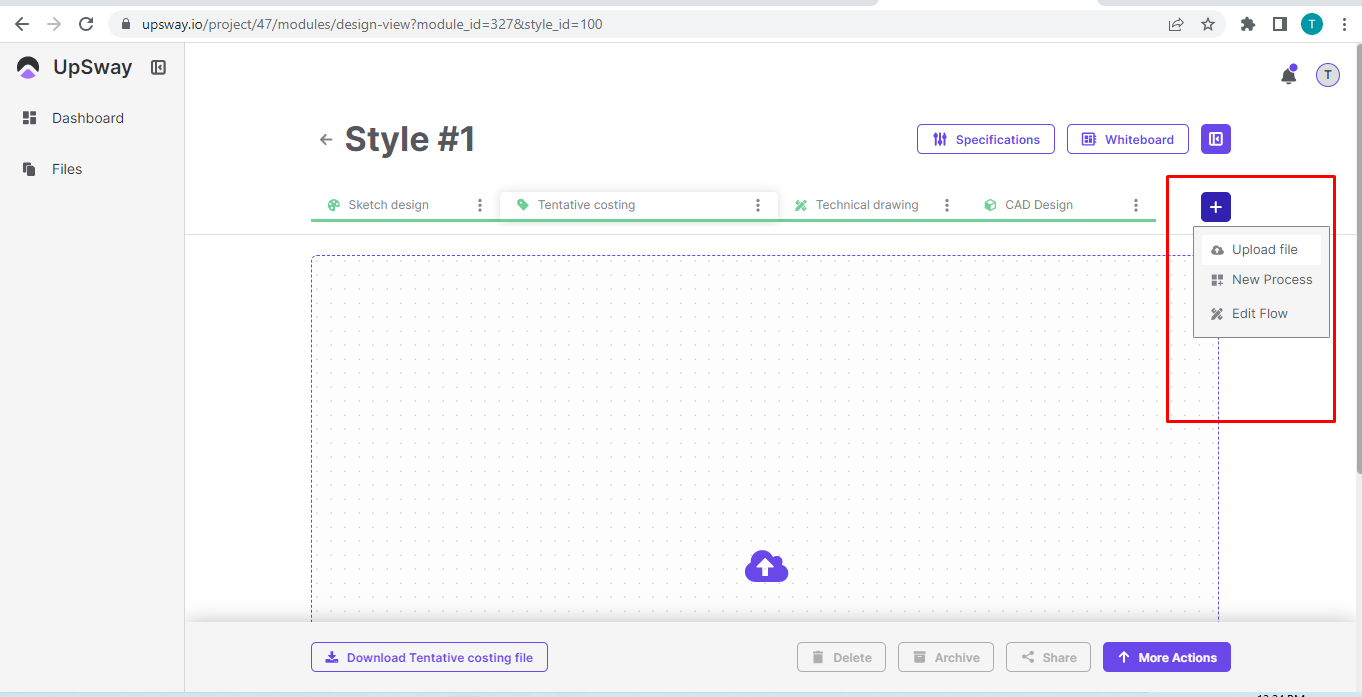 6- Select the upload file option and upload the image in the respective tag of the project 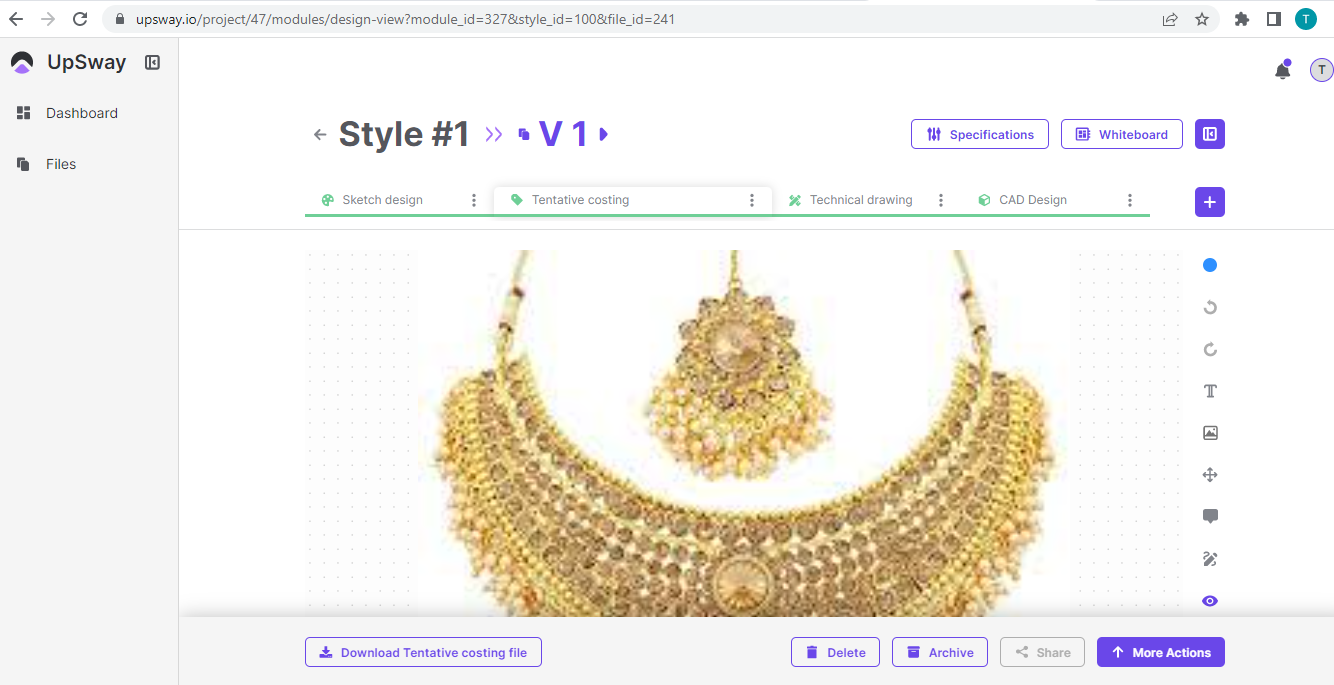 |
Create Version of Style | 1- Go to UpSway website https://upsway.io/dashboard 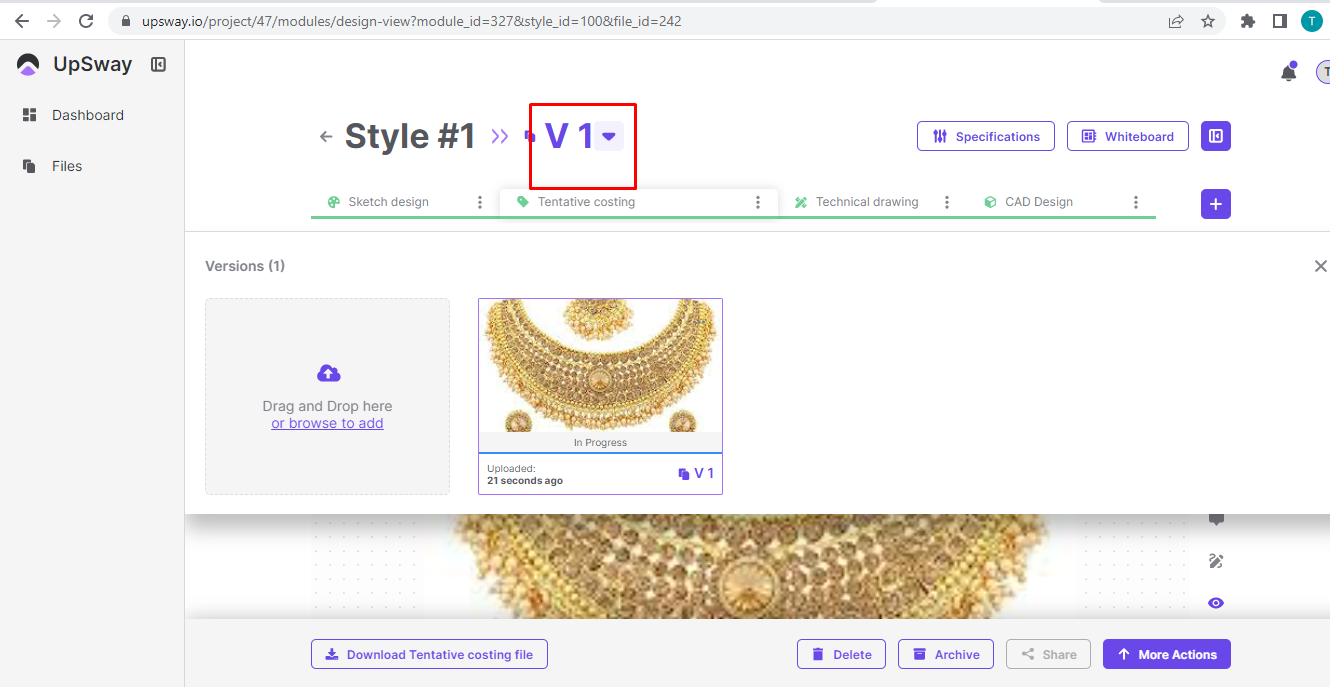 6- Click on upload file and select the file to upload 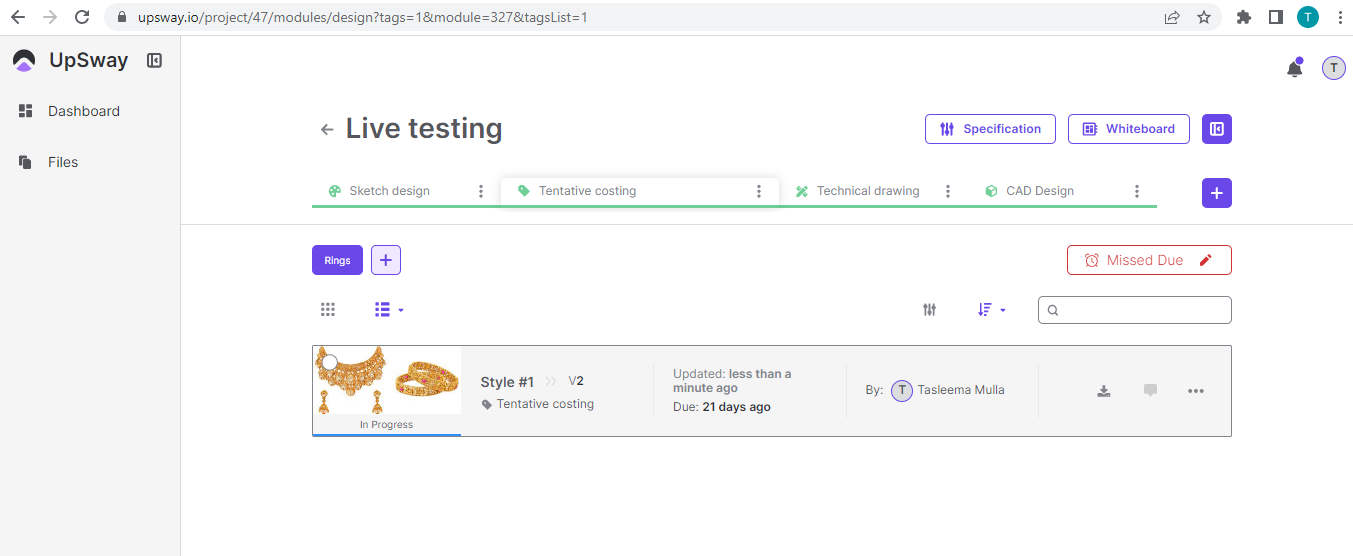 |
Update Style of Project | 1- Go to UpSway website https://upsway.io/login 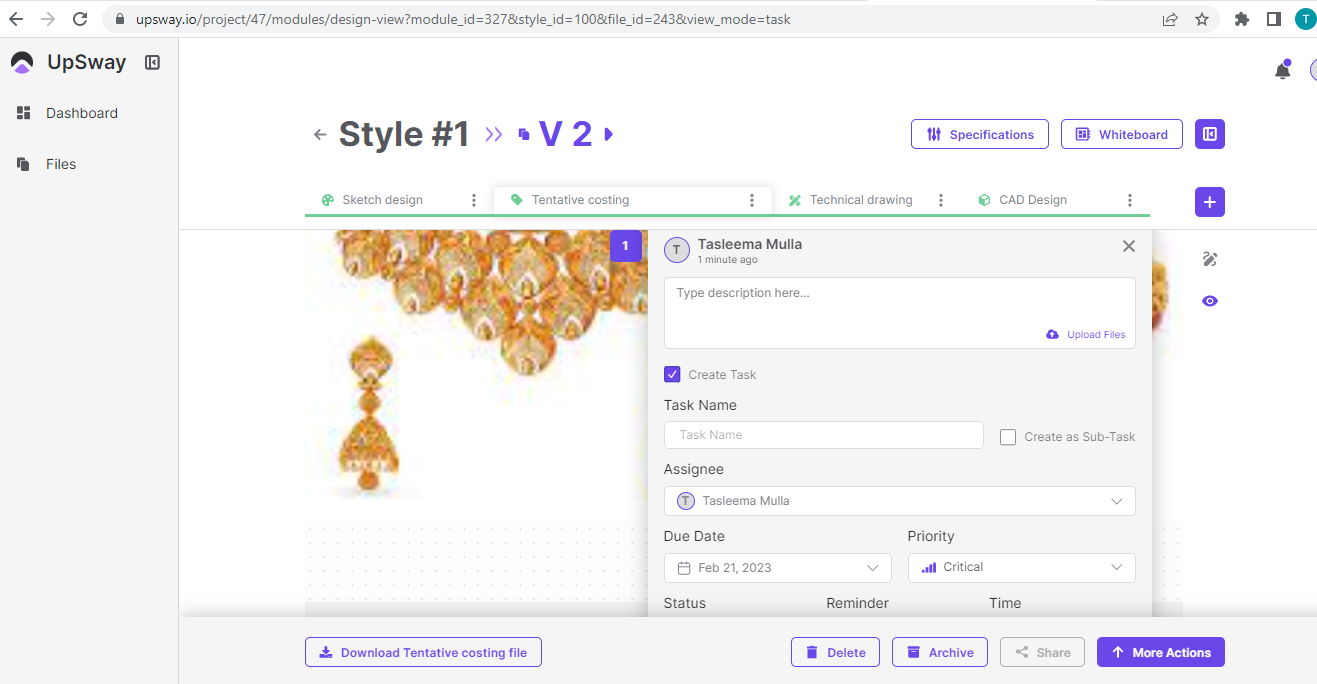 8- If we want to add a task in the design then open the description box and mark the check to create a task or we can also create a sub-task 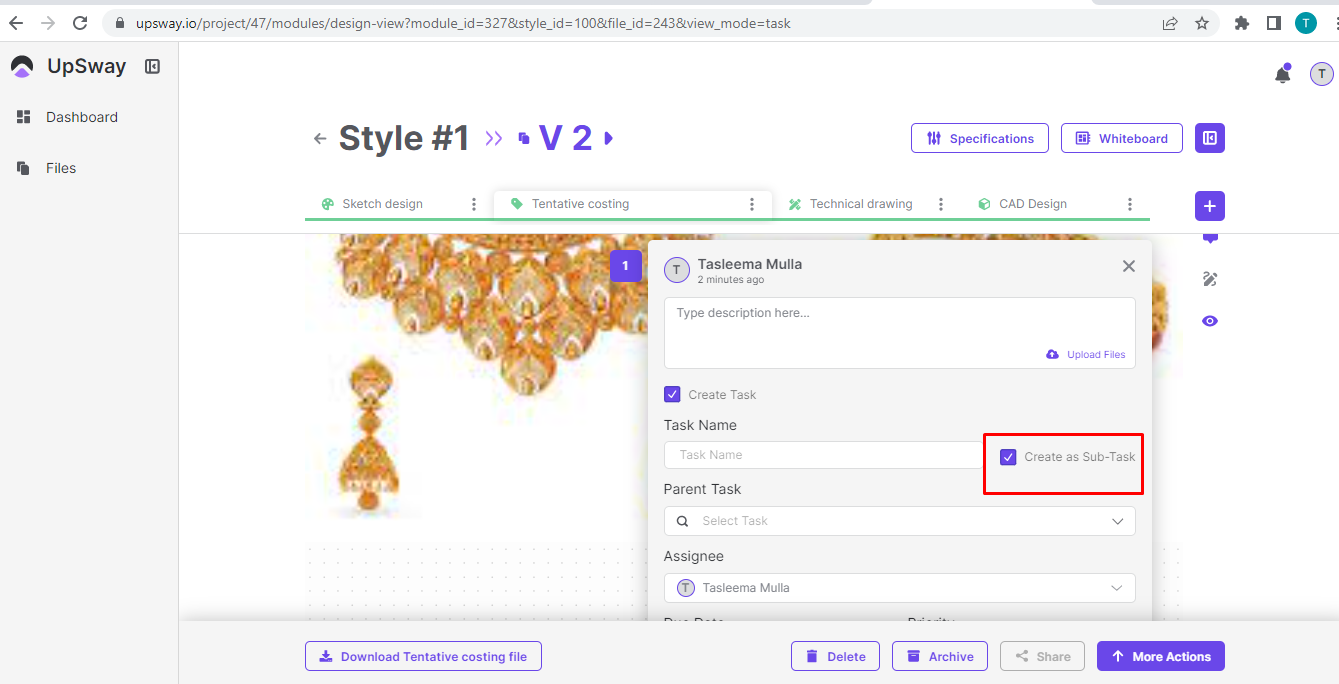 9- A box open contains: Task name, Parent task for sub-task, Assignee, Due date, Priority, Status, Reminder, and Time  11- Or if you want to delete the task then press on the bin and it will ask are you sure want to delete this task? press the button delete and the task will be deleted |
Update Version of Style | 1- Go to UpSway website https://upsway.io/login 8- If we want to add a task in the design then open the description box and mark the check to create a task or we can also create a sub-task 9- A box will open containing the task name, parent task for sub-task, assignee, due date, priority, status, reminder, and time |
Delete Style of Project | 1- Go to UpSway website https://upsway.io/login 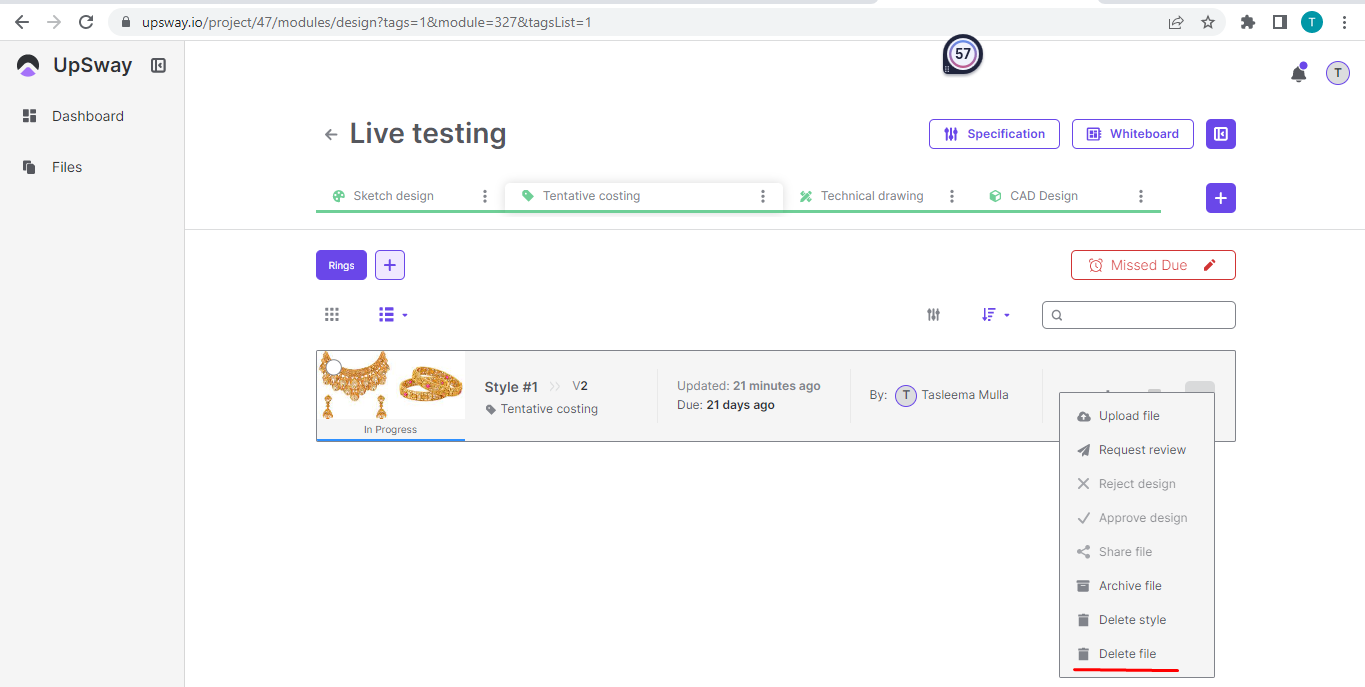 6- Click on the deleted file and it will ask are you sure? press the button delete and the style will be deleted |
Delete Version of Style | 1- Go to UpSway website https://upsway.io/login 6- Click on the deleted file and it will ask are you sure? press the button delete and the version will be deleted |
Archive Style | 1- Go to UpSway website https://upsway.io/login 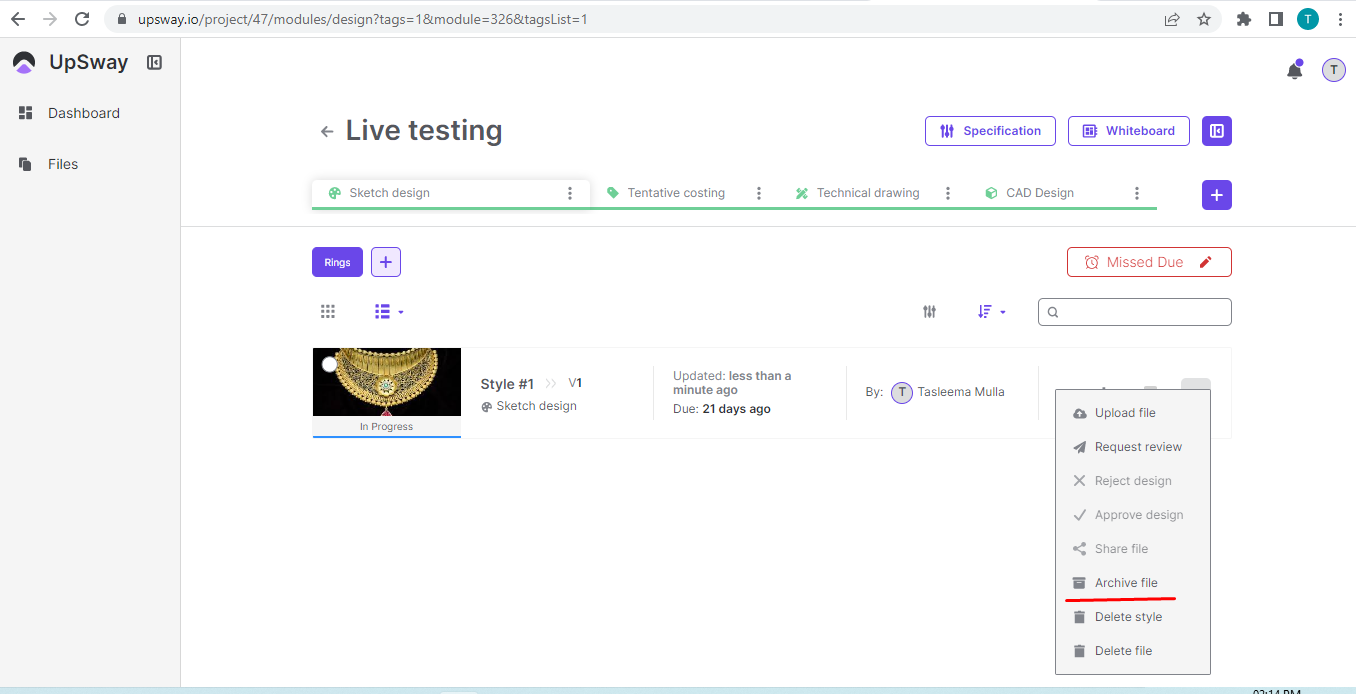 7- Another way to archive the style is to open the style and press the button archive and it will archive the style 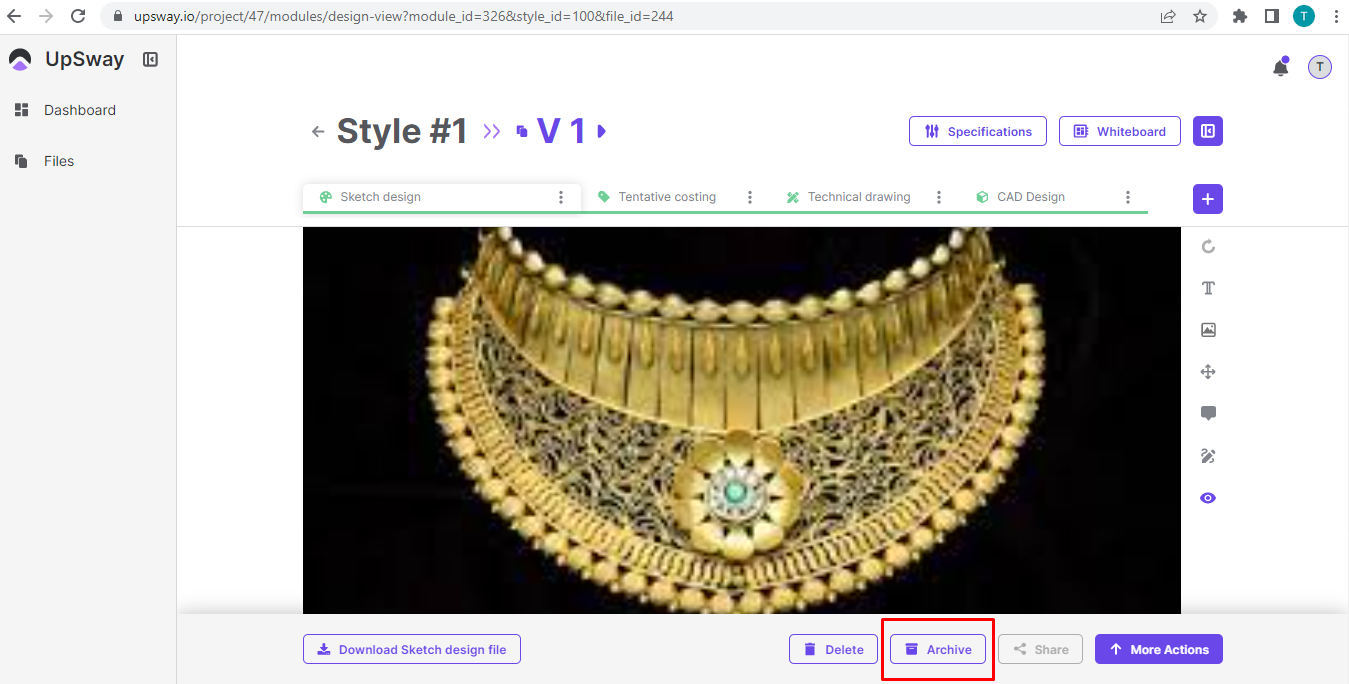 |
Archive Version | 1- Go to UpSway website https://upsway.io/login 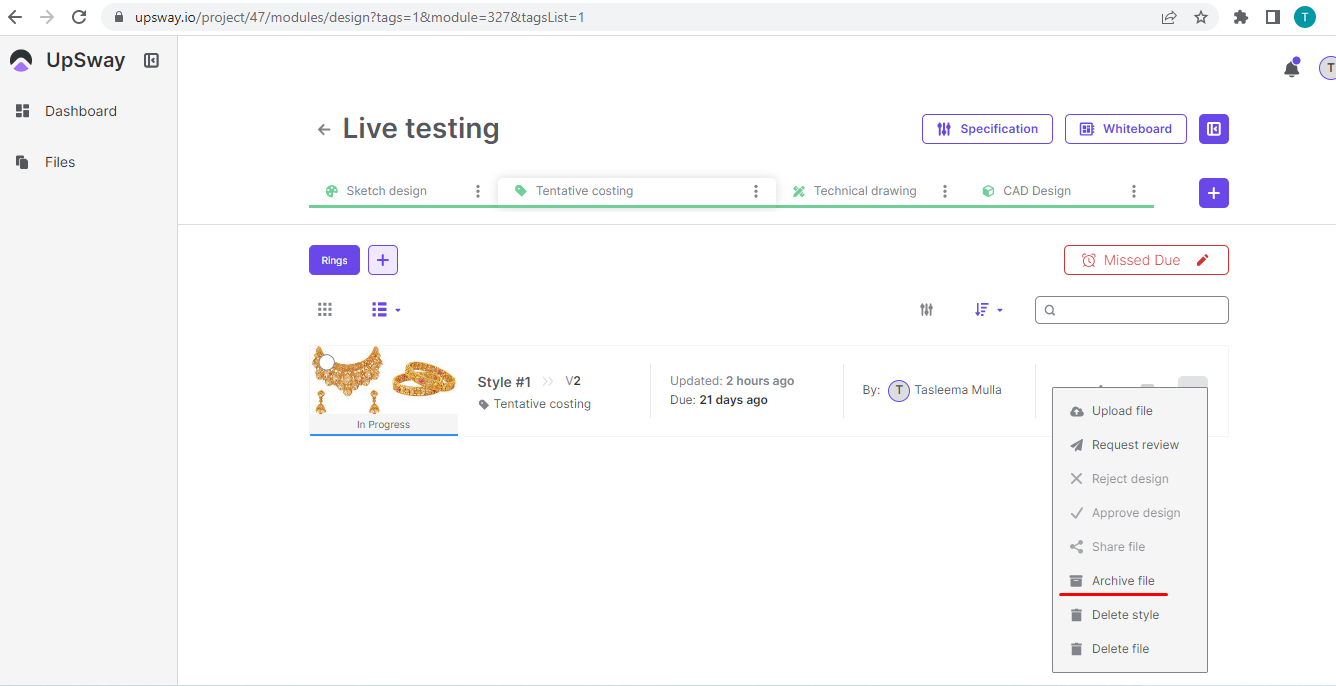 7- Another way to archive the version is to open the version and press the button archive and it will archive the version of the style 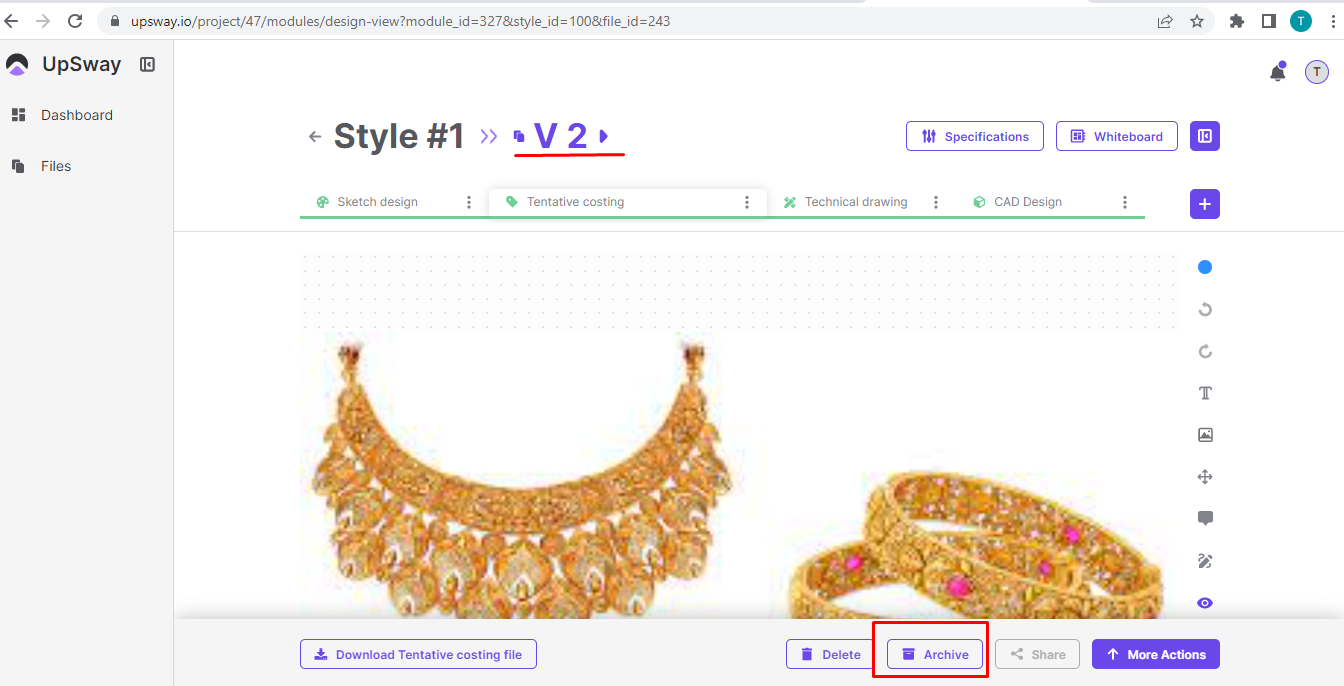 |
Create Due Date of Design | 1- Go to UpSway website https://upsway.io/login 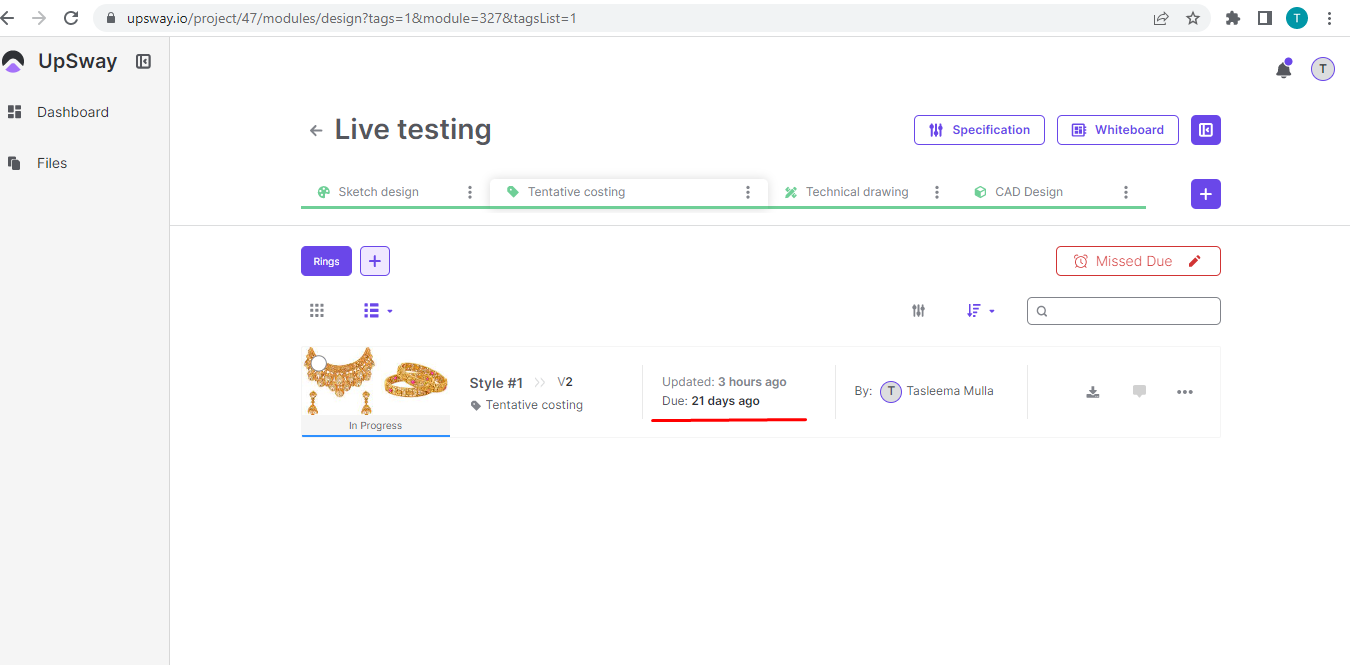 5- Or open the project and click on the clock icon and it will open the calendar 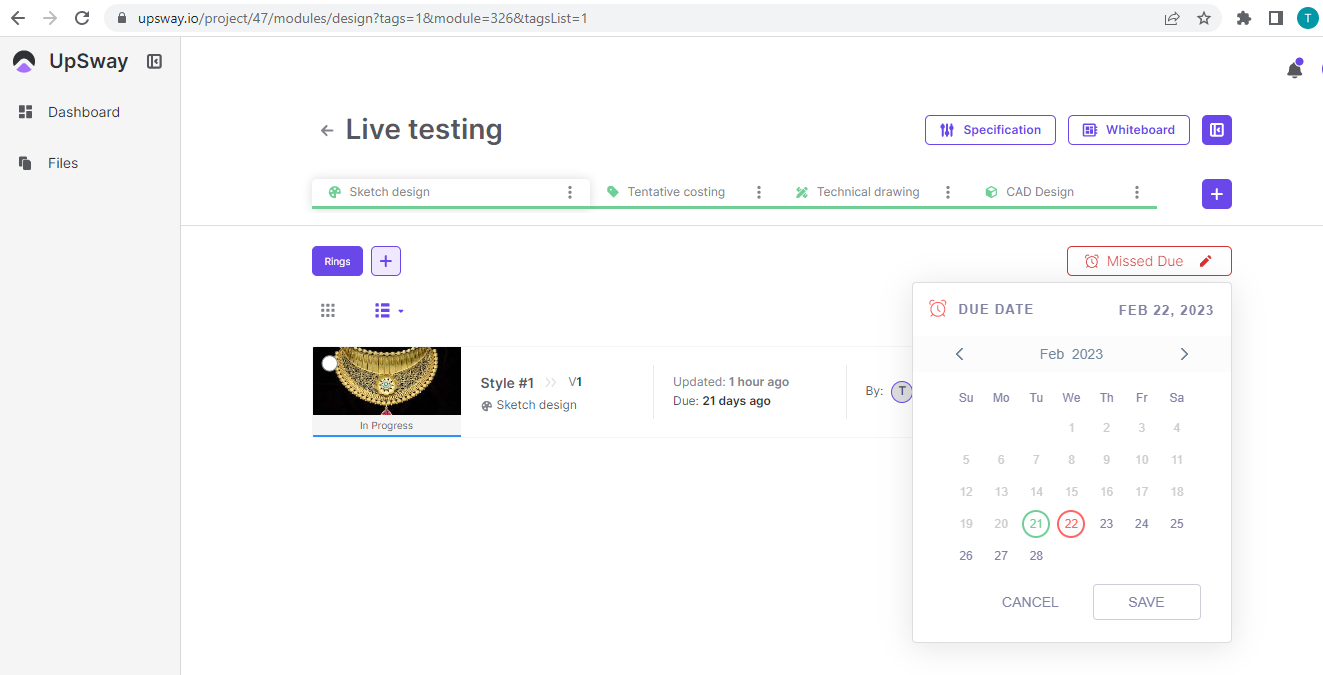 7- The due date of the design will be saved |
Download Design | 1- Go to UpSway website https://upsway.io/login 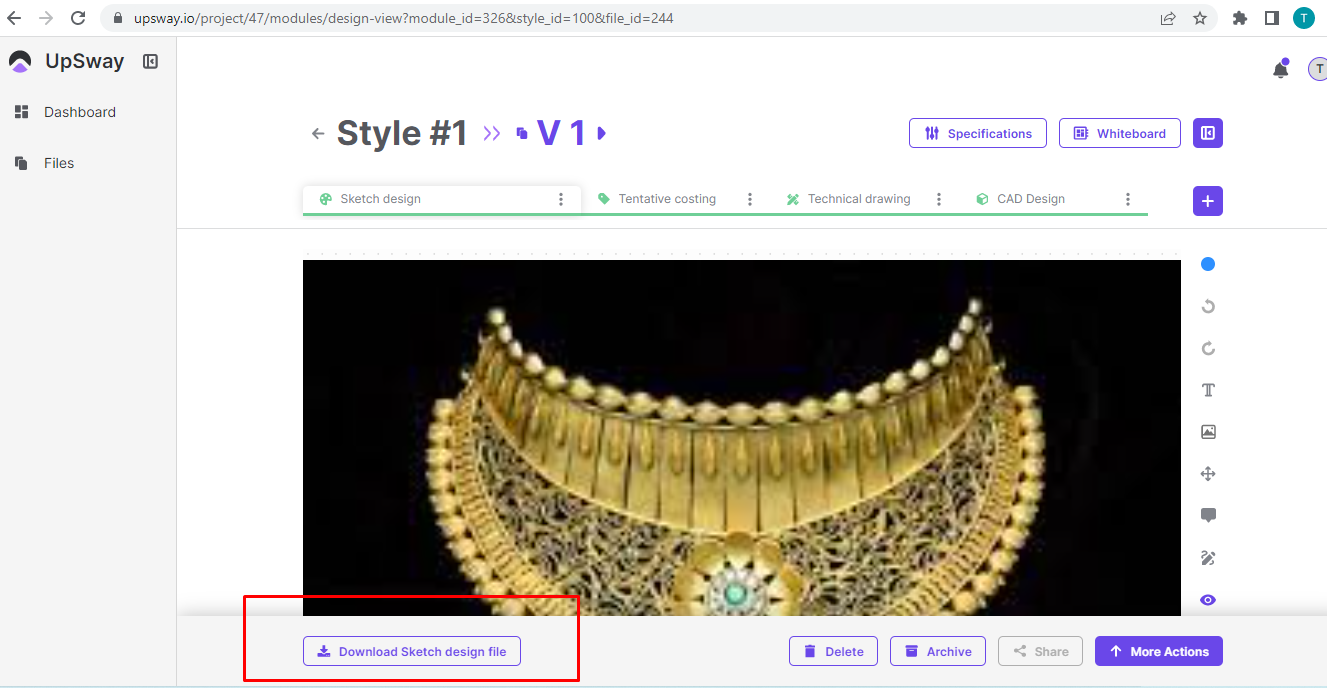 6- Another way to download the design is to open the project and click on the More action button 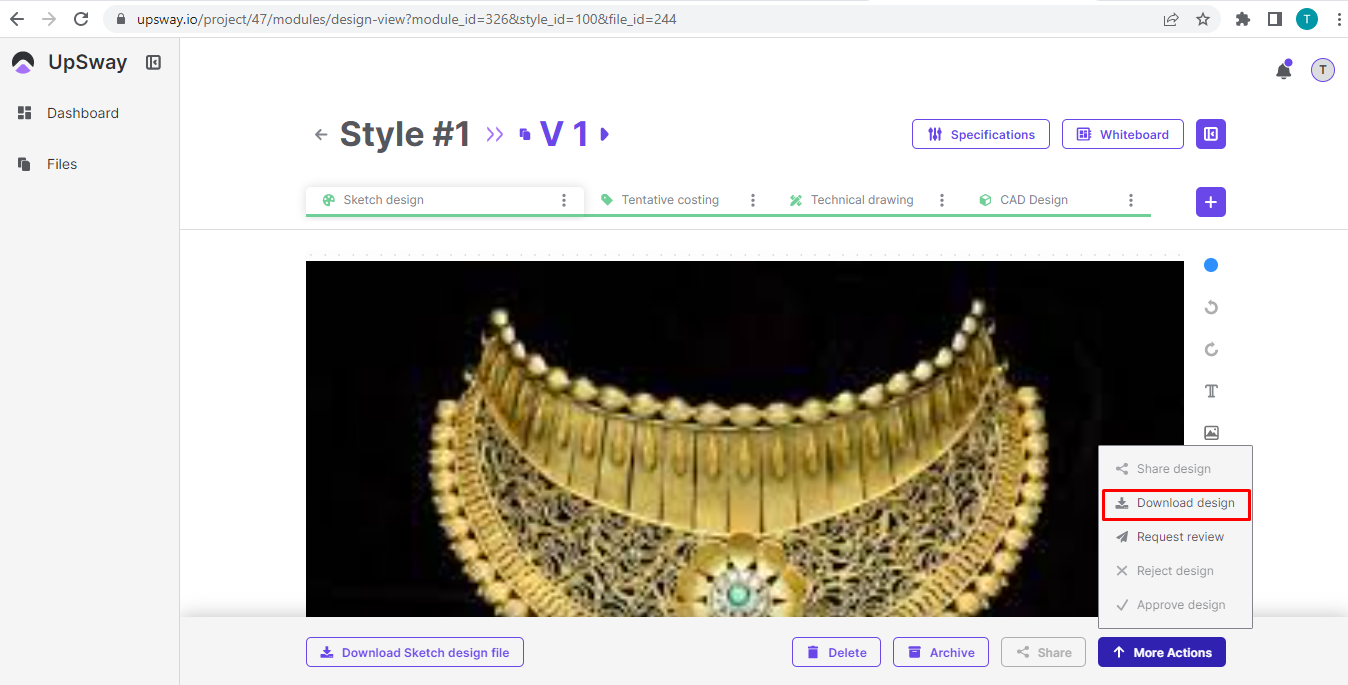 8- Click on the download design and the design will be downloaded |
Send Request Review | 1- Go to UpSway website https://upsway.io/login  7- Click on the request review A form will open that shows the team member and client member 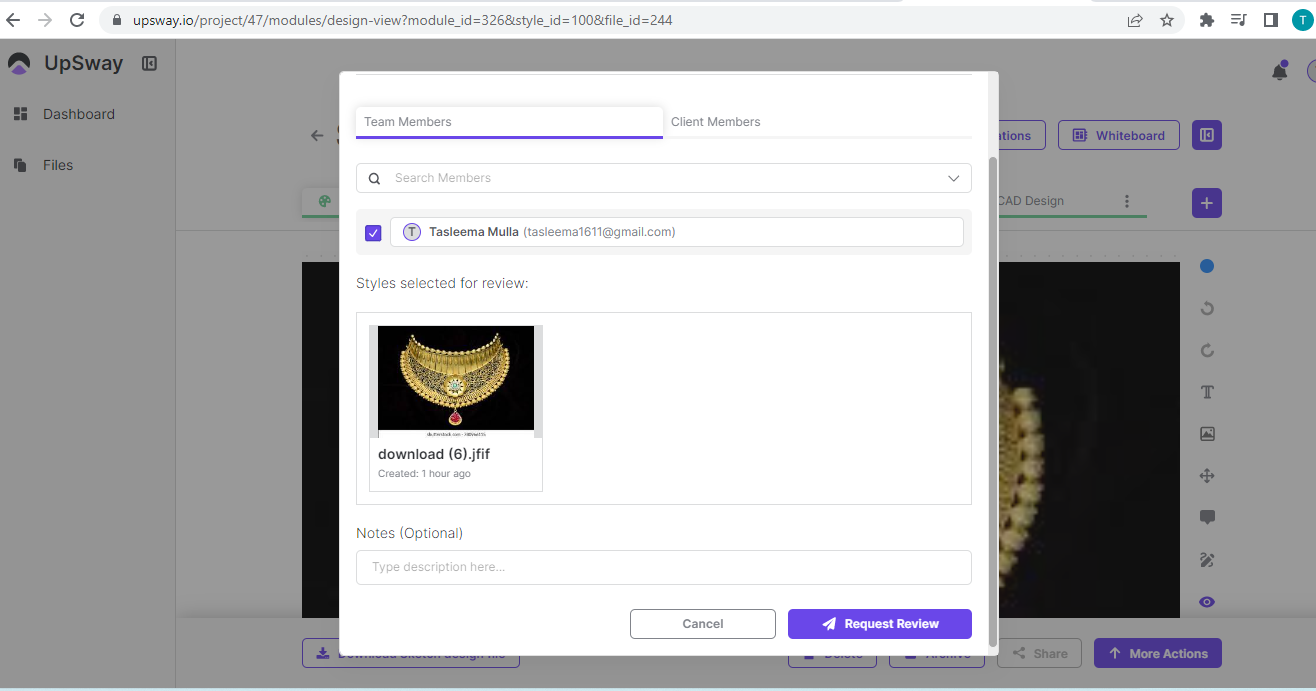 8- Enter the name of the team member if you want a review from a team member and enter the client's name if you want a review from a client 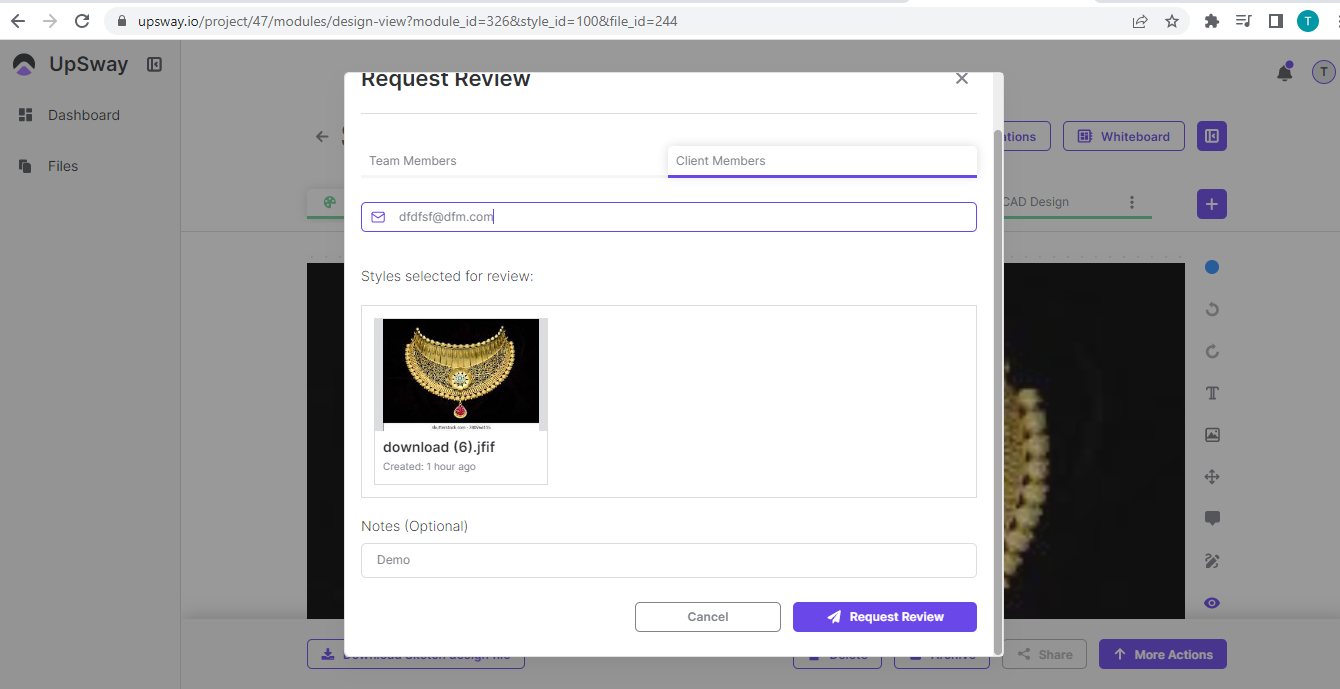 9- You can add notes also and then press the button to request a review |
Approve/ Reject Design | 1- Go to UpSway website https://upsway.io/login 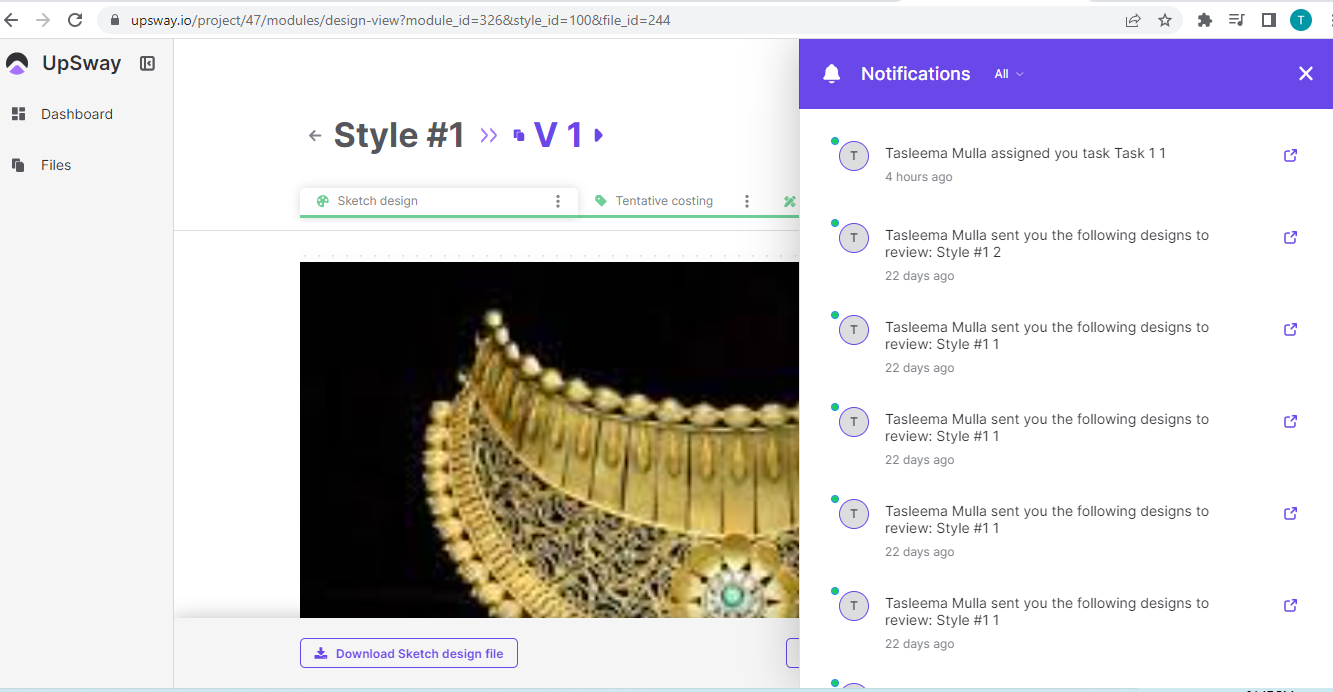 5- A request review notification will appear to Open the request 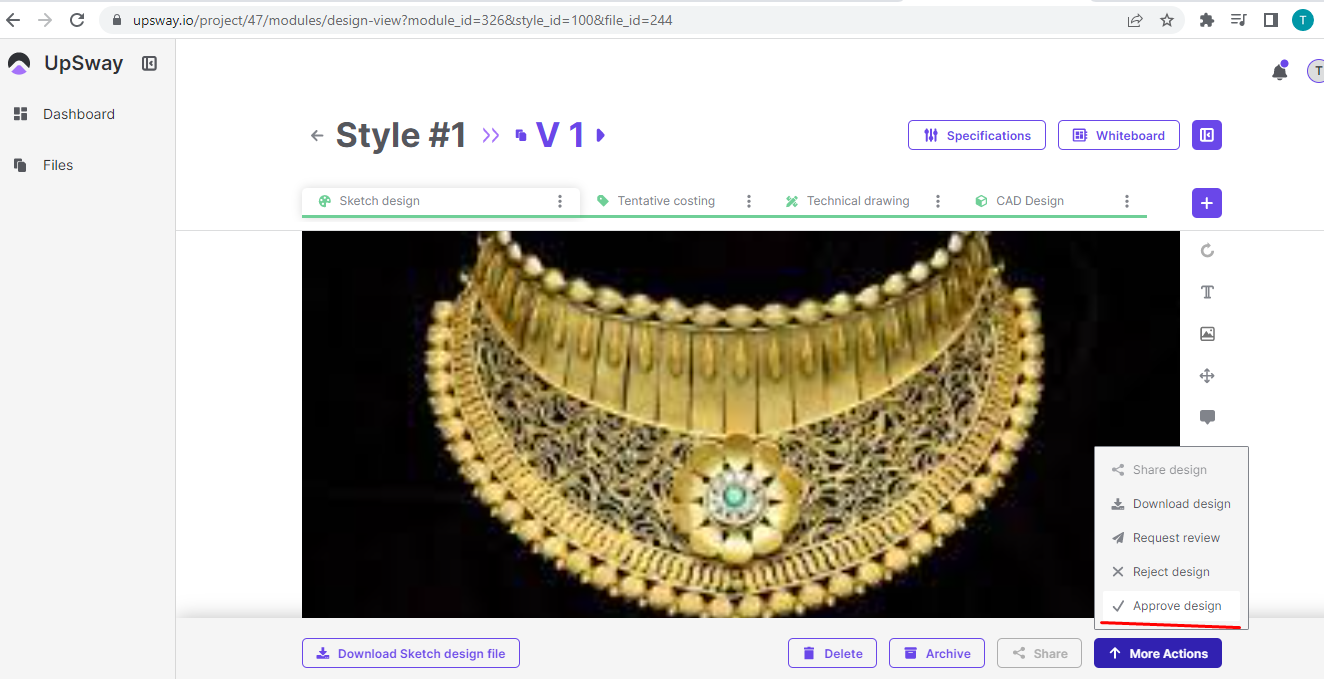 9- If you want to reject the design click on the rejected design and the design will get rejected and the project will not move forward |
Search Projects | 1- Go to UpSway website https://upsway.io/login 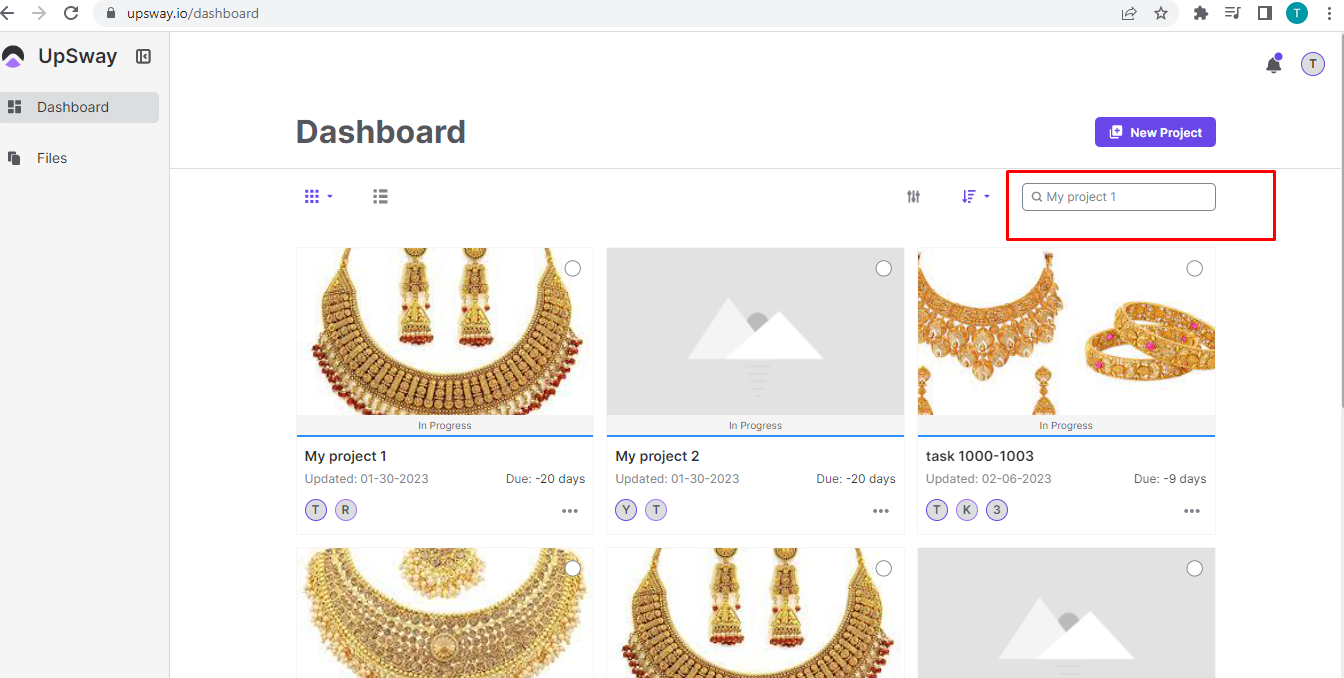 7- The searched project will appear |
Search Style | 1- Go to UpSway website https://upsway.io/login 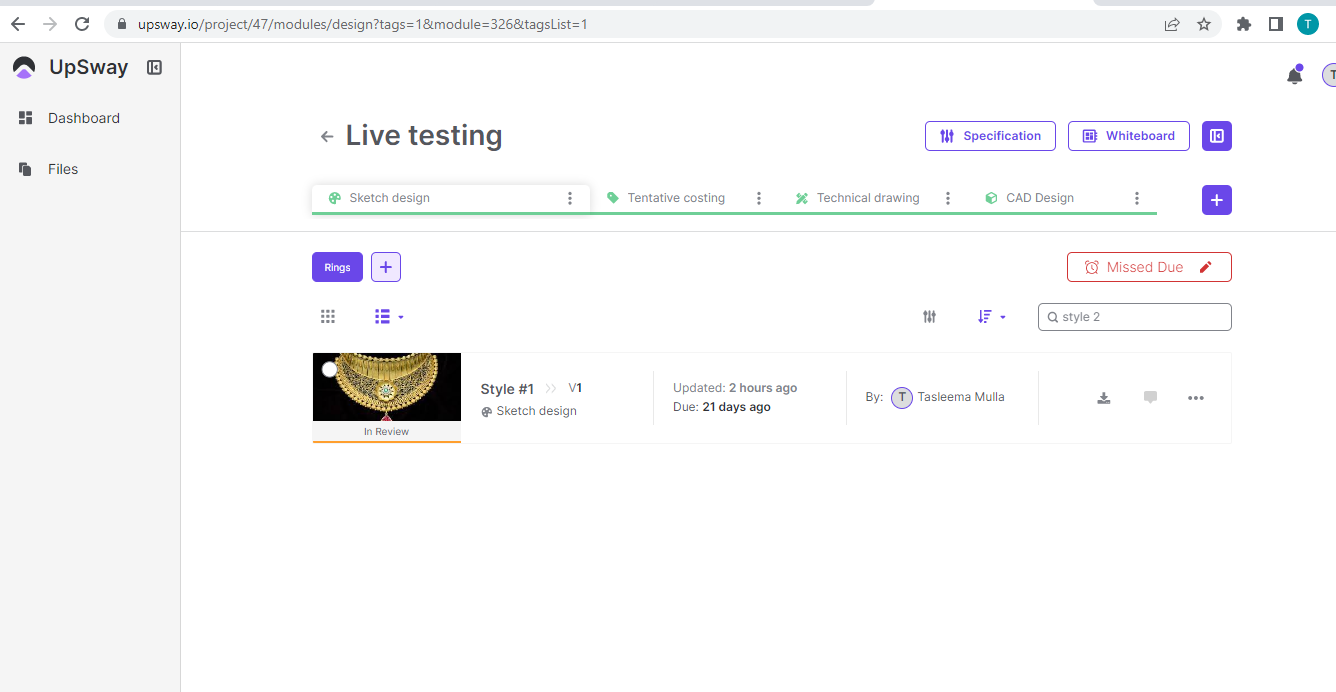 7- Enter your style number and press enter |
Check Notifications | 1- Go to UpSway website https://upsway.io/login  |
Filter Notifications | 1- Go to UpSway website https://upsway.io/login 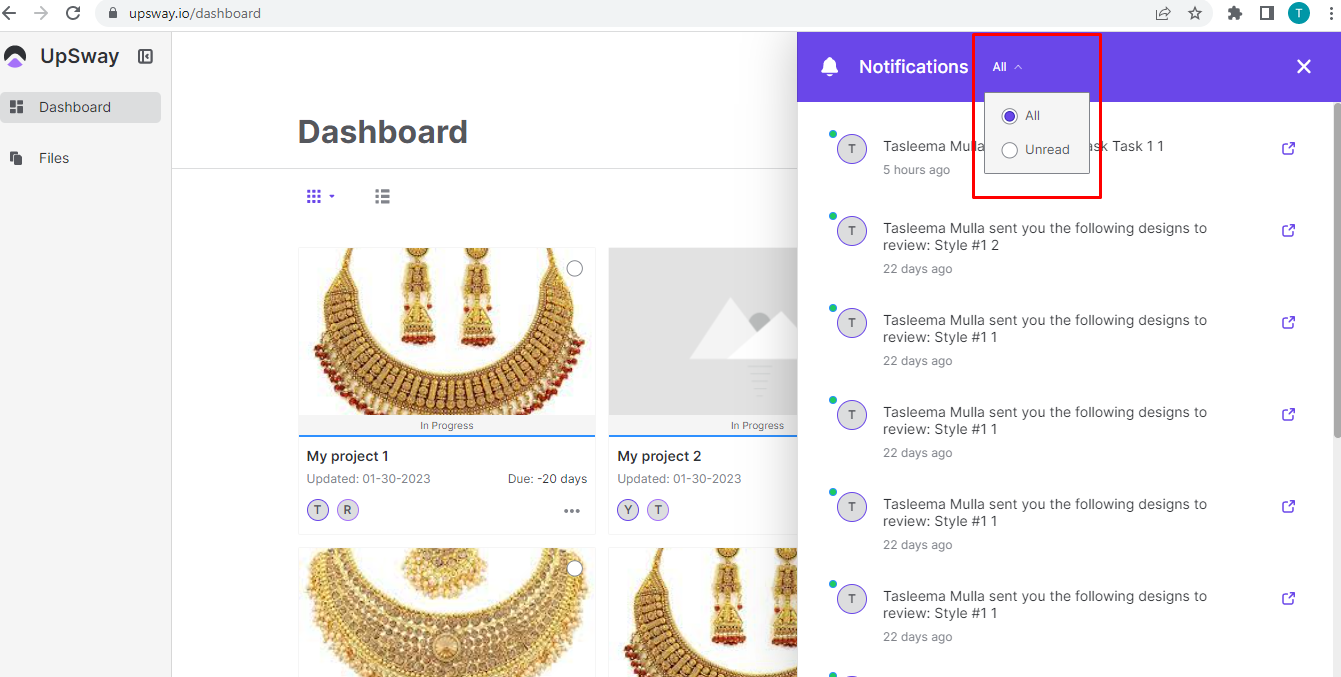 |
Account | 1- Go to UpSway website https://upsway.io/login 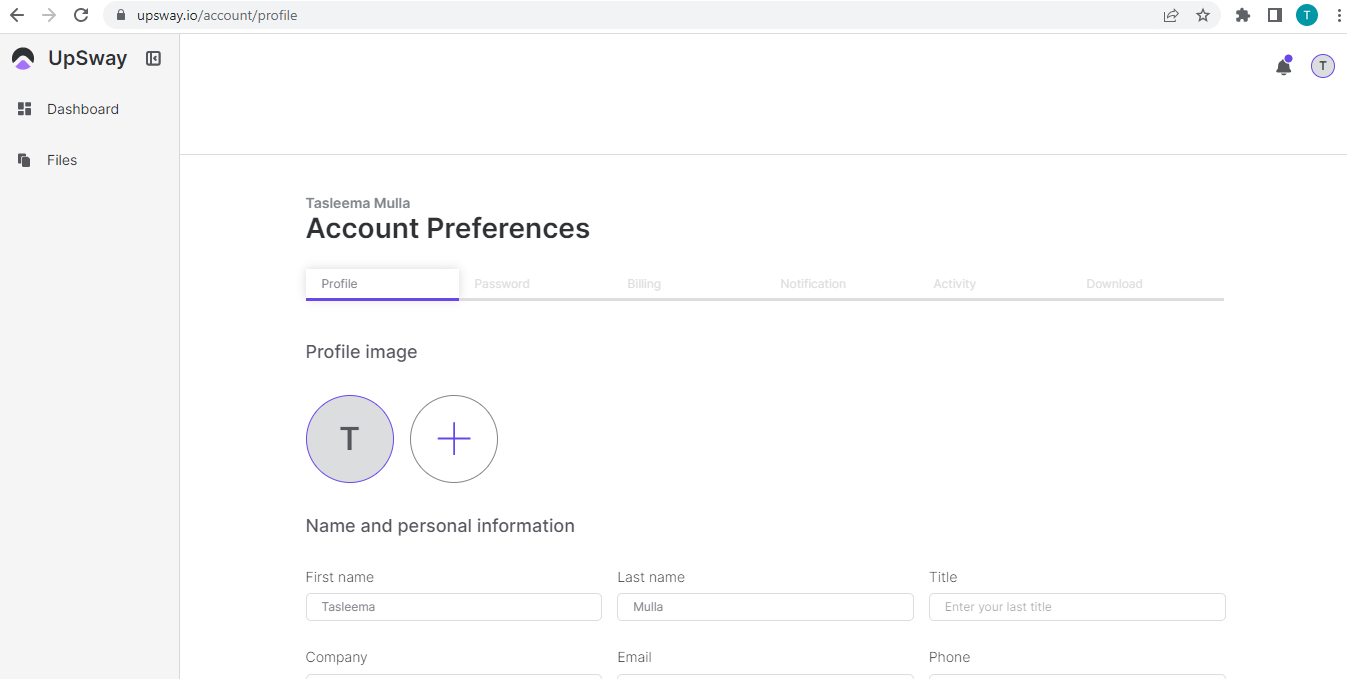 7- Profile section includes- Profile picture, First Name, Last name, Title, Company, Email, Phone, and Biography 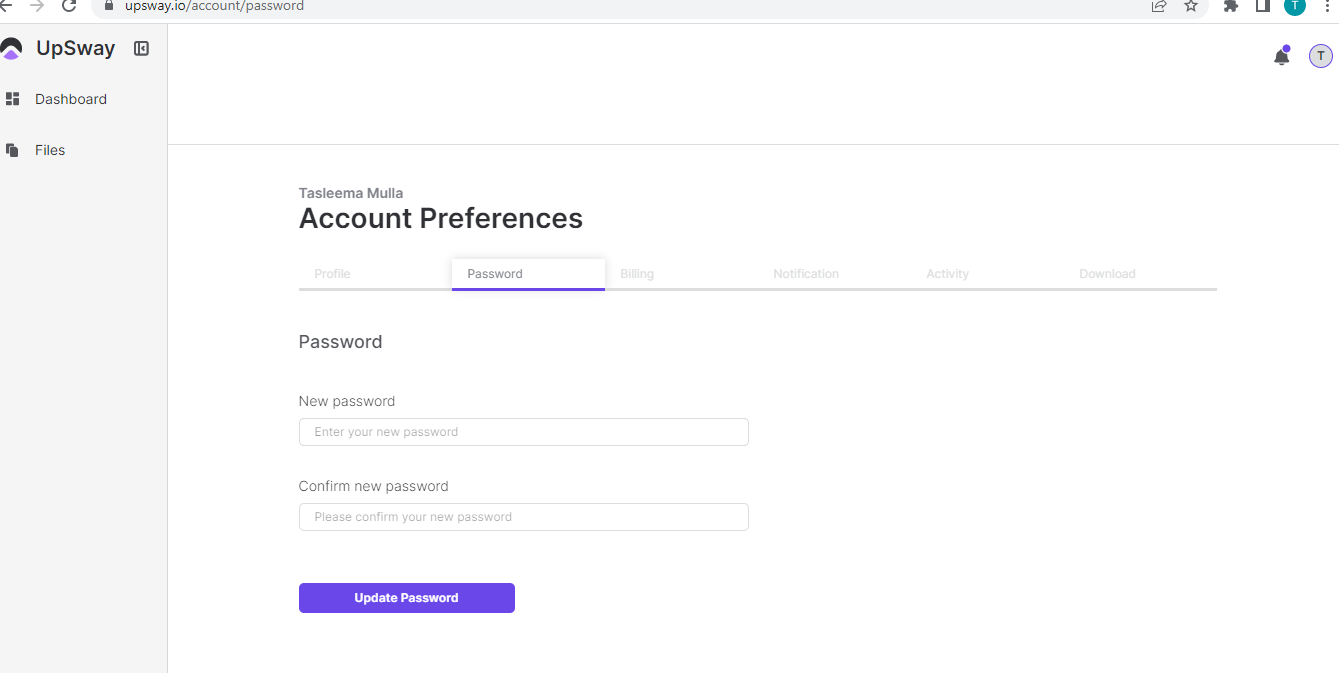 10- The password can be updated by entering a new password and clicking on Update Password 11- In the billing section you can upgrade your plan or cancel your plan and your payment method like a card showing 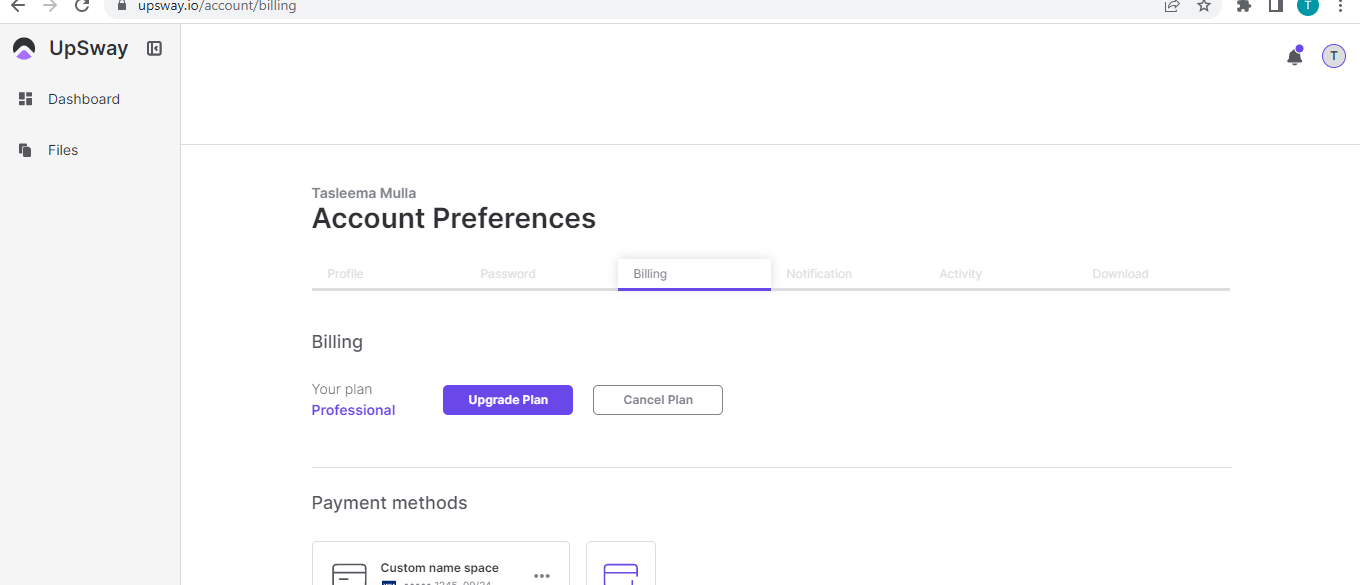 12- The new card can be added by clicking on the card plus symbol and it will show the card holder's name, card number, month, year, and CVV or 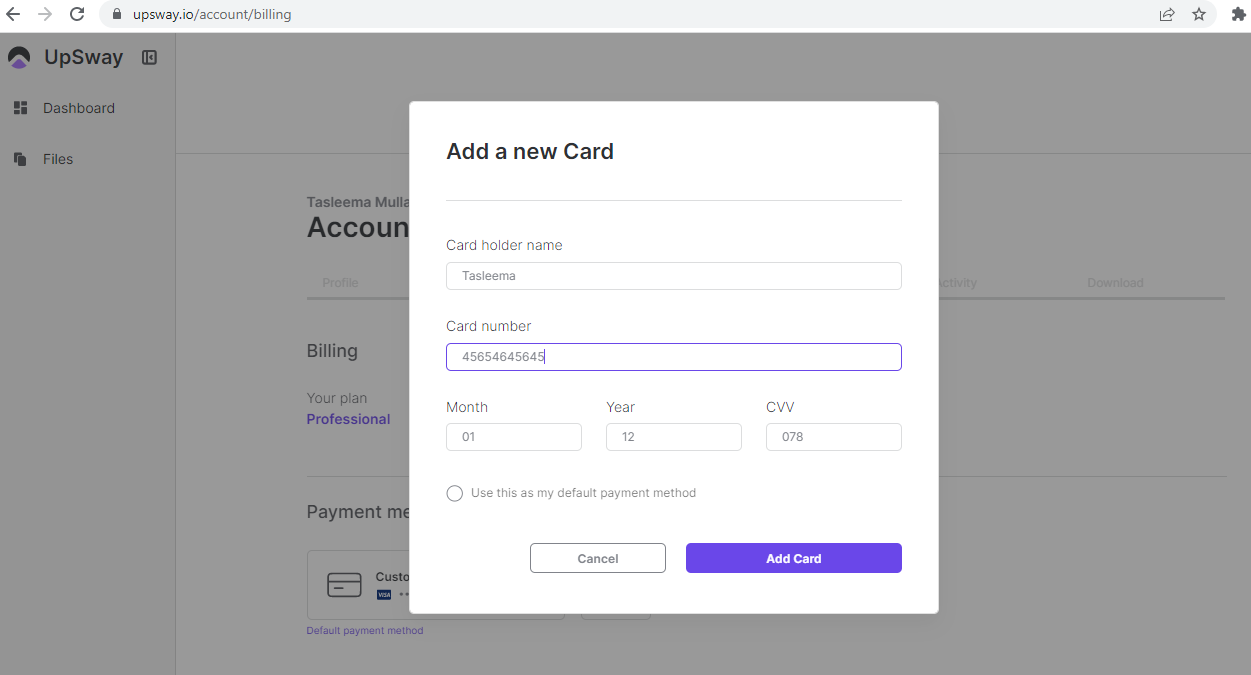 you can also make your card the default payment method by checking the filter. 13- In the notification section there is an image of a project, project name, and notification options filter like email, In-app, or in browser  14- In the Activity section there will be activities like project created, deleted, request for review, approve or reject, etc 15- In the download section there will be projects that are downloaded |
Settings | 1- Go to UpSway website https://upsway.io/login 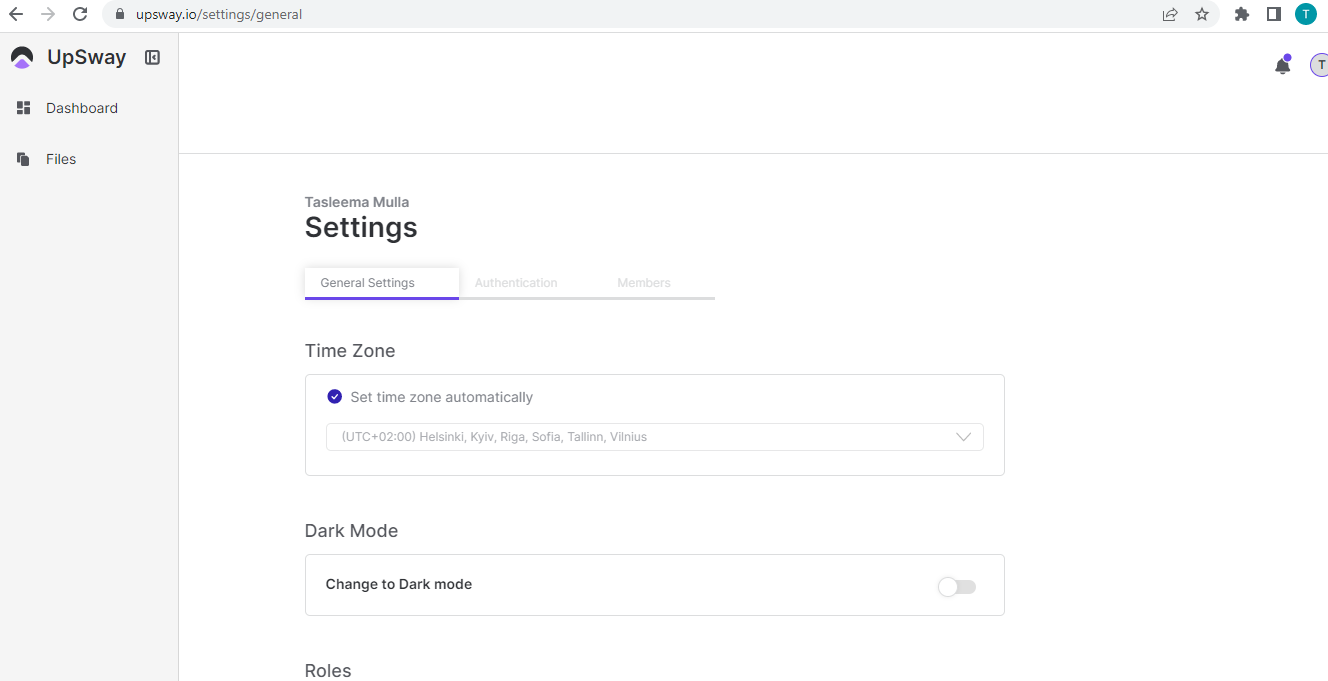 6- The settings will have 3 sections that include: General Setting, Authentication, and Members 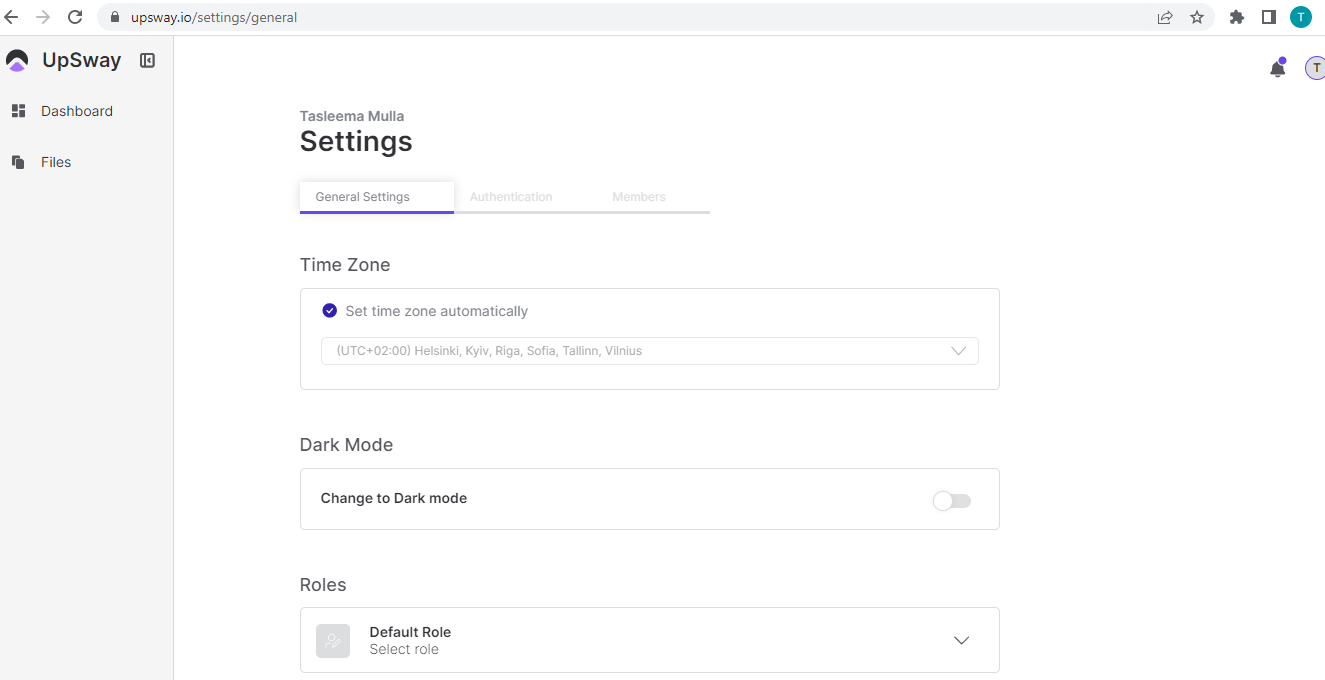 8- In time zone you can apply a filter to set time automatically or you can set it according to the origin  11- The authentication and member settings are yet to build |
View Project In Files | 1- Go to UpSway website https://upsway.io/login 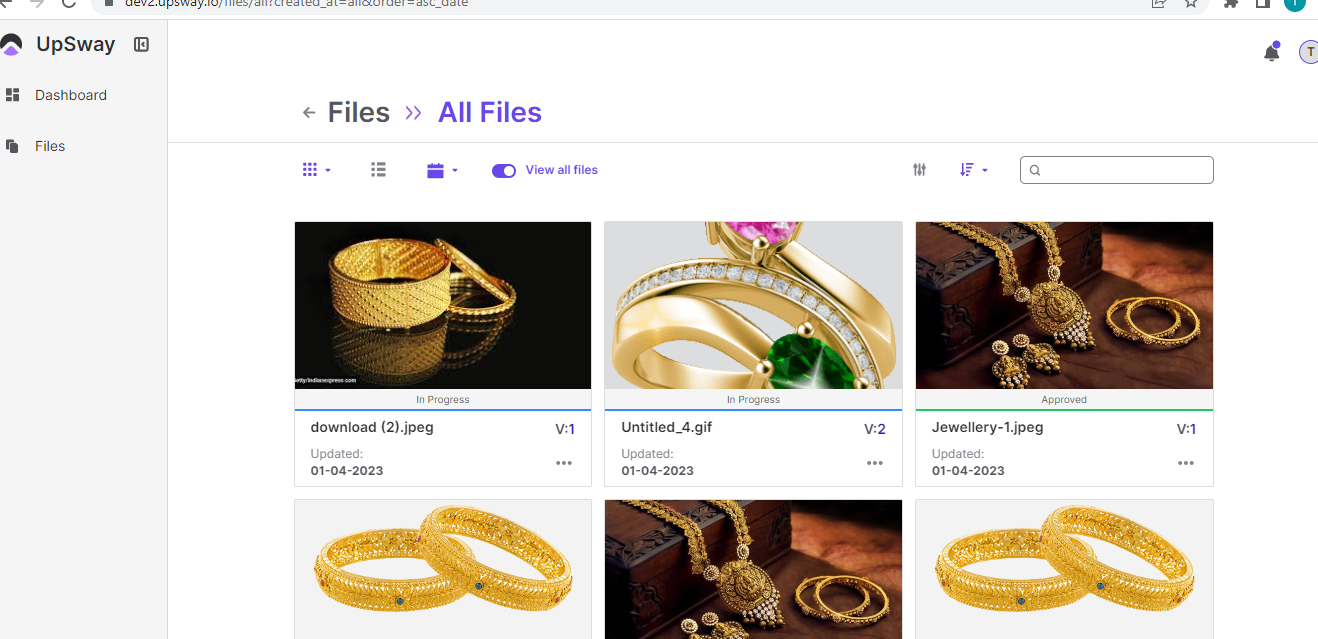 5- On the files page, All the projects are listed 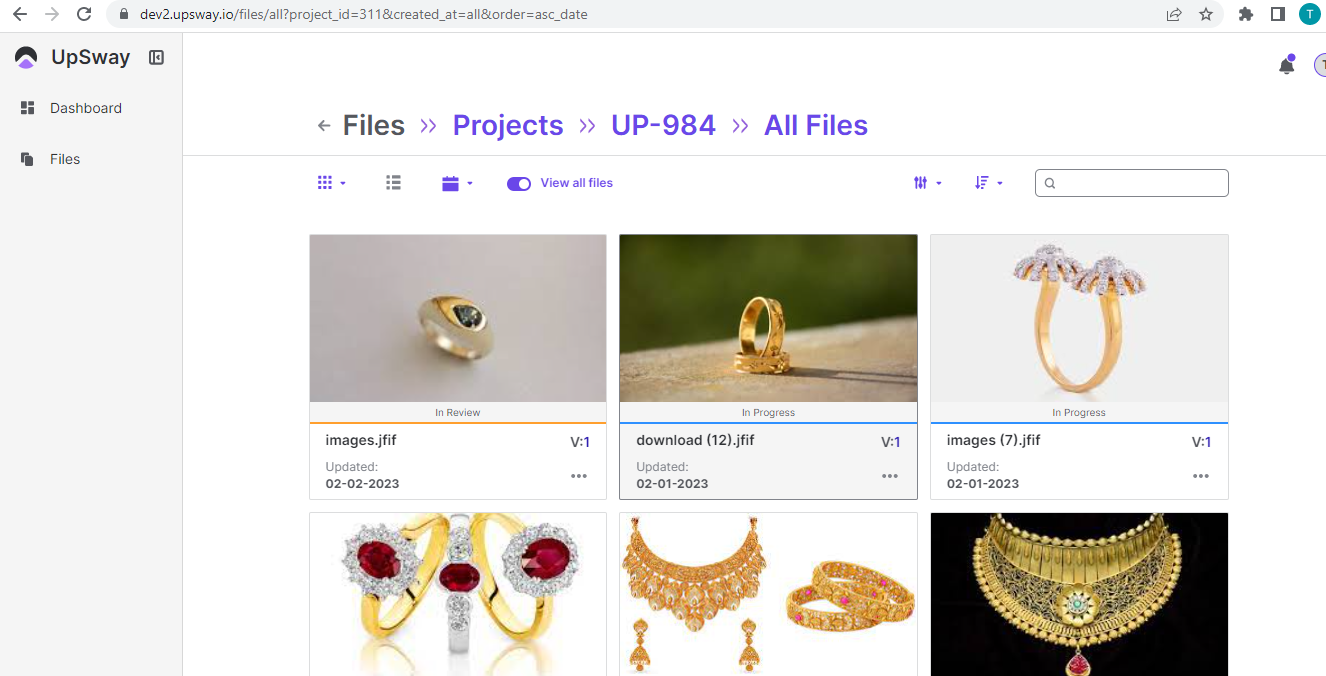 |
Select Projects on Dashboard & Files Page | 1- Go to UpSway website https://upsway.io/login 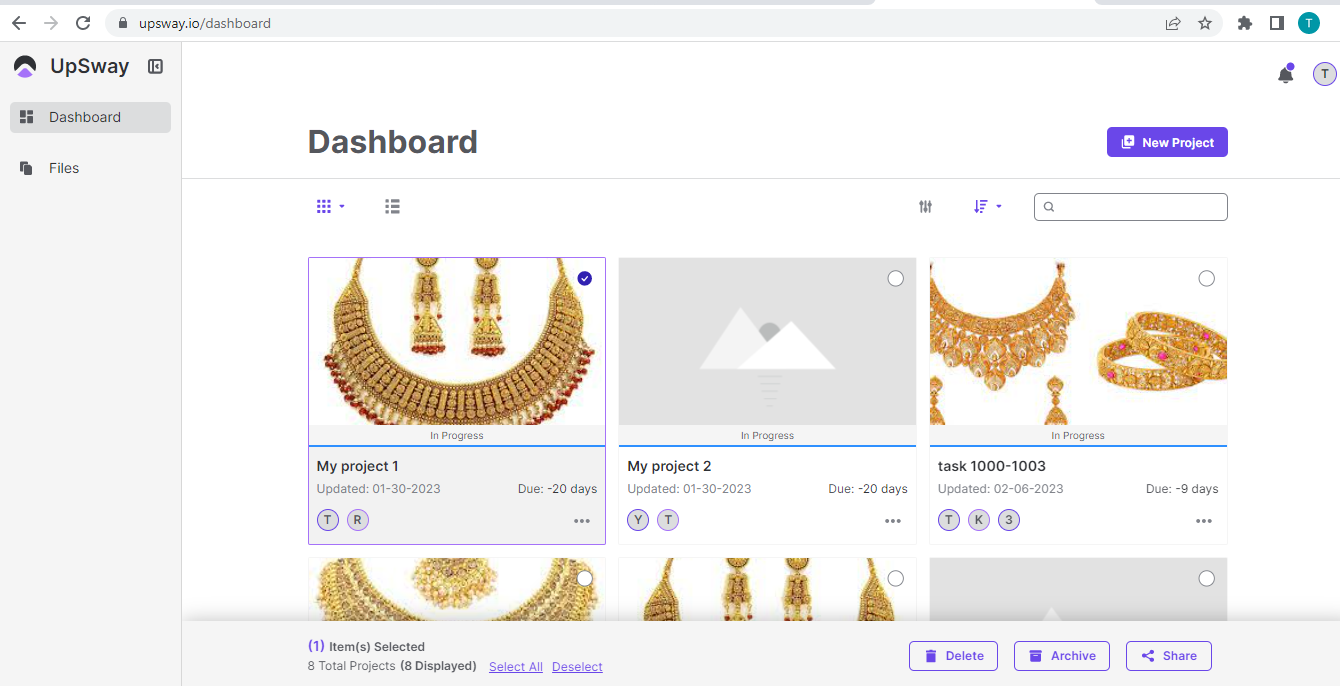 6- The same process is for Files pages if we want to select project from files page |
Projects Display | 1- Go to UpSway website https://upsway.io/login 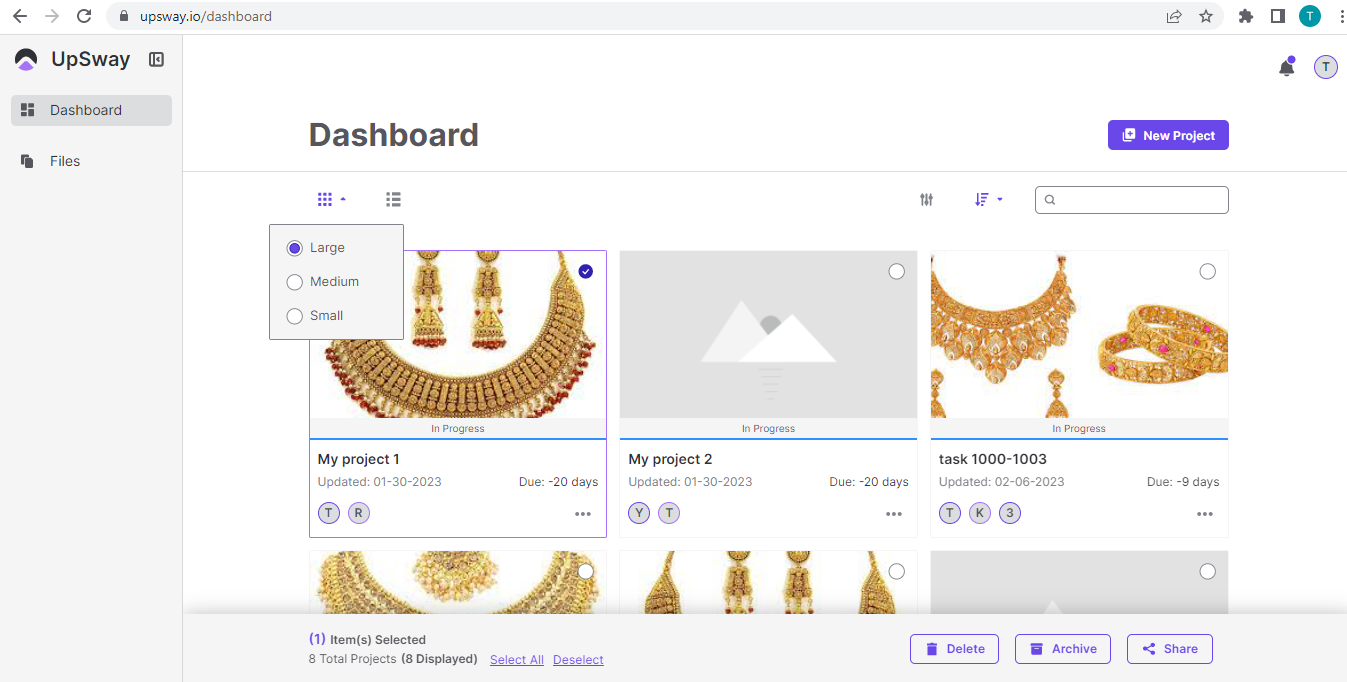 5- Click next to the dotted box and it will show the projects in tabular form  6- Click on the search filter and it will show Name, Modified, Modified by, due date, Ascending, and Descending  7- Click on the search filter and it will show Categories, the Status of the project, and the Workflow process mark check on the options you want and press the button Apply  8- Click on any of the options you want and then the projects will display according to the filter |
Project Styles on Files | 1- Go to UpSway website https://upsway.io/login |
Project Versions on Files | 1- Go to UpSway website https://upsway.io/login  |
New Process & Edit Workflow Process | 1- Go to UpSway website https://upsway.io/login 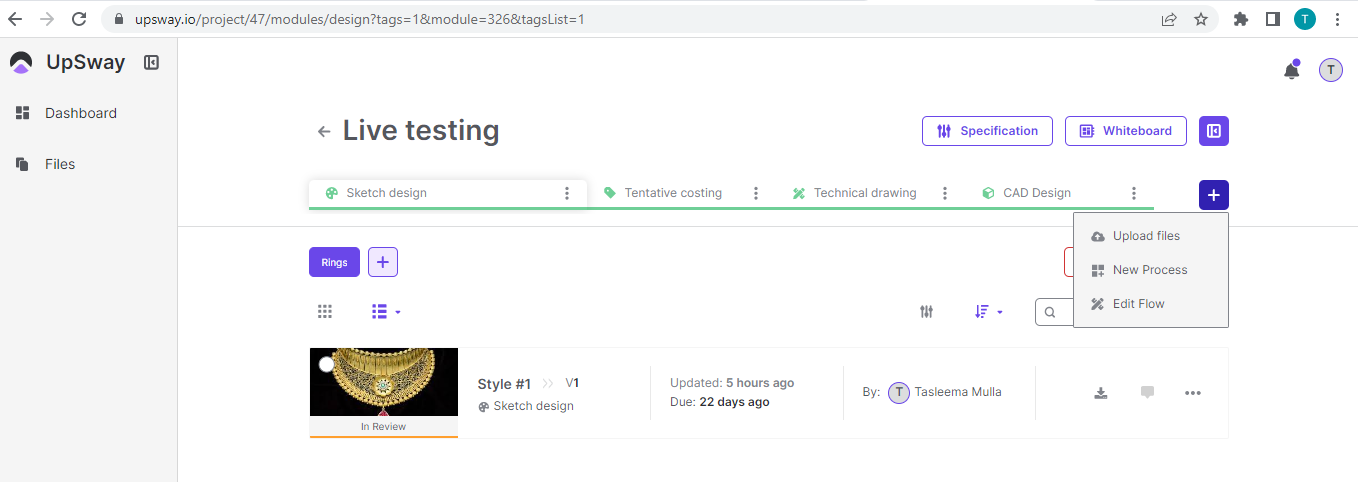 7- First click on the new process and it will open a box 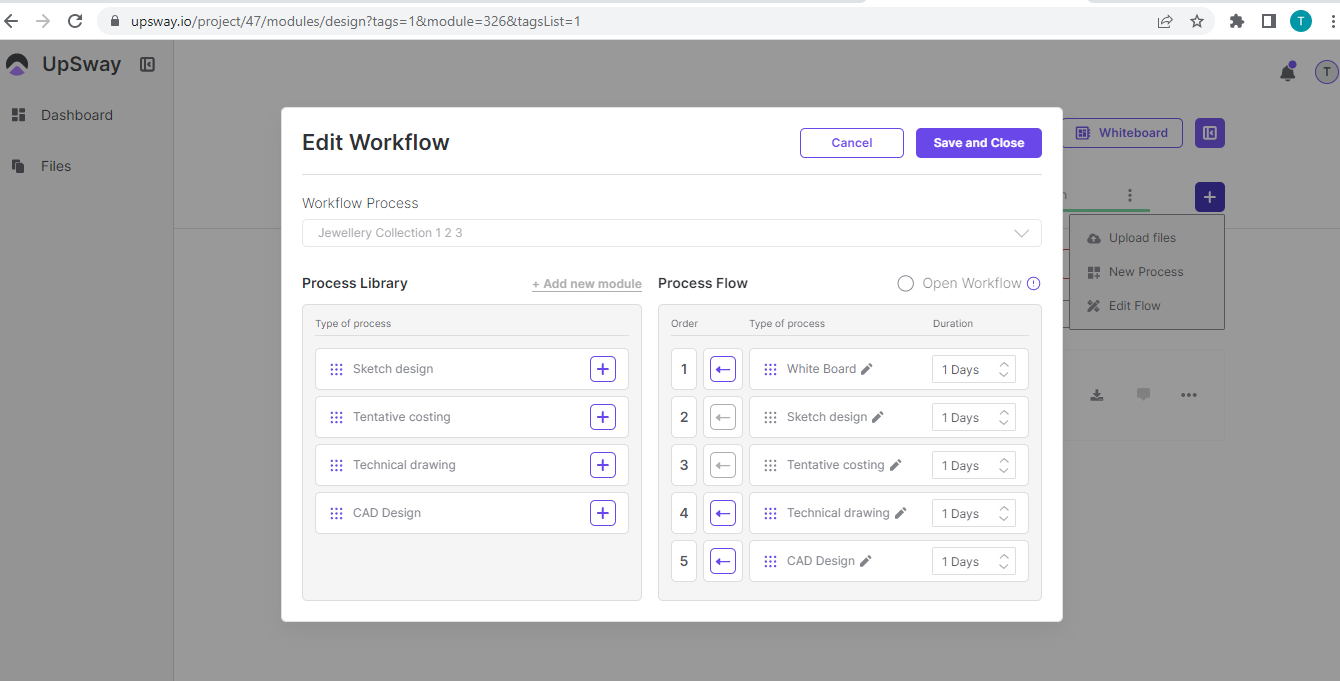 9- Select according to your choices like sketch design, tentative costing, CAD design, Technical Drawing, etc 11- Now if you click on the edit flow it will show to select a process from the previous workflow or you can create a new workflow according to your need like above stated |
Project Activity Bar | 1- Go to UpSway website https://upsway.io/login  1- In the Activity section there is a filter to check the detail of any tag, style, and design module & to show things in ascending or descending order, and to search for any tag of the project 2- In the Activity section there are updates about the project like when a new style was created, the new version created along with the time and date 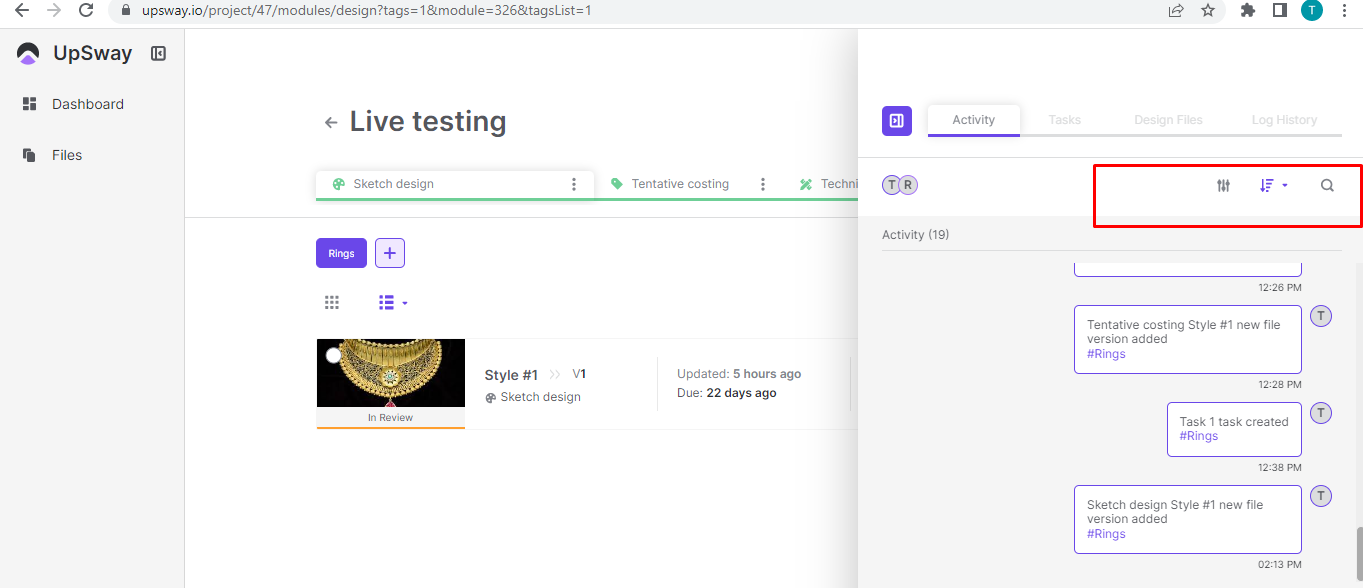 1- In the Task section there is a filter to check the detail of any tag, style, and design module & to show things in ascending or descending order, and to search for any tag of the project 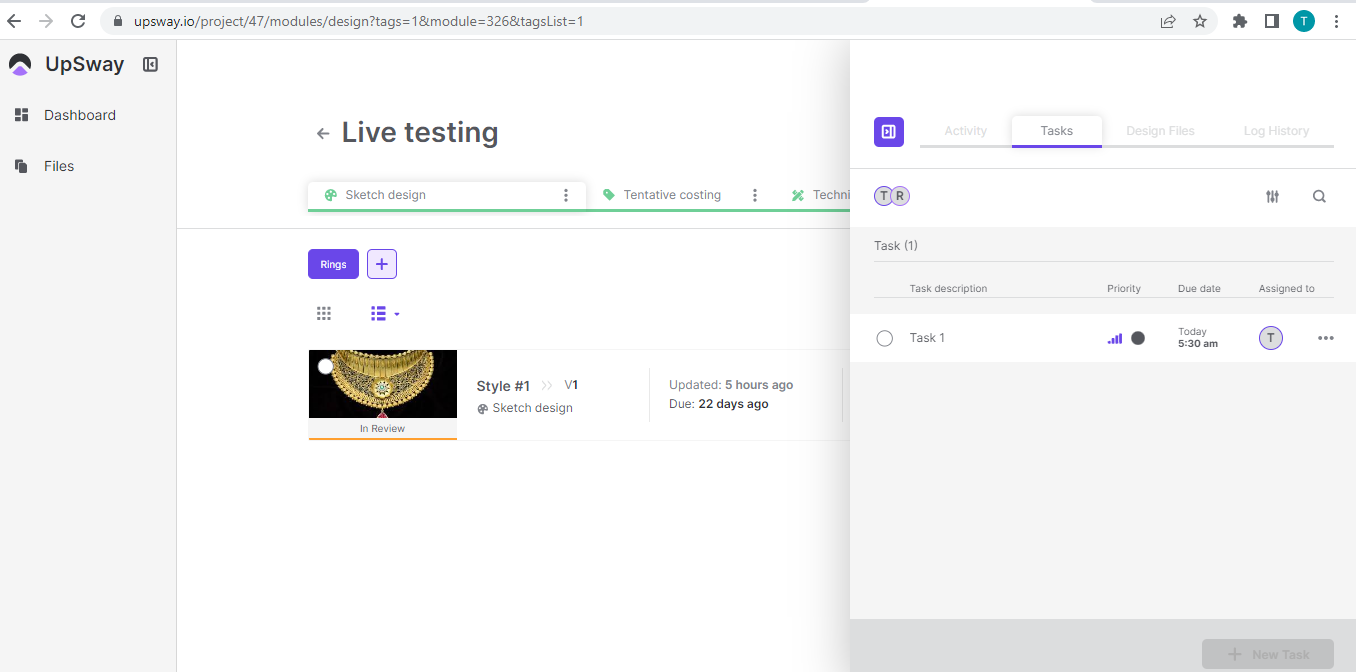 1- In the Design Files section there is a filter to check the detail of any tag, style, and design module & to show things in ascending or descending order, and to search for any tag of the project 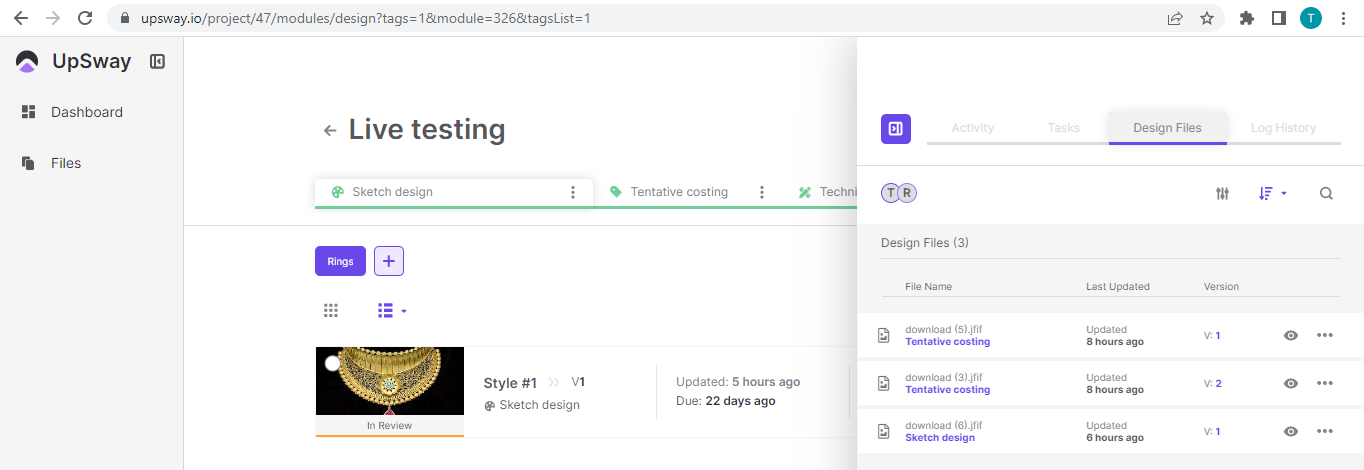 1- In the log history it will show the project log history just like the design files 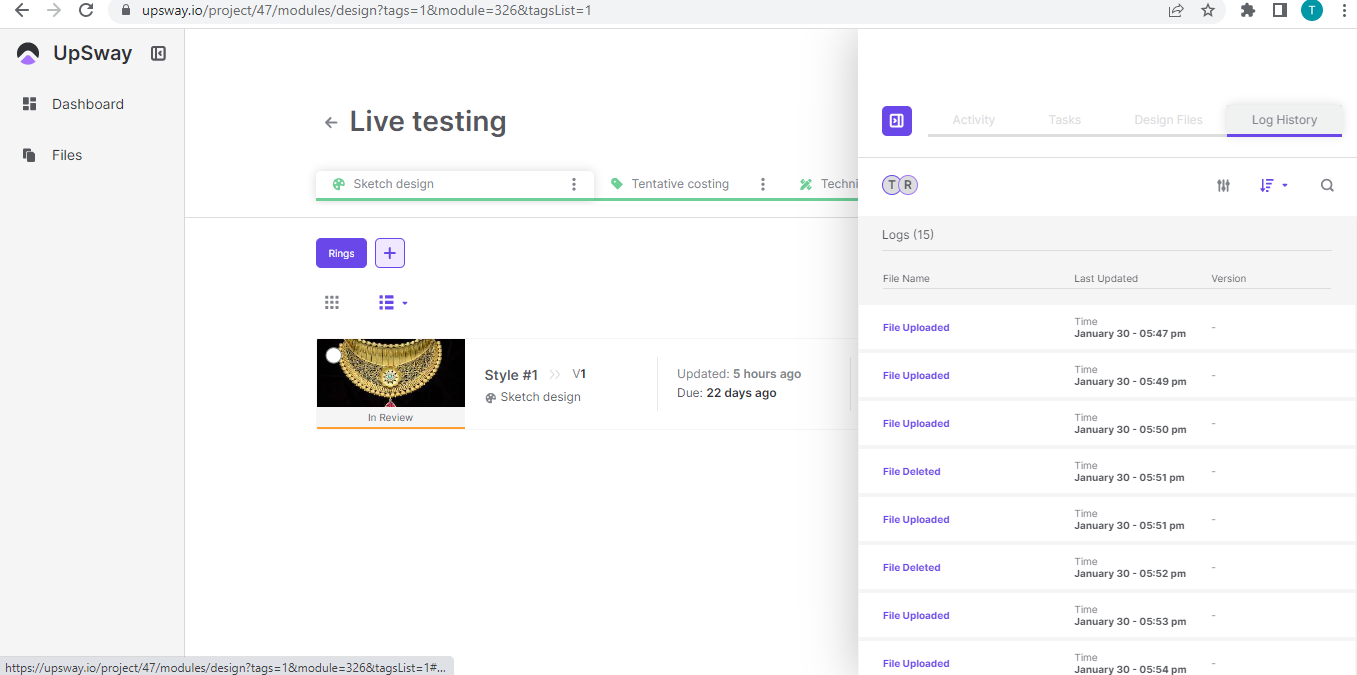 |
White Board | 1- Go to UpSway website https://upsway.io/login 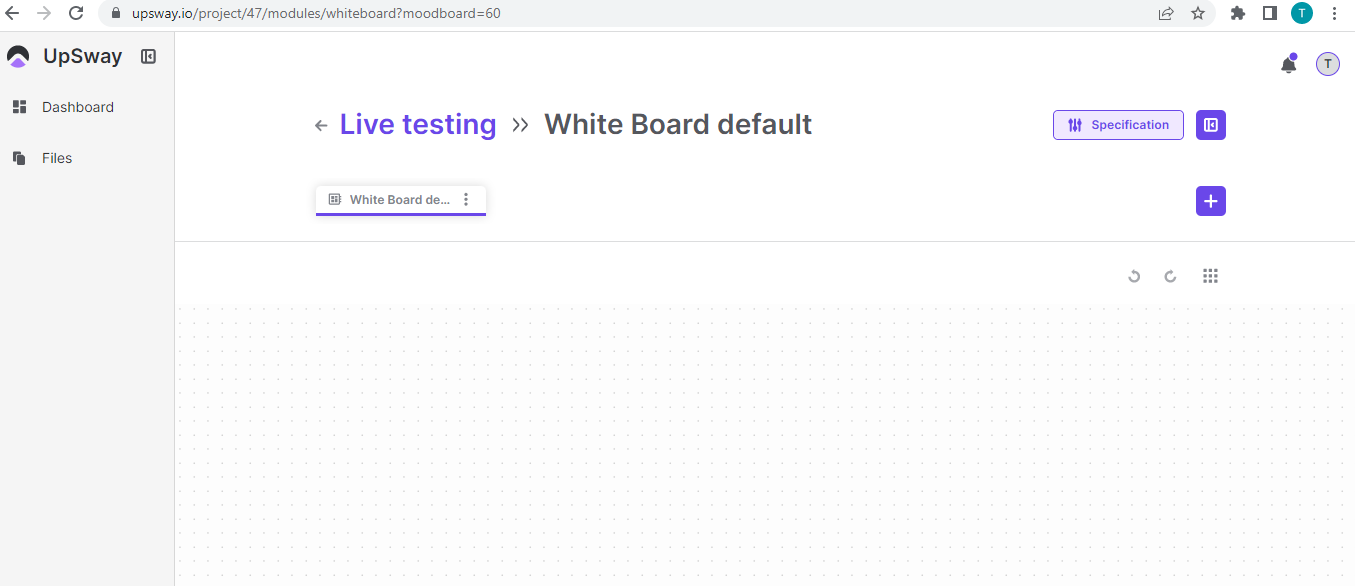 7- Click on the + button it includes Upload File, Delete File, Add URL link, a new whiteboard 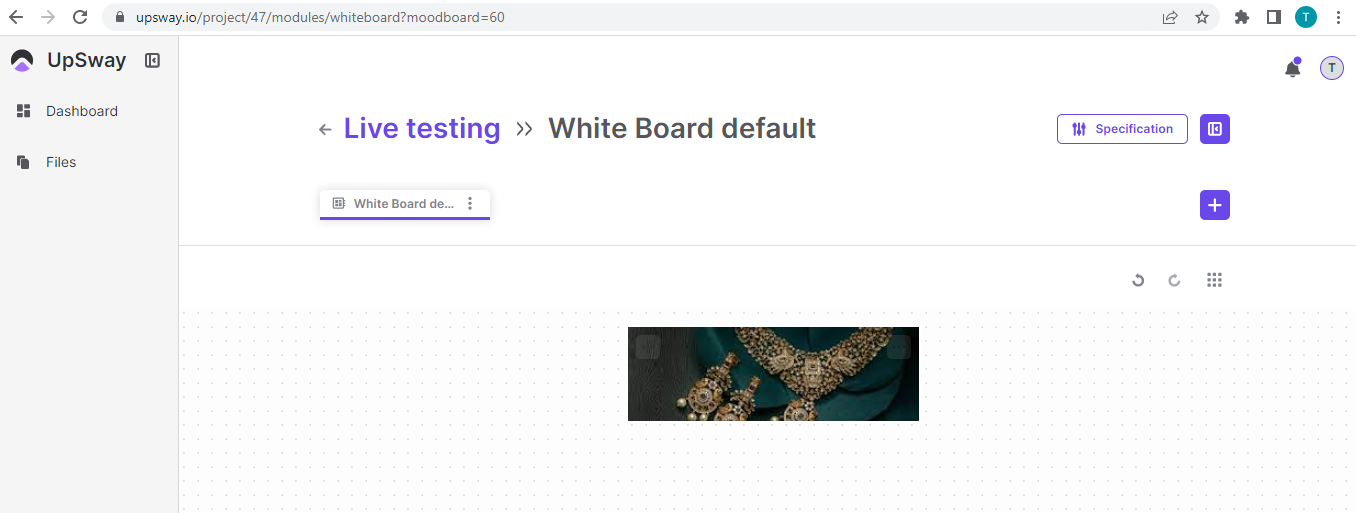 9- Once you add a file to the whiteboard then the delete/duplicate file option be available  11- Click on the new whiteboard and then a new whiteboard will be available 1- When a file is added to the whiteboard then it can be resized on the file a 3 dot will be available 1- If you want to undo or redo press the arrow options available besides the icons there is a dotted box available 1- Click on the Whiteboard Default button and it shows Rename board, Lock board, Add a URL, and Remove the board 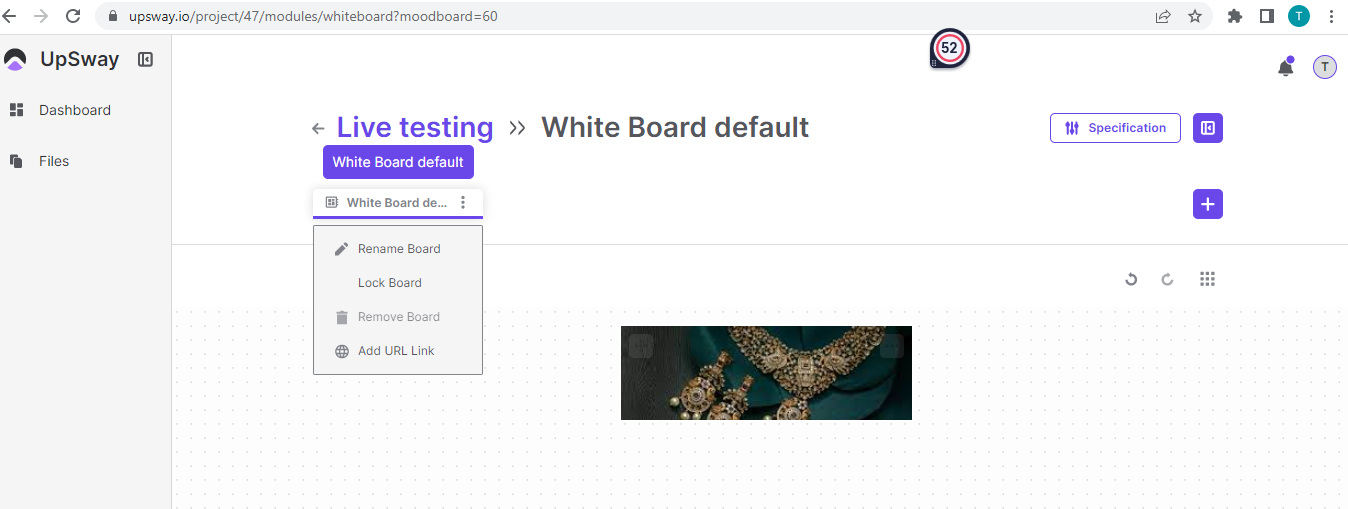 2- Click on Rename board and you can name the board of choice |
Client - Upsway - User Flows
Client - Sign-Up
Table of Contents
Table of Contents
Overview
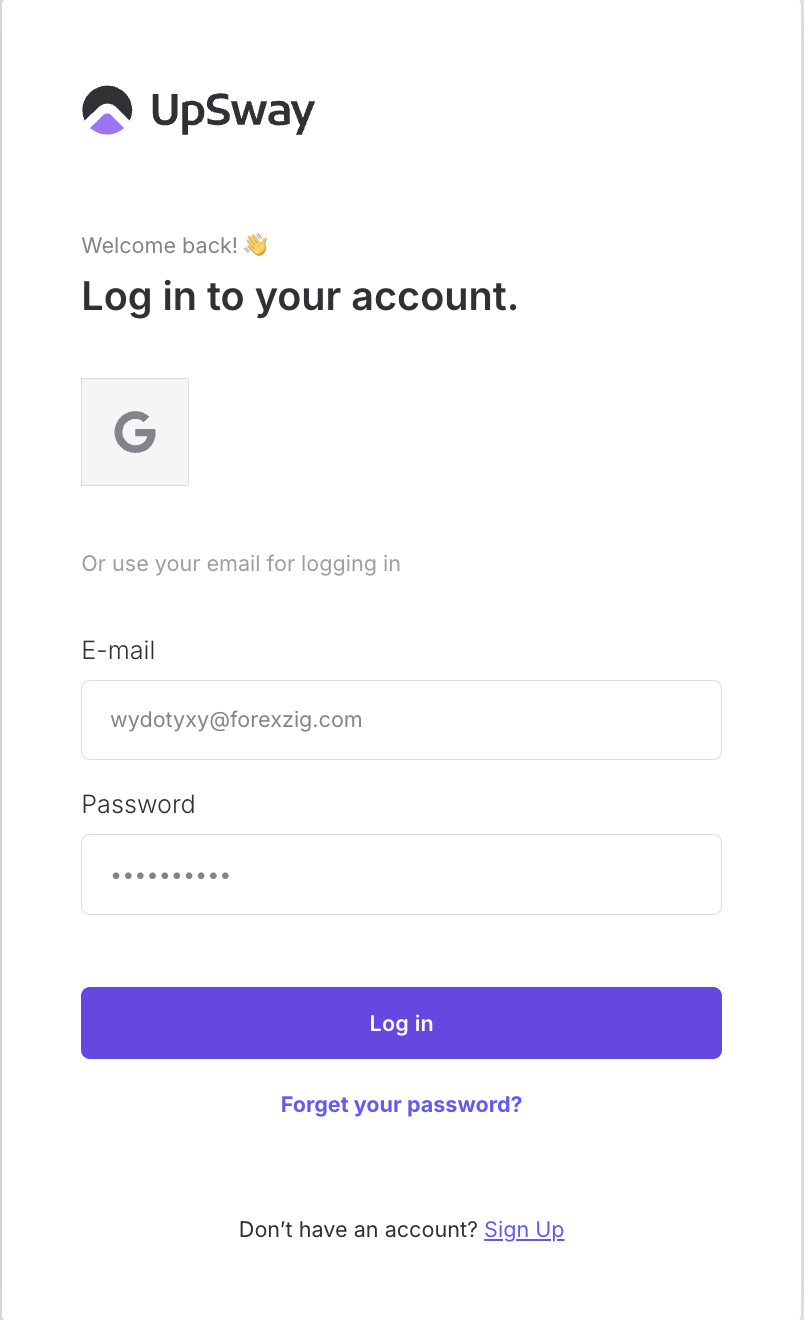
The Sign-Up process in Upsway allows new users to create an account and access the platform. With an account, you can create or join Spaces, manage projects, and collaborate with your team.
Creating an Account
To create a new account:
Go to the Upsway website.
Click Sign Up.
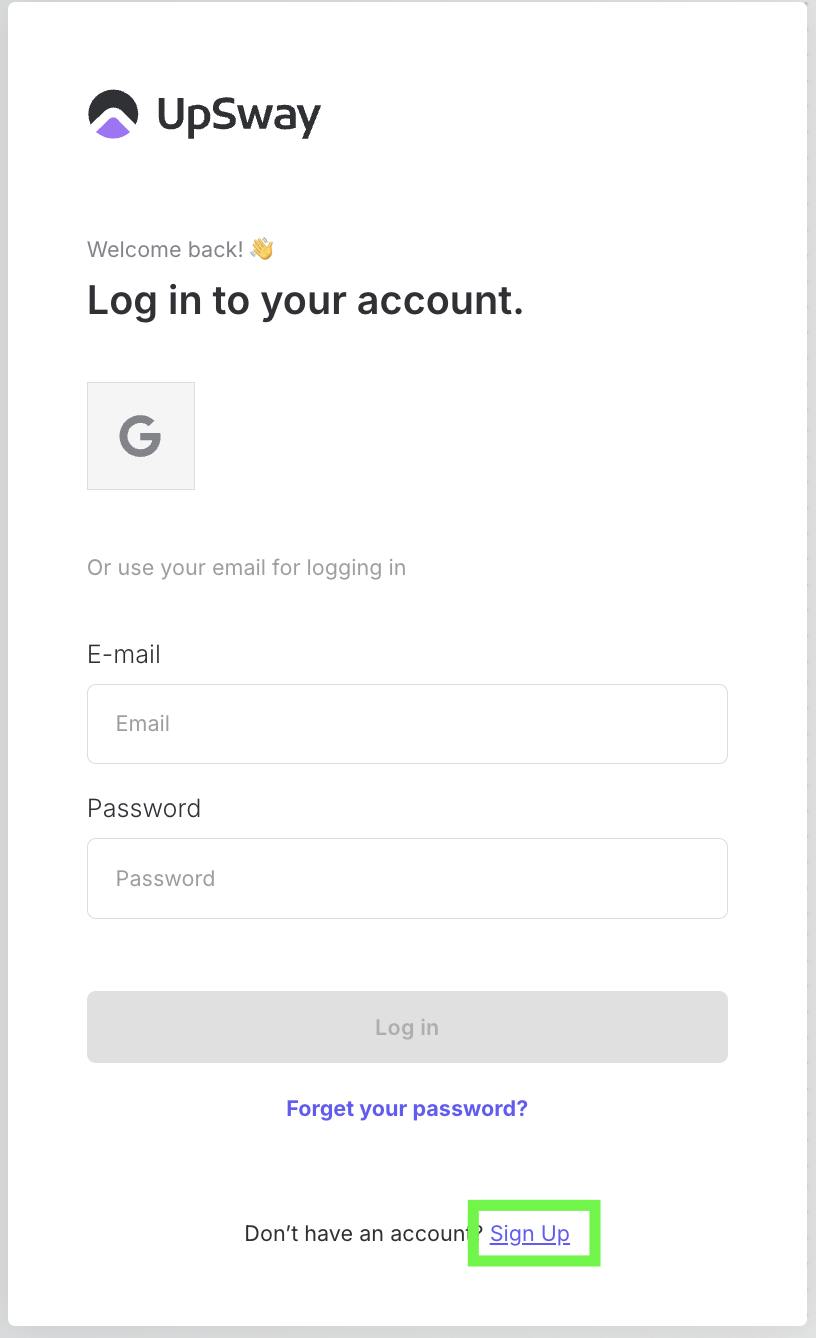
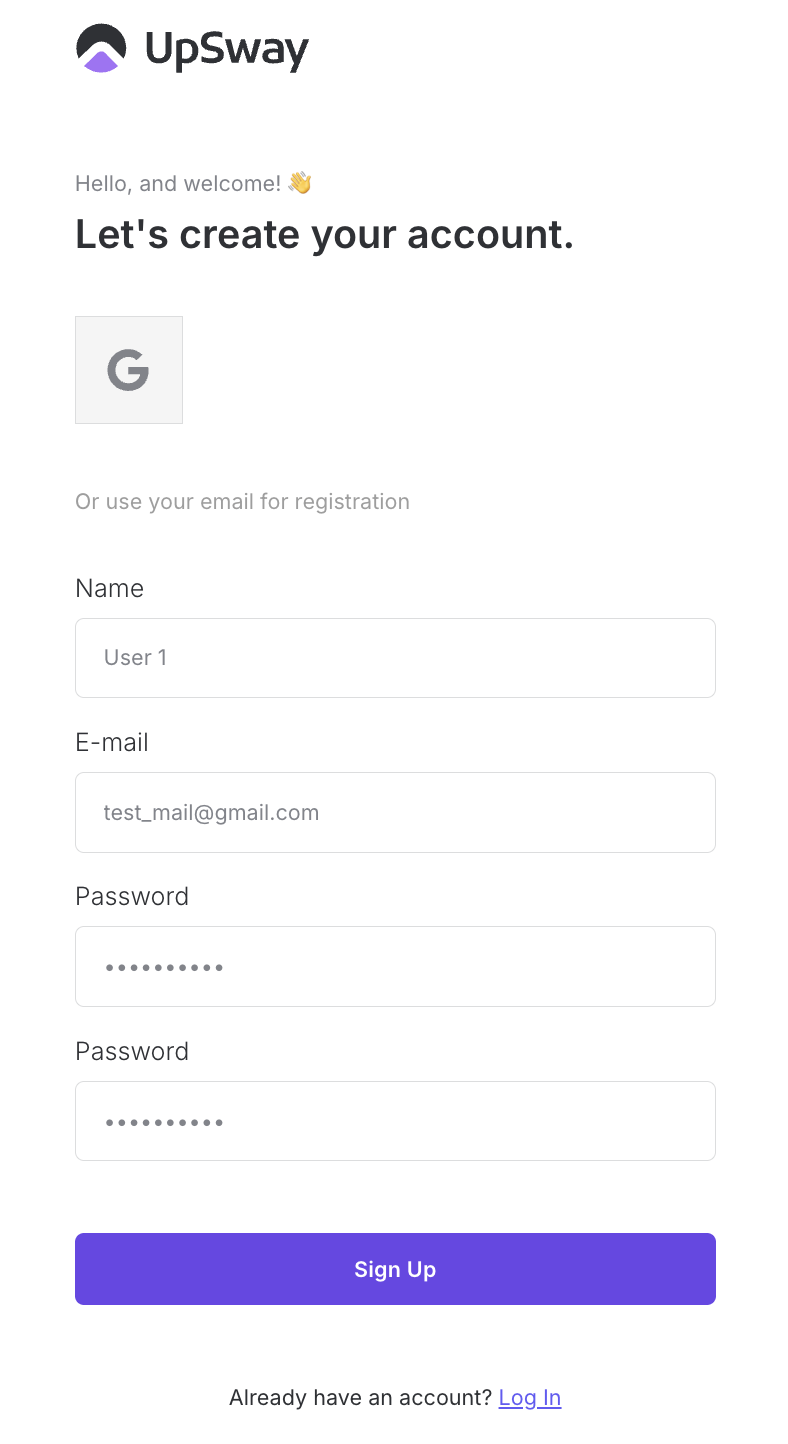
Fill in the required fields:
Name
Email
Password
Click Sign Up to complete the process.
After registration:
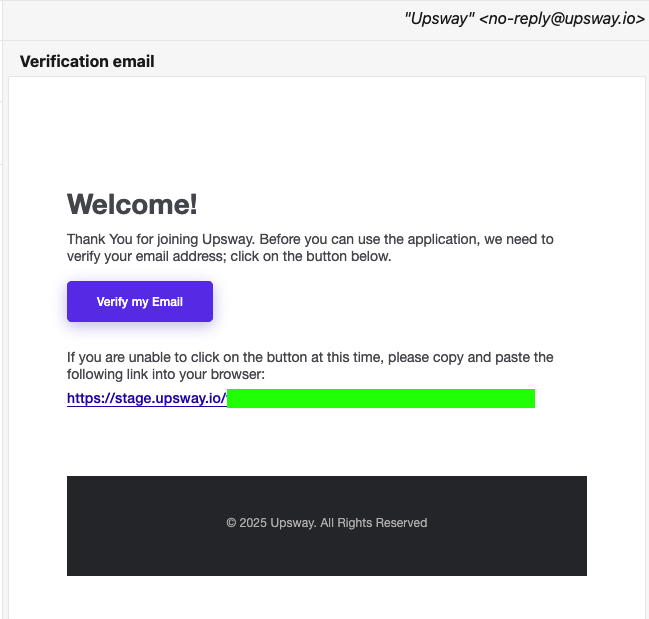
You will receive a verification email at the address you used during sign-up.
Open the email and confirm your registration.
⚠️ Until your email is verified, you will not be able to access your new account.
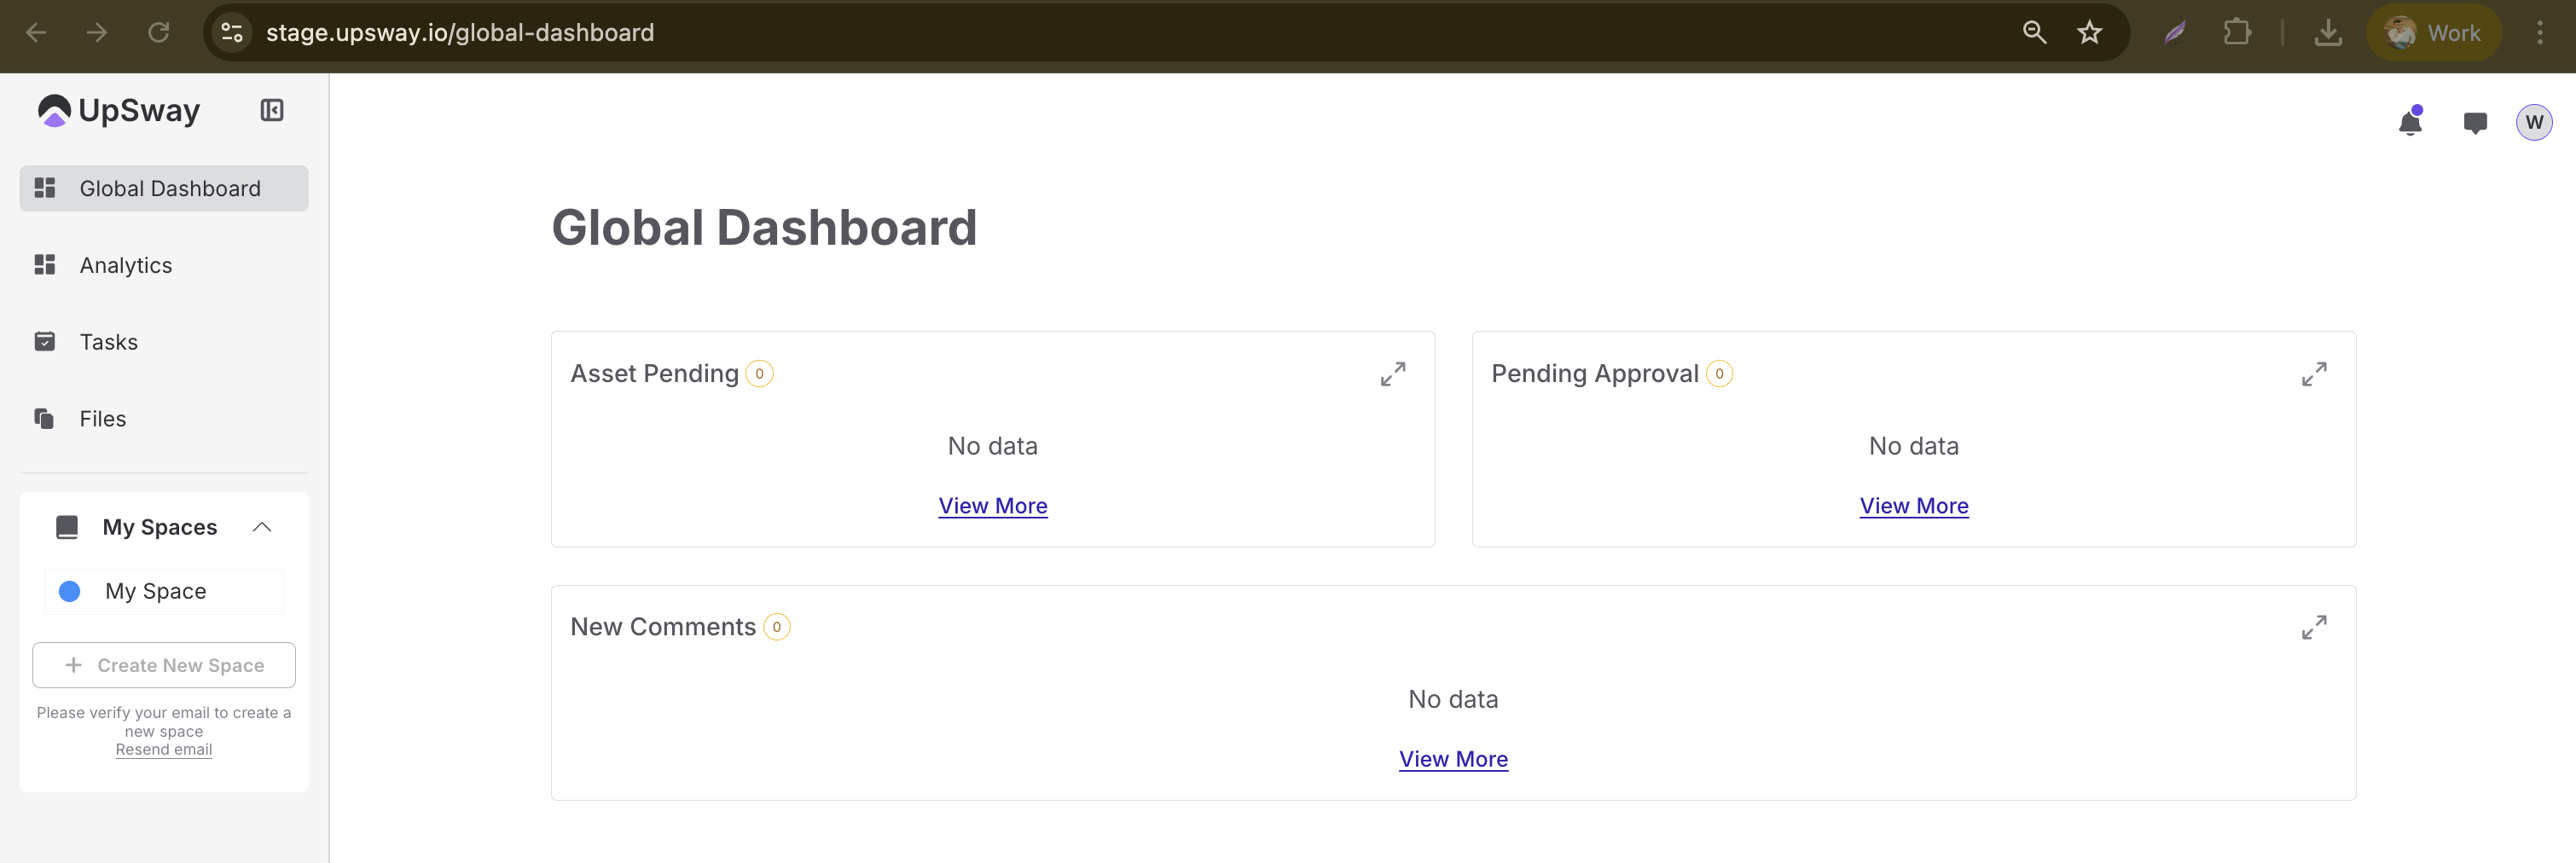
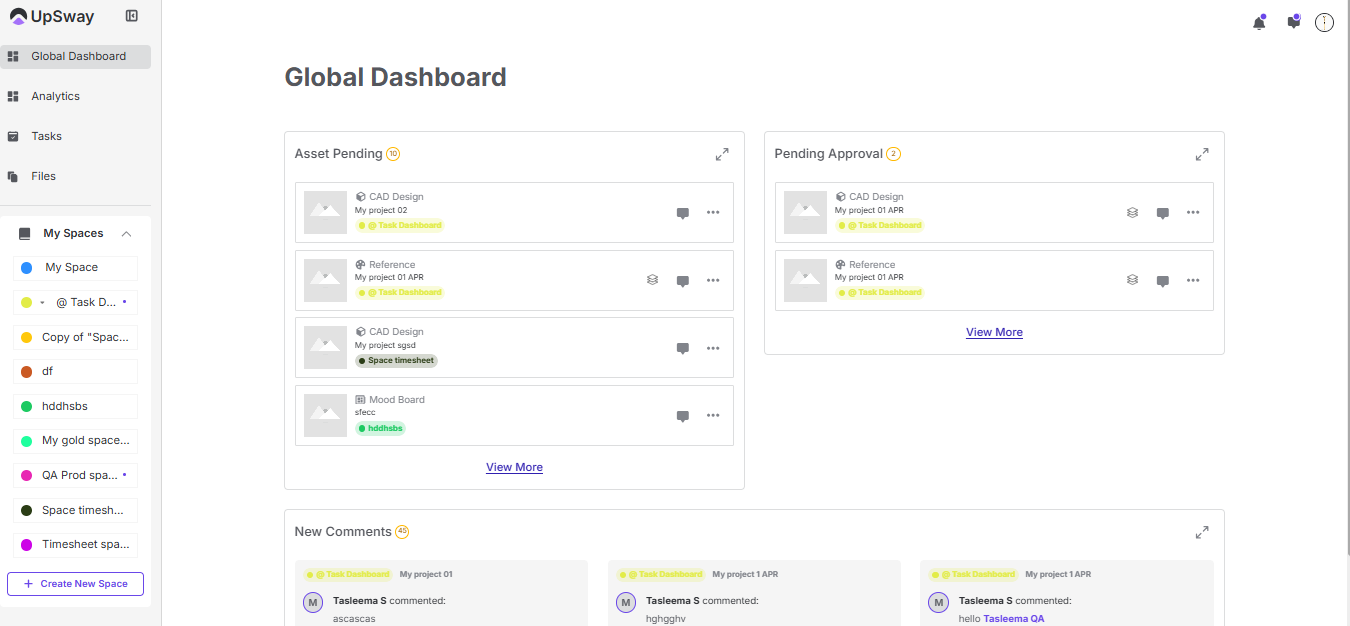
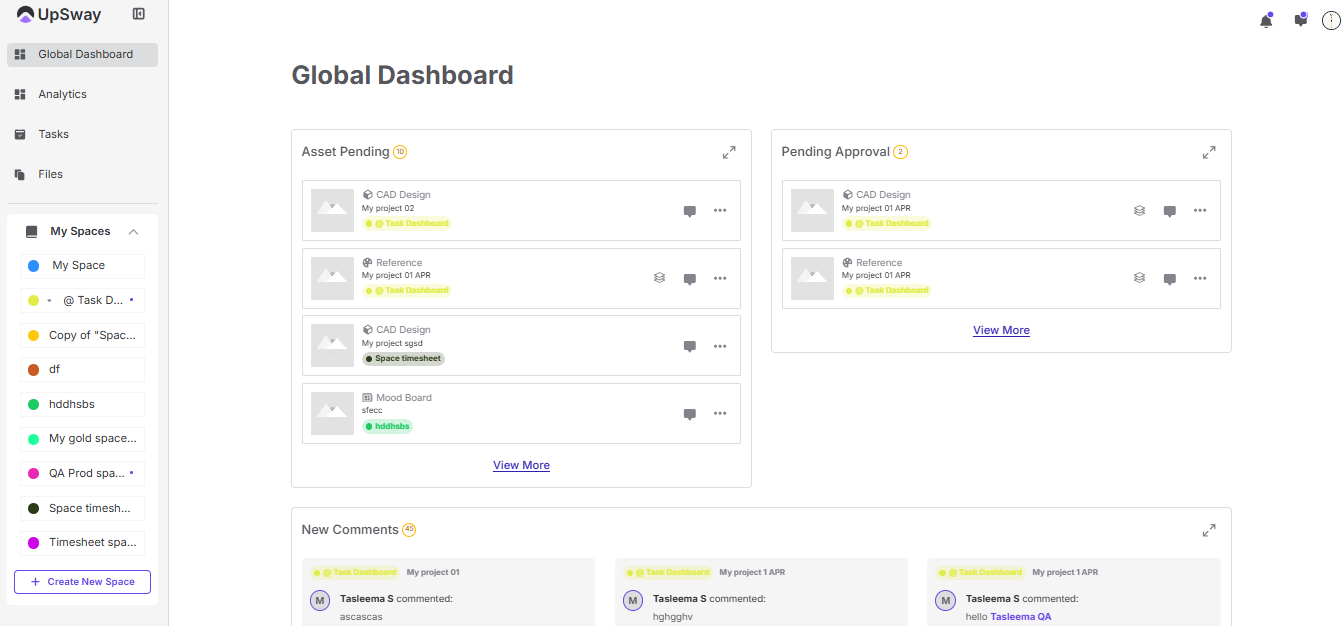
Once verified, you will be redirected to the Global Dashboard, where you will see sections such as:
Asset Pending
Pending Approval
New Comments

Alternative Sign-Up Options
If you prefer, you can also sign up using your existing accounts:
Google
This provides a faster onboarding experience without creating a separate password.
Notes
After signing up, make sure to verify your email address to unlock all platform features (e.g., creating a new Space).
Choose a strong password for better account security.
If you don’t receive a verification email, check your spam folder or request a new one.
Client - Log In
Table of Contents
Table of Contents
Overview
The Log In process in Upsway gives registered users access to their dashboard, projects, and Spaces. Once logged in, you can manage tasks, collaborate with team members, and review project activity.
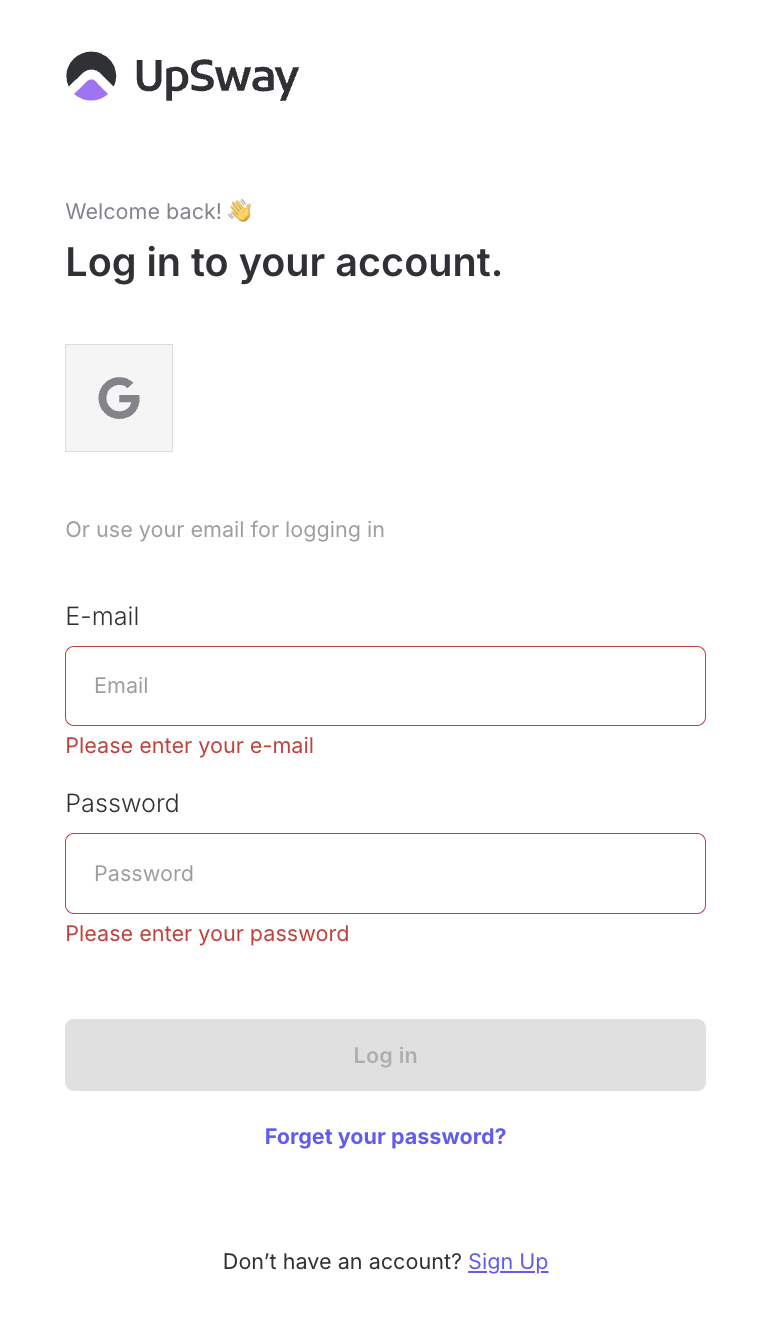
Standard Login
To log in with your Upsway account:
Go to the Upsway login page.
Enter your email and password.
Click Log In.
After successful login, you will be redirected to the Global Dashboard, which includes:
Asset Pending
Pending Approval
New Comments
Alternative Login Options
For faster access, you can also log in using third-party accounts:
Google
This option is especially convenient if you prefer not to remember a separate password.
Notes
Make sure you have verified your email address after sign-up; otherwise, login may not be possible.
If you forget your password, use the “Forgot Password” option on the login page to reset it.
For security reasons, always log out after using Upsway on shared or public devices.
Client - Log Out / Sign-Out
Table of Contents
Table of Contents
Overview
The Log Out (or Sign-Out) option in Upsway allows you to securely end your session. Logging out is recommended when using shared or public devices to prevent unauthorized access to your account.
How to Log Out
While logged in, click on your profile icon in the top-right corner of the page.
From the dropdown menu, select Sign Out.

You will be redirected to the Login page.
Notes
Always log out when using Upsway on a shared or public computer to protect your account.
On personal devices, you can stay signed in for quicker access, but use logout if you switch accounts frequently.
If you close the browser without logging out, your session may still remain active until it times out.
Client - Forget Password
Table of Contents
Table of Contents
Overview
The Forget Password feature in Upsway allows you to reset your account password if you cannot log in. By requesting a recovery link, you can create a new password and regain access to your account securely.
How to Reset Your Password
Go to the Upsway login page.
Click Forgot your password?
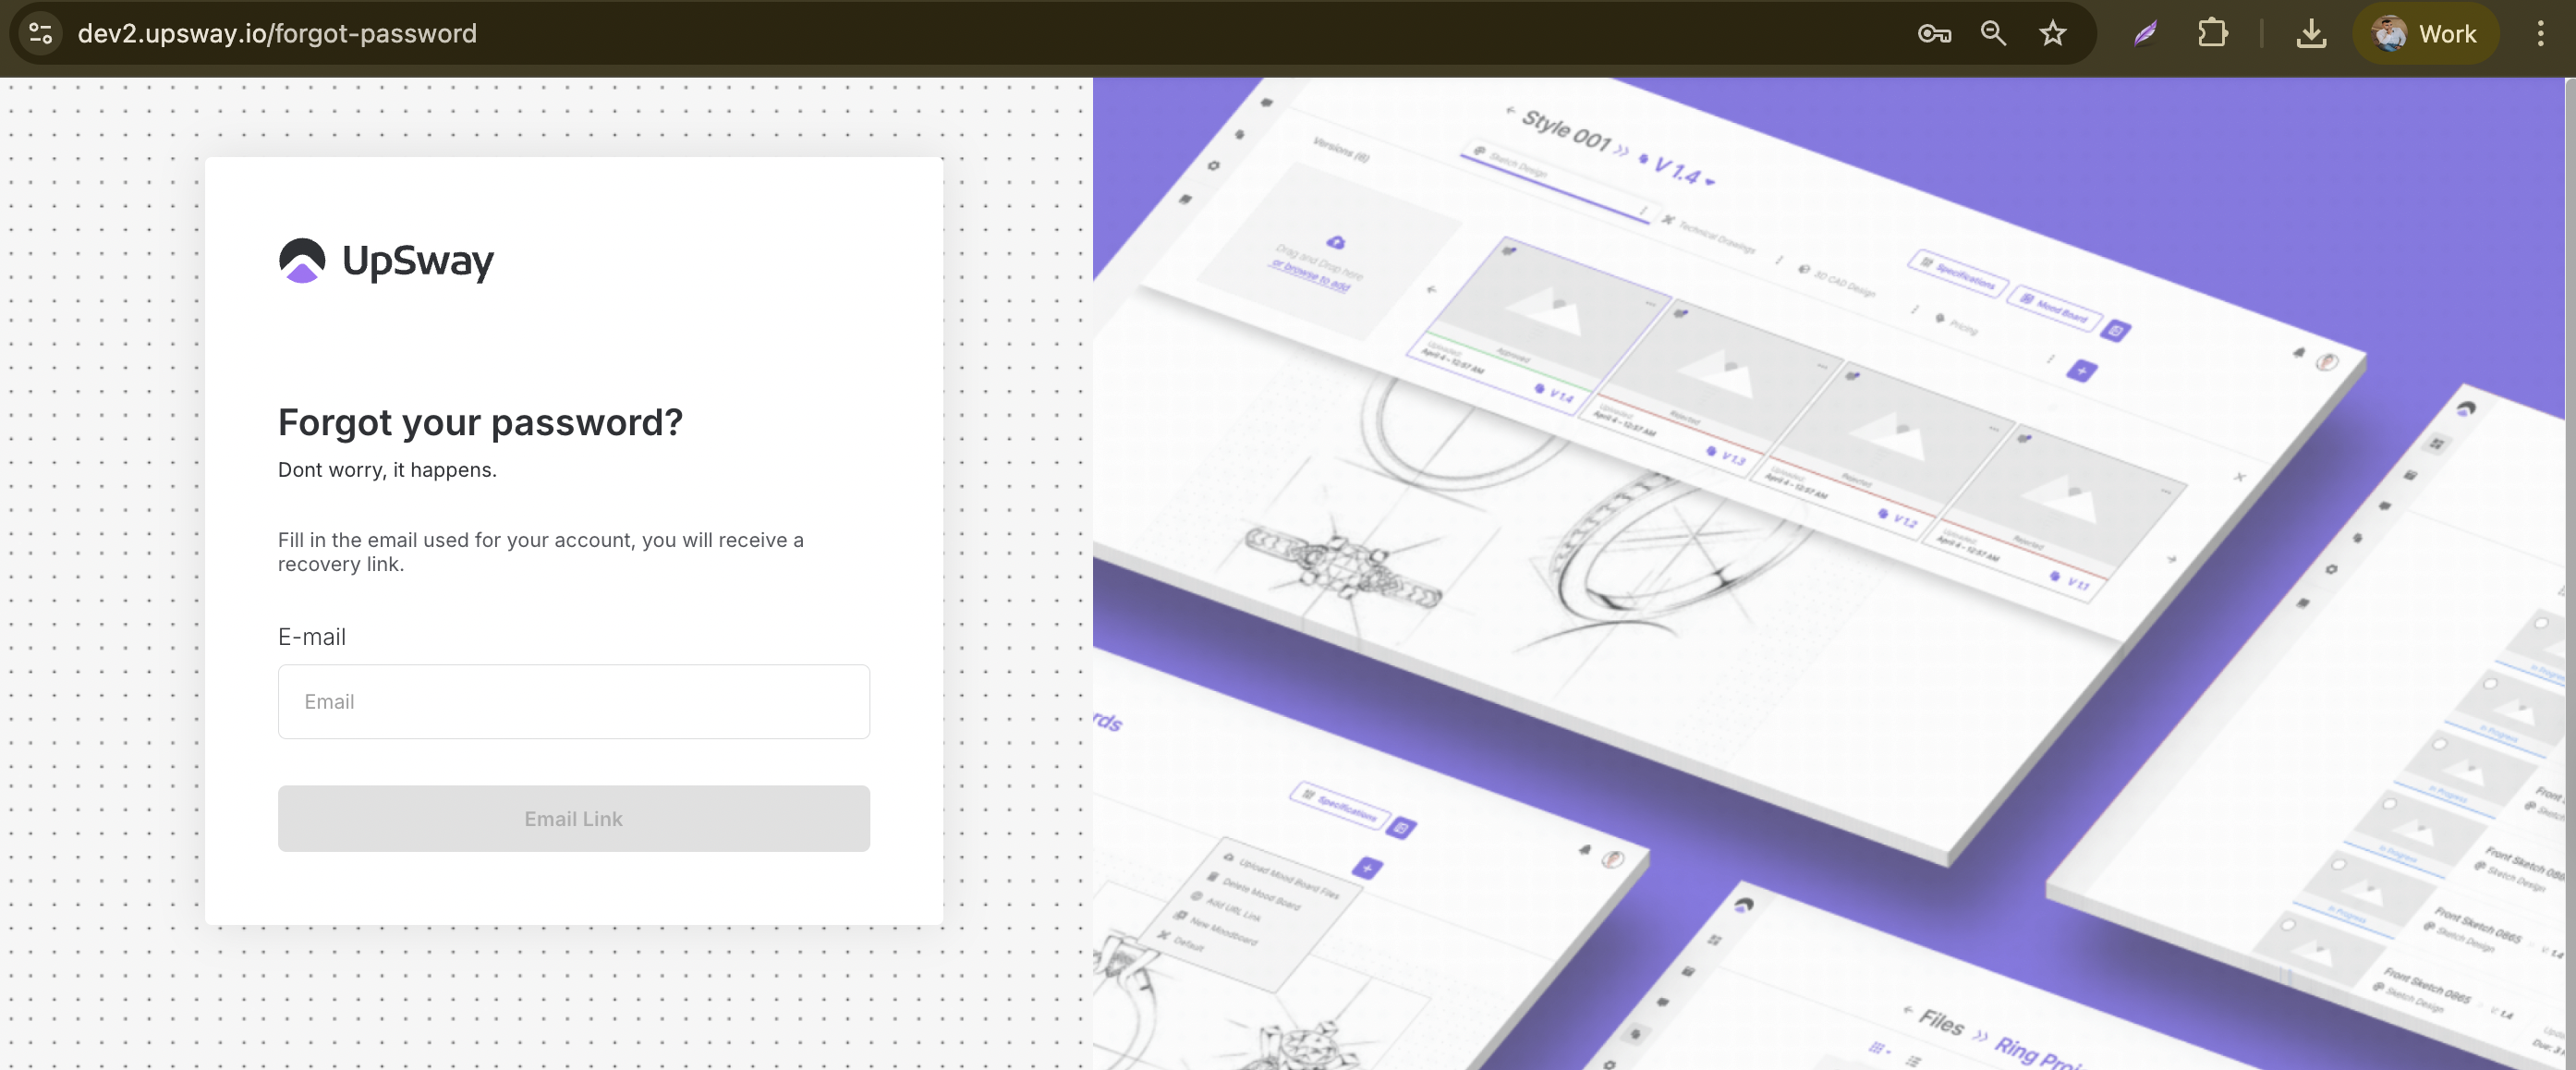
Enter the email address associated with your account.
You will receive a recovery email with a reset link.
Open the email and:
Click on the Reset Password button.
Enter a new password, confirm it, and submit.
Your password will be updated successfully.
Notes
Check your spam or junk folder if you don’t see the recovery email in your inbox.
Choose a strong password that includes a mix of uppercase, lowercase, numbers, and symbols.
For security, recovery links expire after a limited time. If expired, request a new reset email.
Client - User Roles
Table of Contents
Table of Content
Overview
Roles in Upsway define what each user can see and do within a Space or Project. Assigning roles correctly ensures smooth collaboration and prevents unauthorized actions.
There are two types of roles:
Space Roles – define global permissions inside a Space.
Project Roles – define responsibilities and actions within a specific project.
Space Roles
Space roles determine who can manage the Space itself and who only participates in projects.
Admin – full control over the Space: can see and manage everything, invite members, and configure settings.
Member – regular user within a Space. Can participate in projects but has limited administrative rights.
Visitor – restricted role, often used for review-only access.
Project Roles
Project roles define what a user can do inside a specific project. They include:
Project Owner
The user who creates the project.
Has the highest level of control: editing, archiving, deleting, and managing team access.
Only one Project Owner per project.
Project Manager
Manages day-to-day project progress.
Can edit project details, create tasks, approve modules, and manage deadlines.
Designer
A flexible role that can be customized further with sub-roles:
Sketch Designer – responsible for initial design sketches.
Tech Designer – ensures technical drawings meet requirements.
Merchandiser – manages product presentation and alignment with market needs.
CAD Designer – creates and manages CAD models.
You can assign one or multiple sub-roles to a user depending on their responsibilities.
Reviewer
Reviews assets, modules, or designs.
Can approve or reject submissions but does not create or edit.
Watcher
Read-only role.
Can view the project and stay updated through notifications but cannot make changes.
Notes
A user can have both a Space Role and a Project Role at the same time. For example, a Space Admin can also be assigned as a Reviewer in one project.
When assigning Designer, remember to specify which sub-roles apply. Otherwise, the user might not receive the right design tasks.
Permissions are cumulative: if a user has multiple roles, they inherit the highest level of access granted by any of them.
Client - Create New Space
Table of Contents
Table of Contents
Overview
A Space in Upsway is your dedicated workspace for organizing projects, inviting team members, and managing workflows.
With a Space, you can:
Group projects under a single collaborative environment.
Assign team roles and responsibilities.
Define and manage workflows that match your process.
Manage connections to your ERP portal for product and data synchronization.
Control ClickUp integration.
This guide explains how to create a Space and configure it for productive teamwork.
Prerequisites
Before creating a Space, make sure you have:
An active Upsway account.
A verified email address. Without email verification, you will not be able to create a new Space.
Access rights to invite team members.
A clear idea of whether you’ll use a Default Workflow or a Custom Workflow.
A list of colleagues you want to invite.
Log in to Upsway
To begin, go to the Upsway login page. You can sign in using your Upsway credentials, or conveniently use your Google account.
Once logged in, you will arrive at the Global Dashboard, your starting point for managing Spaces and projects.
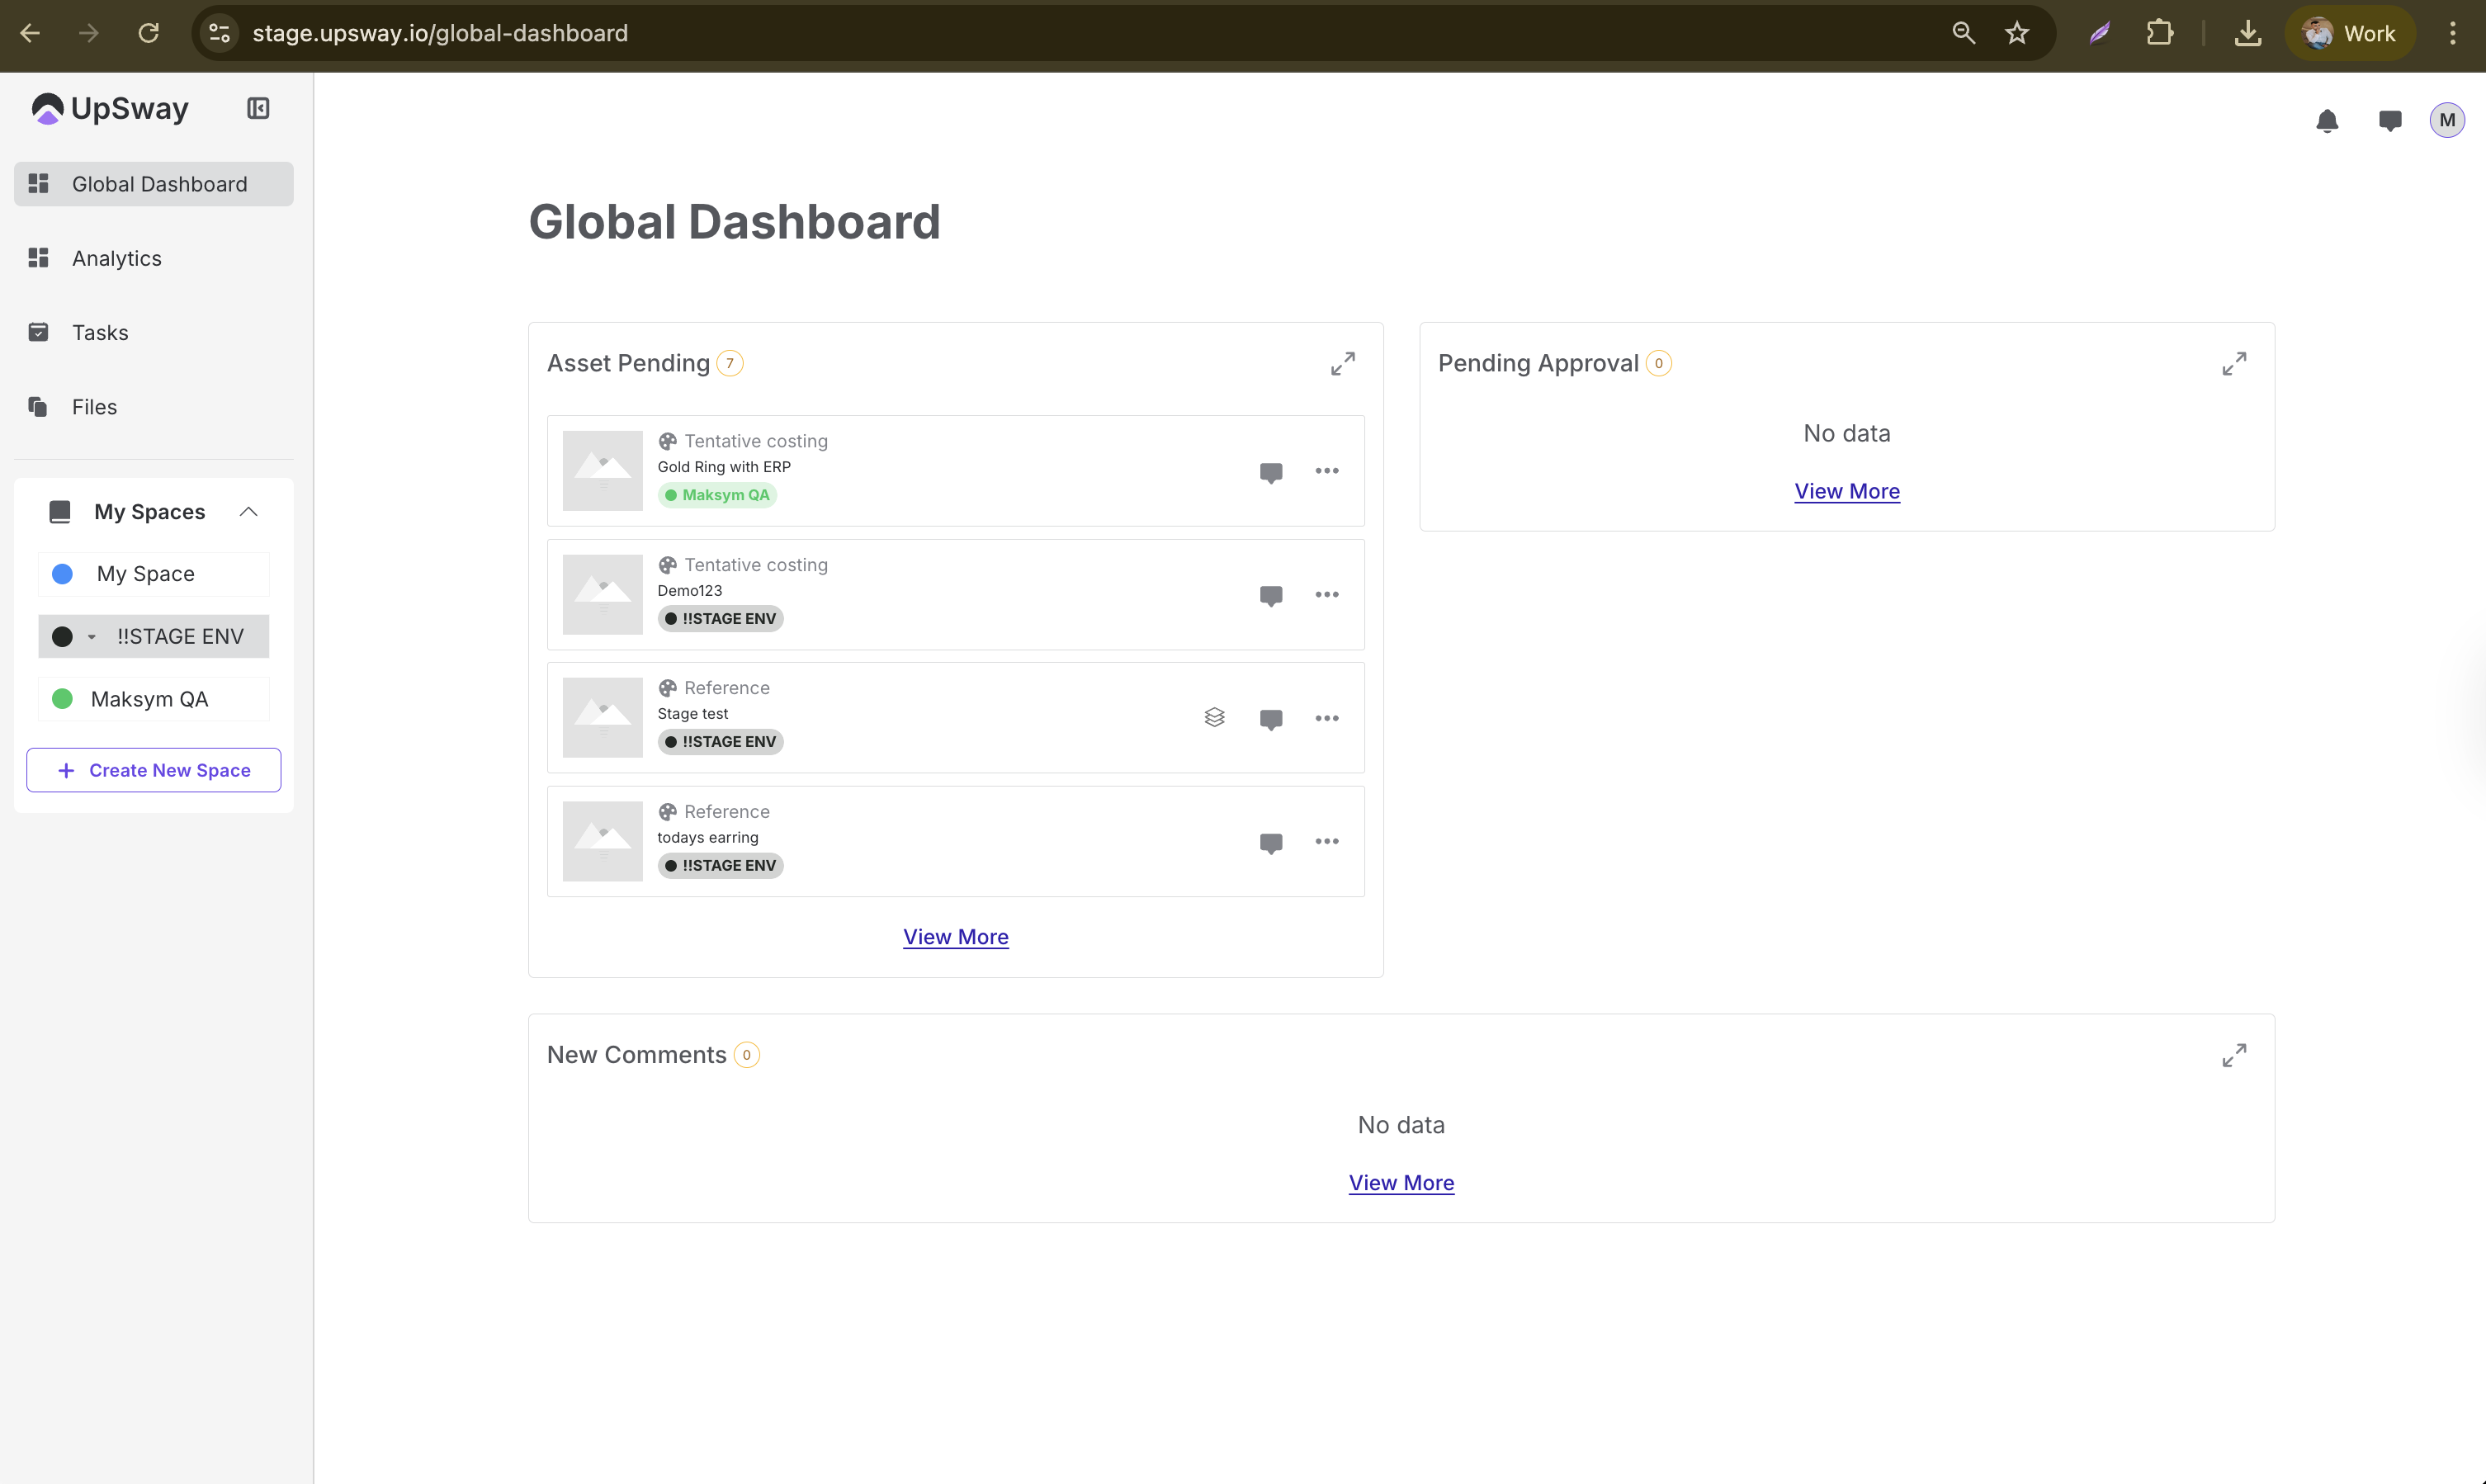
Creating a New Space
From the left sidebar, click Create New Space to open the creation page.
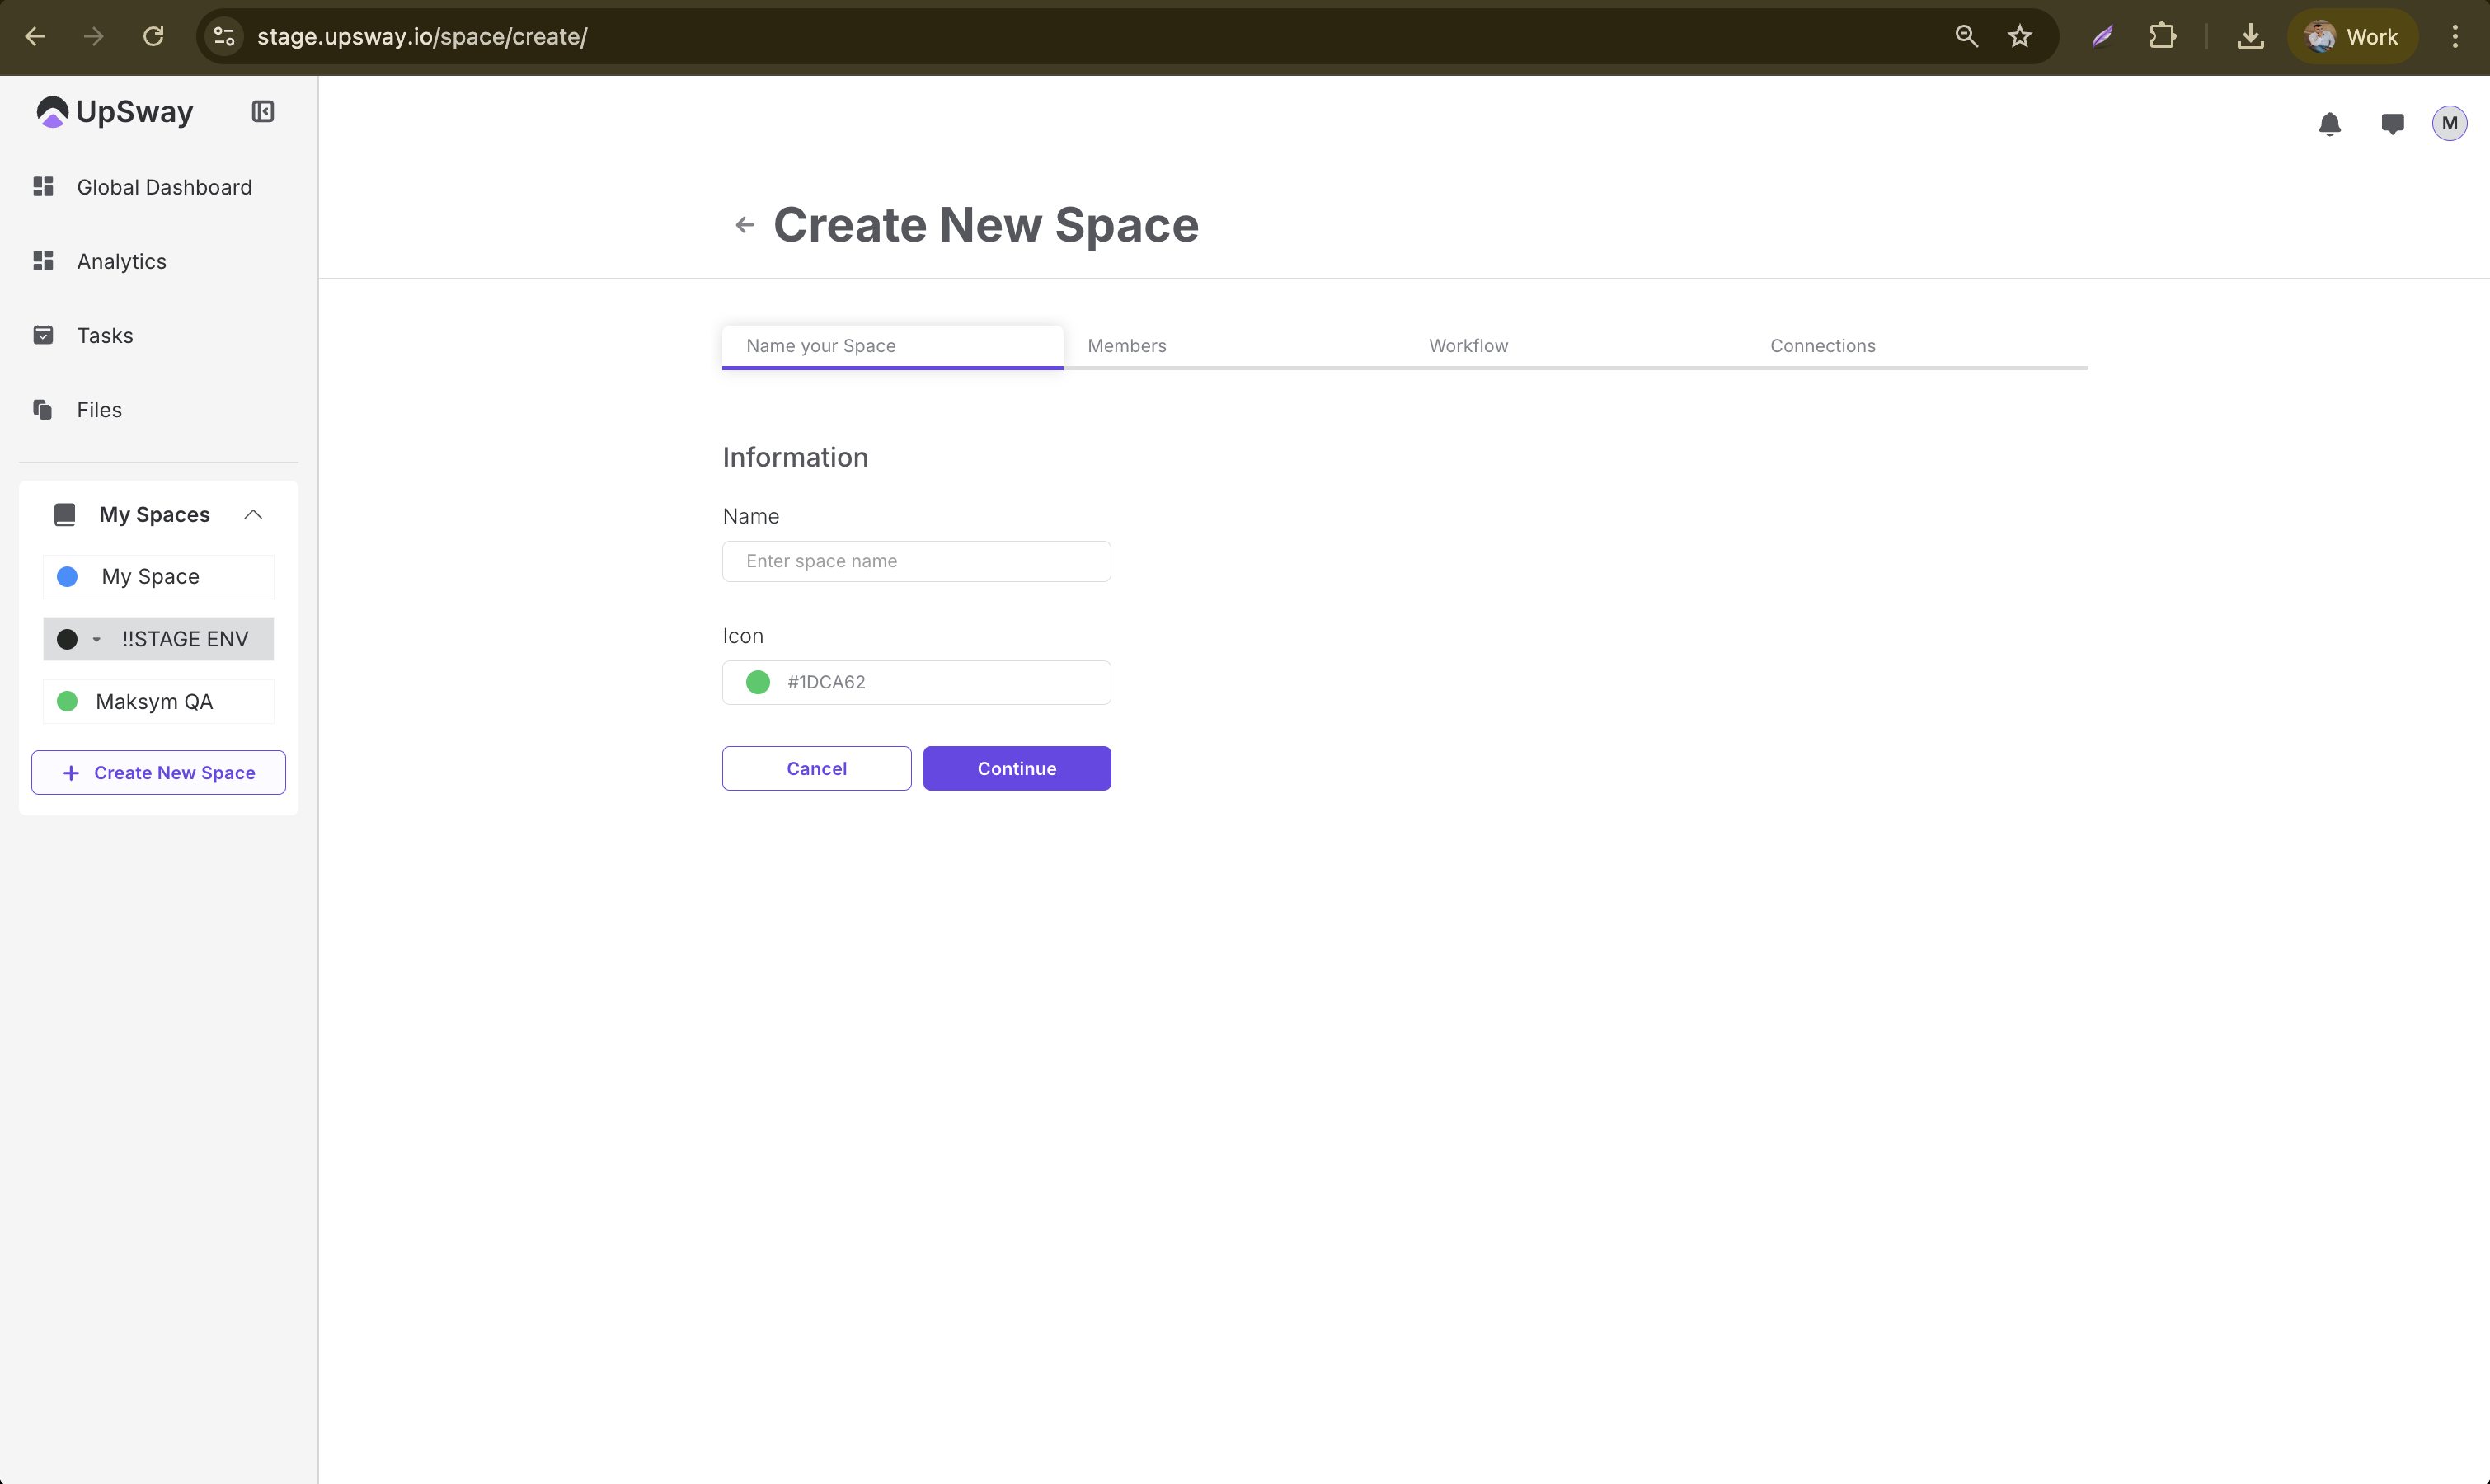
On this page, you will:
Enter a Space name — choose something descriptive, e.g., “Campaign Q4”.
Select a Space color — this color will appear in your space list, helping you quickly recognize it among others.
Once configured, you can either:
Click Continue to proceed to the Members setup page.
Click Cancel to return to the Dashboard.
Note: The chosen color and name will always be visible in your list of Spaces.
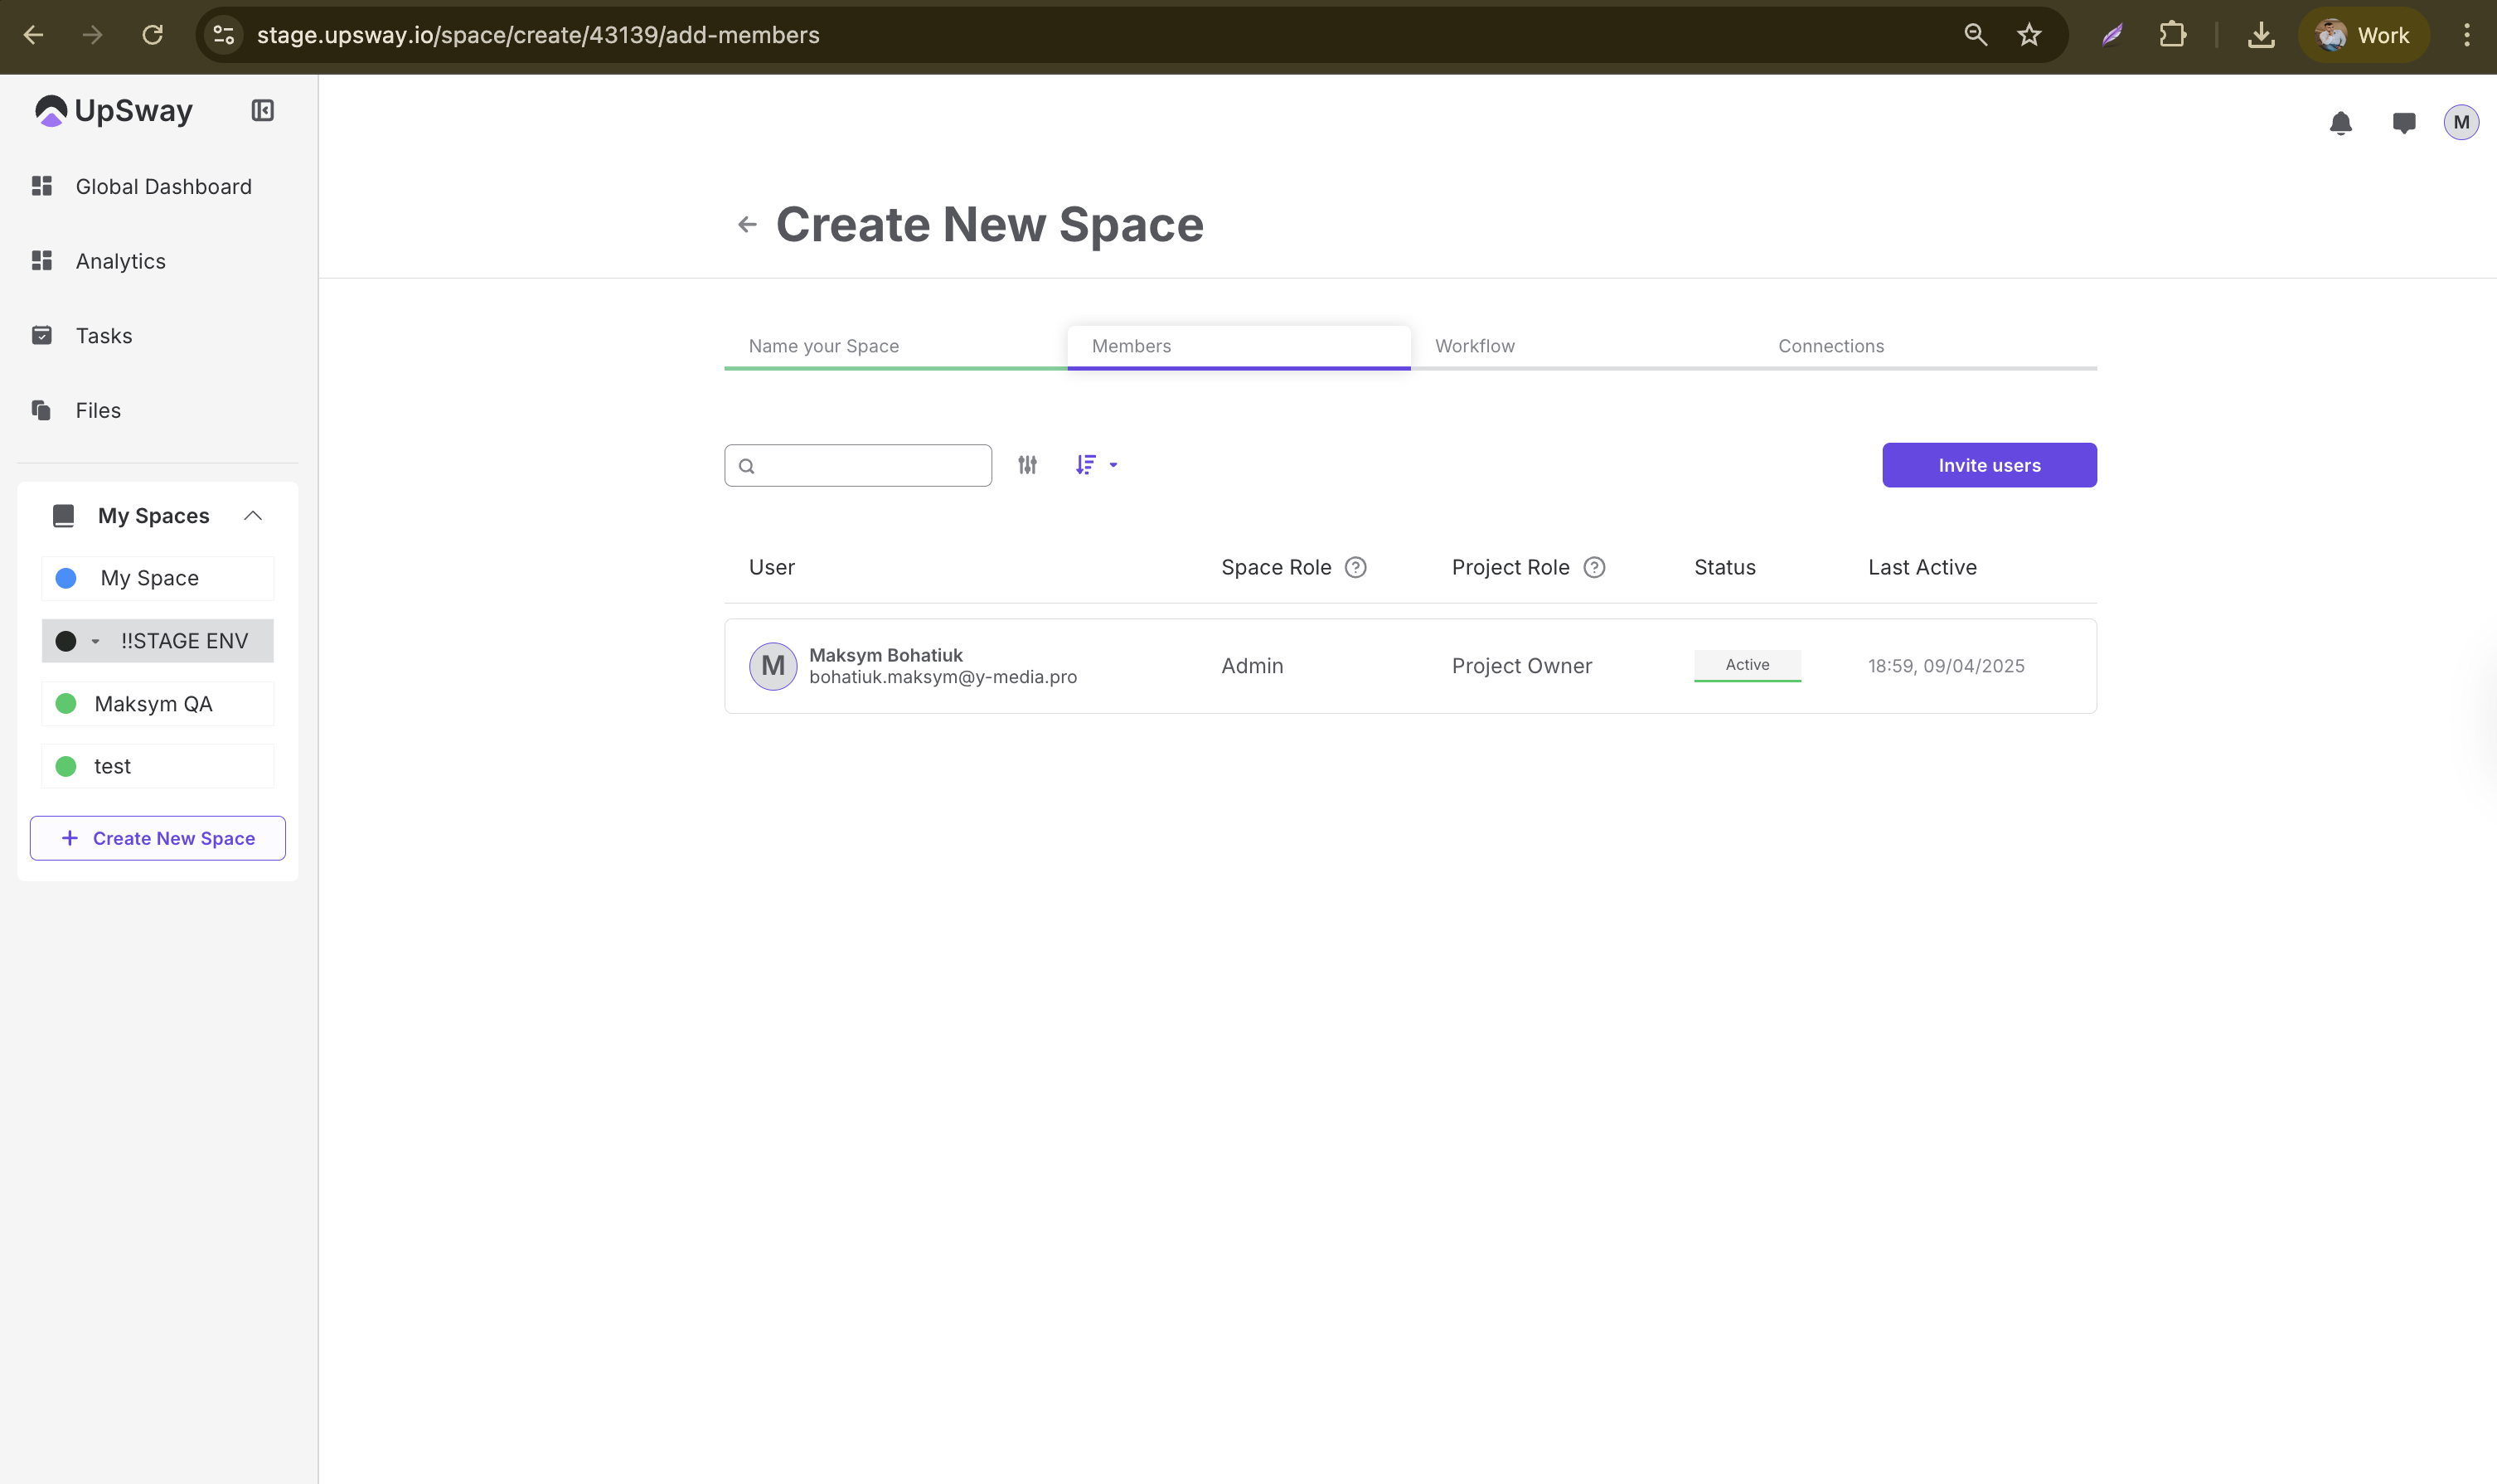
Managing Members and Roles
Each Space is collaborative. On the Members page, you can invite colleagues and assign them roles:
Space roles: Admin (full control) or Member (limited rights).
Project roles: Project Owner, Project Manager, Designer, Reviewer, Watcher.
Only existing Upsway users can access your Space once invited.
Tip: Assign project-specific roles carefully — this ensures clarity in responsibilities and smooth collaboration.
Configuring Workflows
Each Space in Upsway includes a default workflow to help you start quickly, while still offering flexibility for customization.
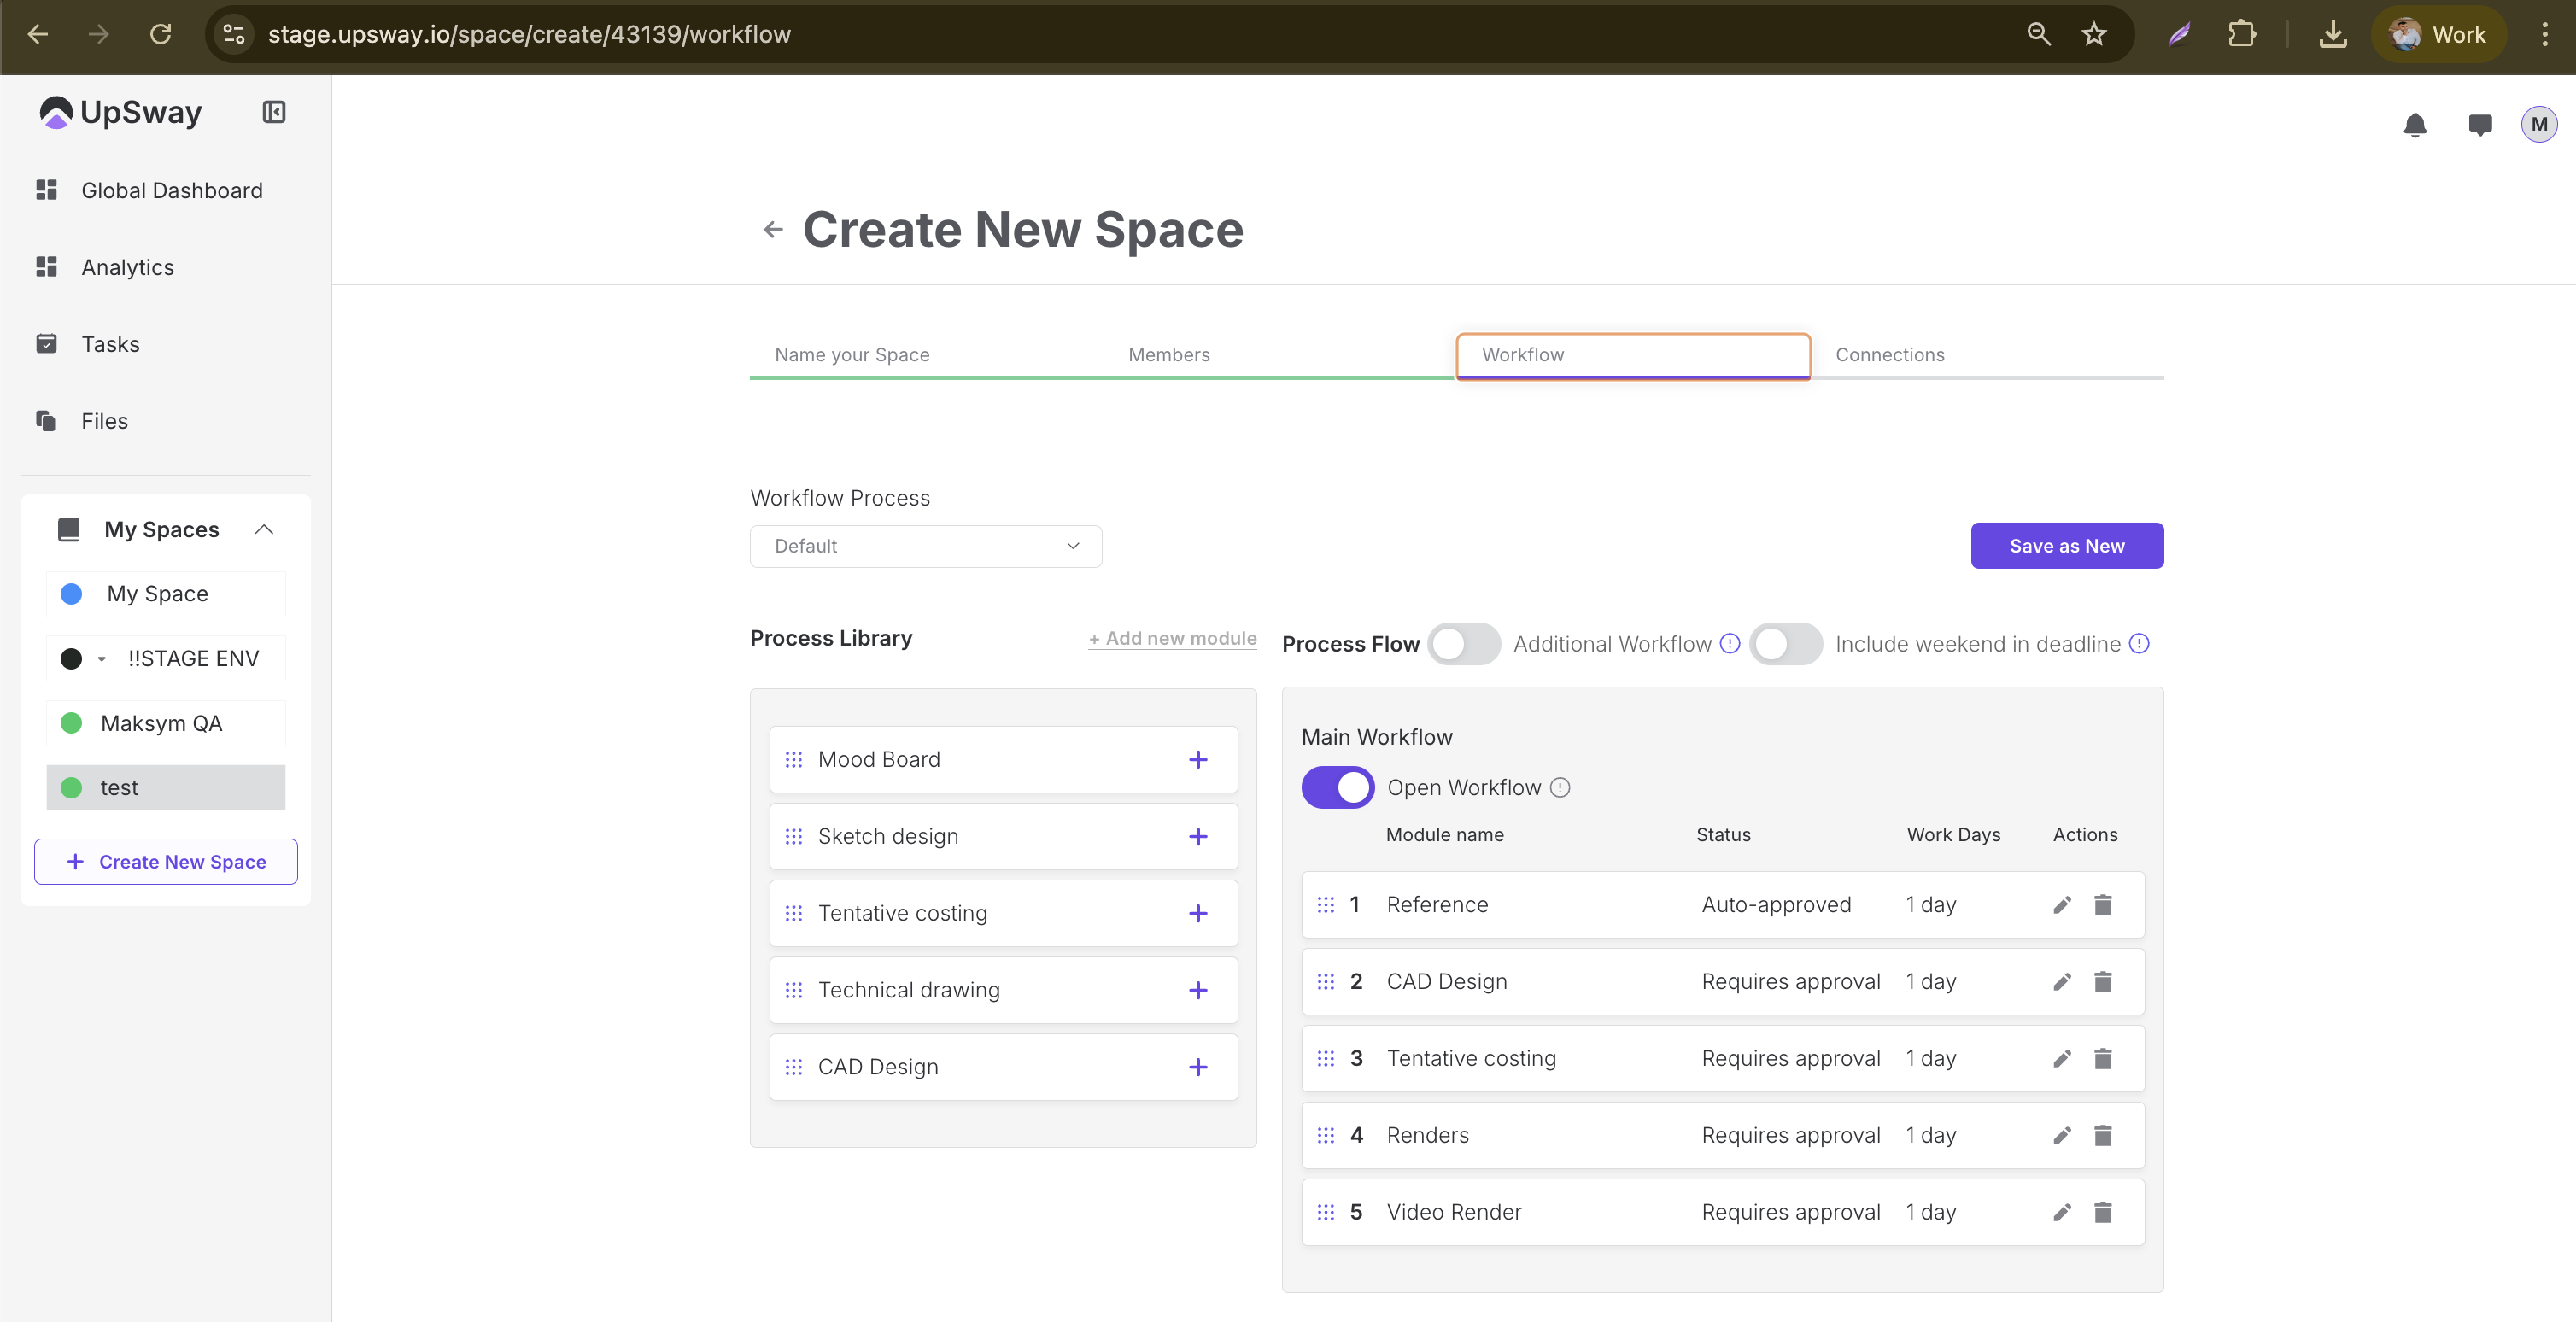
Default Workflow
The first module, Reference, is auto-approved.
All other modules require approval.
By default, the Open Workflow toggle is turned on. This means users can work on modules in any order. If the toggle is switched off, modules must be completed sequentially — you cannot move to the next step until the previous one is approved.
Tip: Keep the workflow open if you want flexibility, or close it to enforce strict step-by-step progression.
Managing Modules
You can customize modules in several ways:
Reorder modules by dragging and dropping them into the desired sequence.
Edit a module by clicking the ✏️ (pencil) icon.
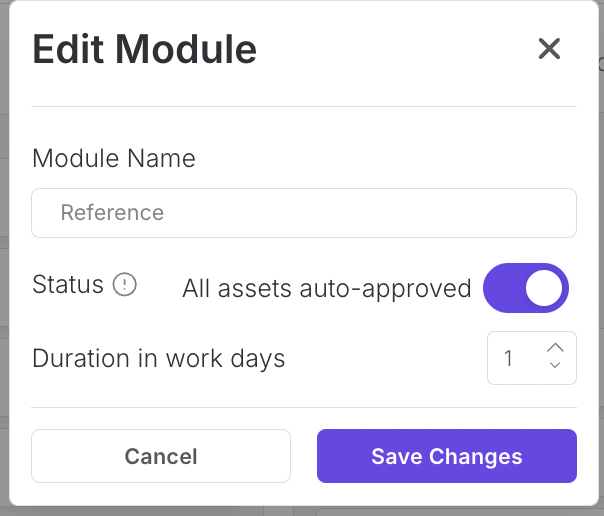
Available options:
Change the module name.
Update the Duration:
Workdays (default).
Calendar days (if the Include weekend in deadline toggle is enabled, the duration is displayed in calendar days).
Enable/disable All assets auto-approved:
This toggle is on by default, meaning the module does not require manual review/approval in order to move to the next step.
Delete a module by clicking the 🗑️ (trash bin) icon.
You can also expand your workflow with modules from the Process Library.
Additional Workflow
In addition to the Main Workflow, you can enable a separate workflow track:
Activate the Additional Workflow toggle to create an extra workflow section below the Main Workflow.
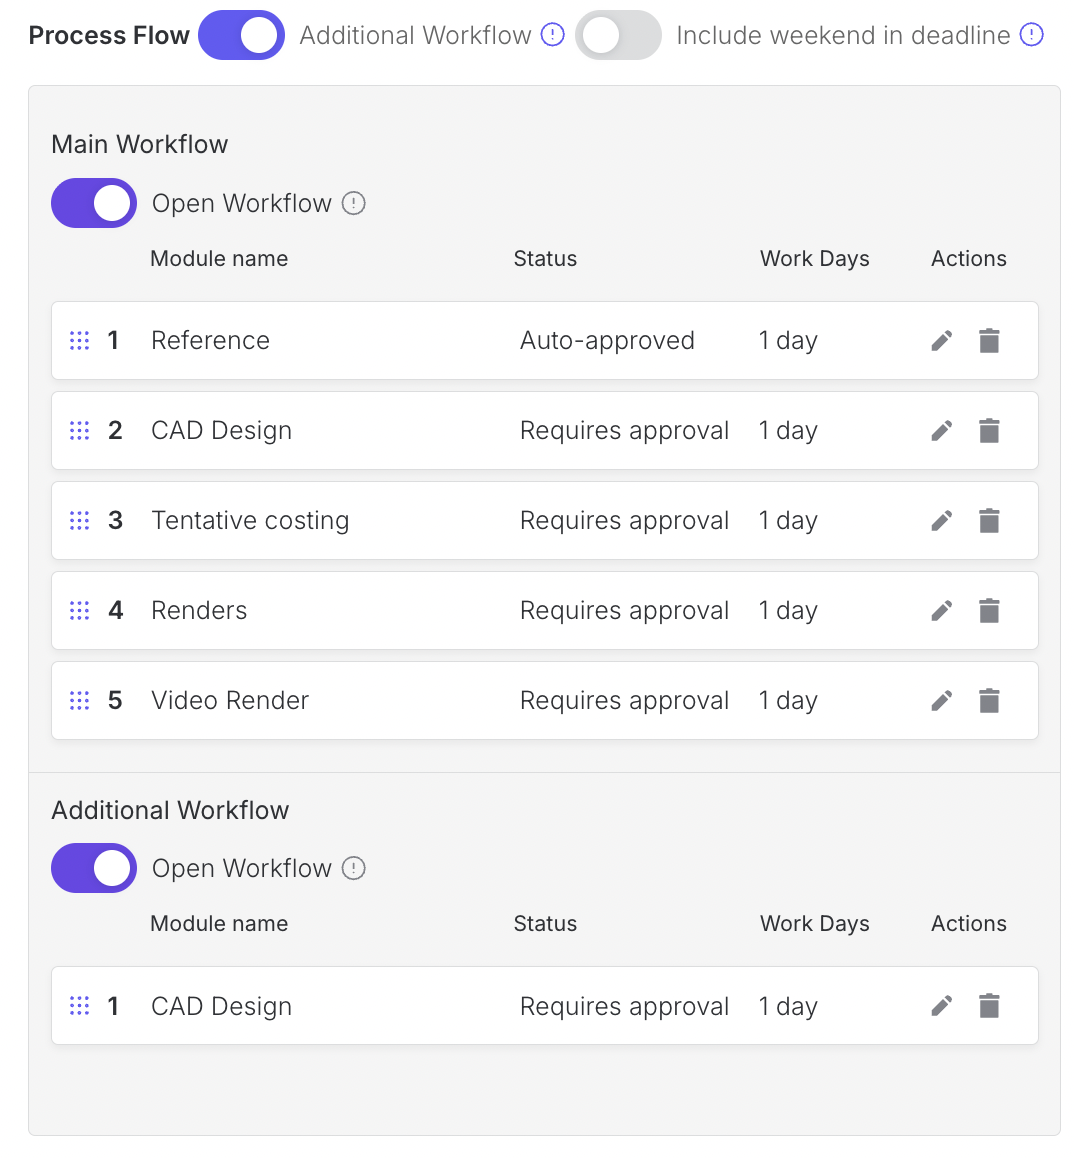
Just like in the main section, you can:
Toggle Open Workflow on/off.
Drag and drop modules to define their order.
Add modules from the Process Library.
Use Additional Workflow for independent steps that should run in parallel with the main process and not depend on its completion.
Saving Your Workflow
After configuring your workflow:
Click Save as New to store it.
The workflow becomes available for projects created in this Space.
Tip: Use descriptive names and realistic durations so your team clearly understands each stage and project deadlines remain accurate.
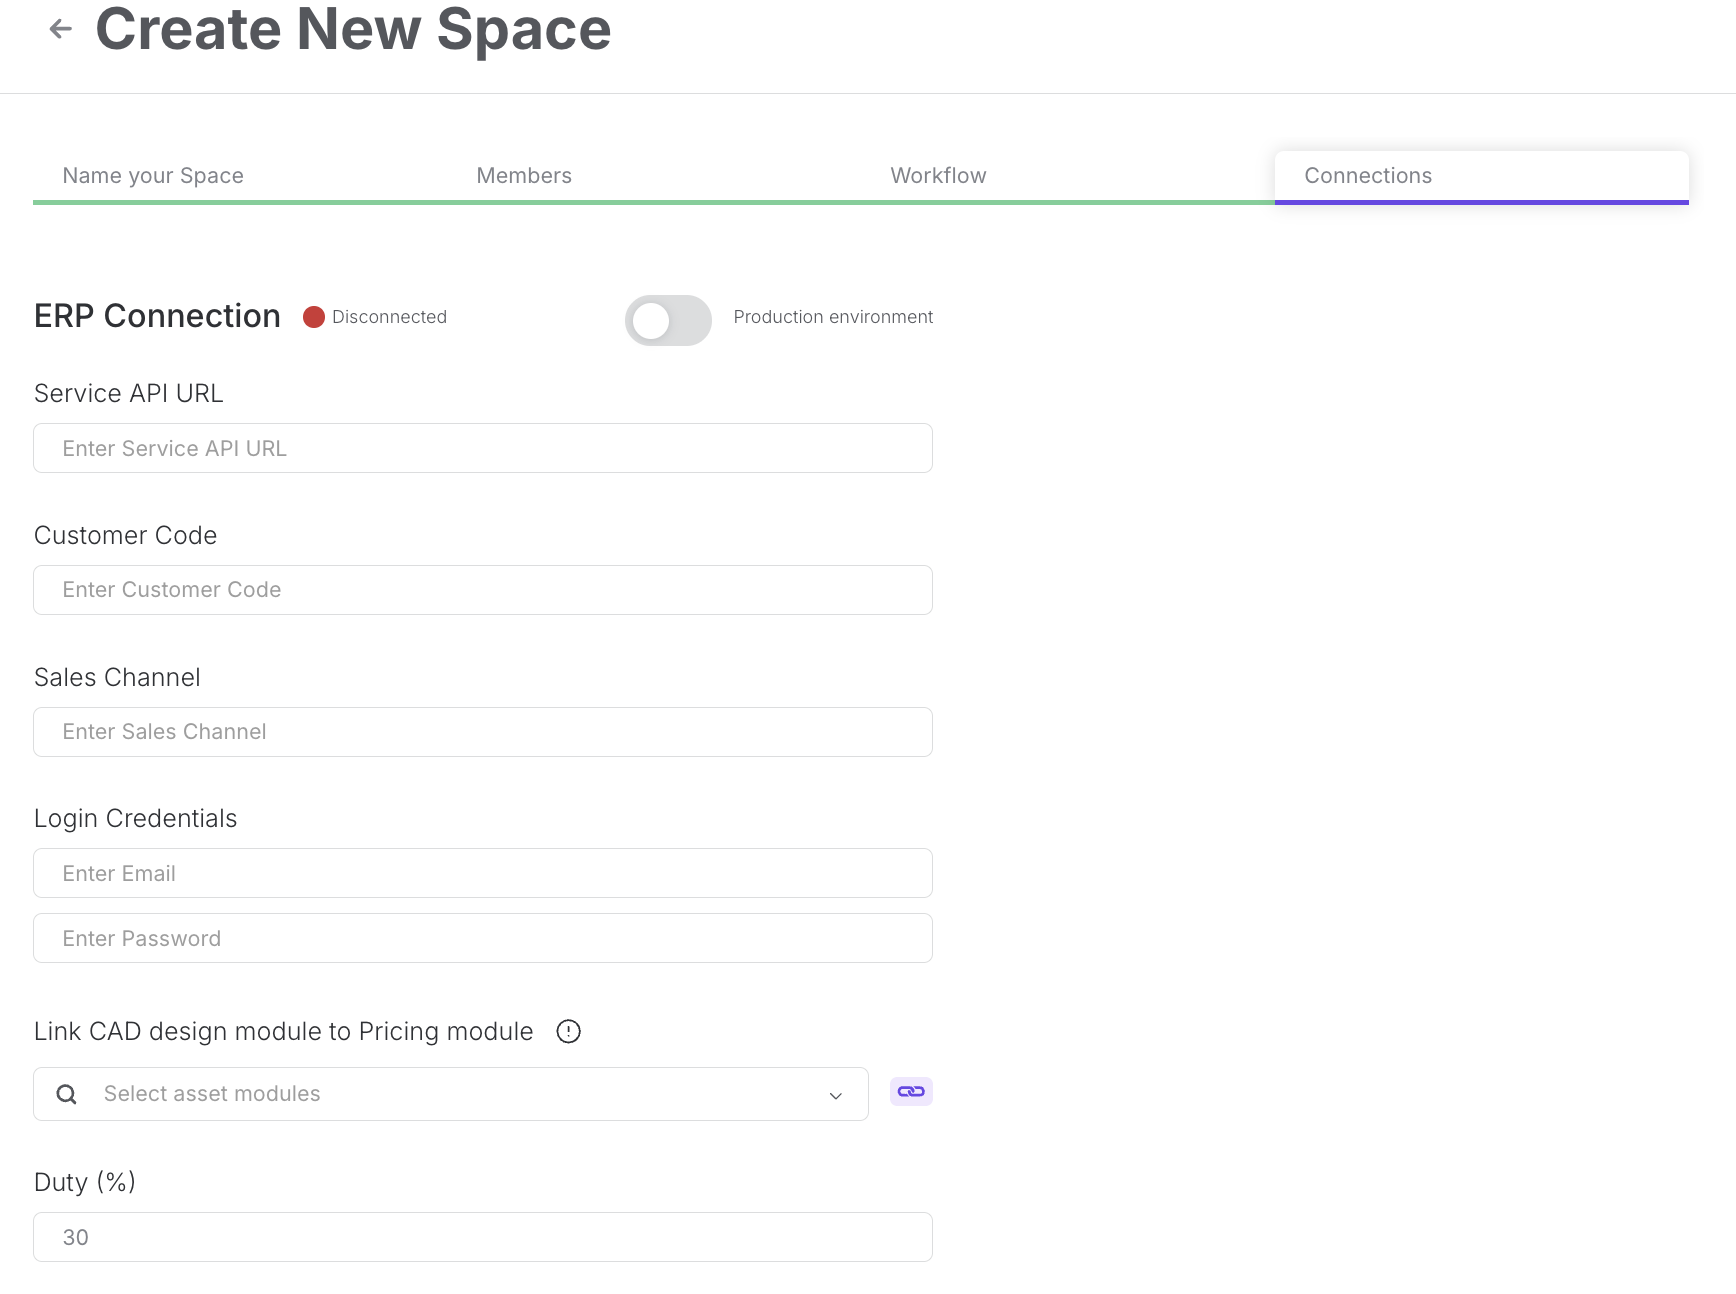
Connections
Spaces in Upsway are not only for project and workflow management — they also allow you to connect with external tools to streamline collaboration and data flow.
ERP Connection
By linking your Space to the ERP portal, you can synchronize product data, and pricing directly.
This eliminates the need to manually re-enter information and reduces errors.
Access rights to ERP must be granted in advance by your administrator
Setting up ERP connection:
Service API URL - https://services.syqor.com
Customer code and Sales channel codes should be gotten from ERP.
Logins - use your account logins
Select a CAD Design module name to create a link with the pricing tool.
Duty (%) - Used for pricing exports to include duty
ClickUp Integration
If your team uses ClickUp for task and project tracking, you can integrate it with your Space.
This allows project tasks created in Upsway to appear in ClickUp, ensuring alignment across platforms.
Integration settings can be managed from the Space configuration panel.
Tip: Enable integrations early in your project setup so the whole team benefits from synchronized workflows right from the start.
Client - Search Style
Table of Contents
Table of Contents
Overview
Each project contains one or more styles. Styles represent specific product designs and their related assets (drawings, 3D files, costing).
The Search Style feature allows you to quickly locate a style by entering its unique style name, saving you time and ensuring accuracy.
Functional description
After logging in to Upsway, the Global Dashboard displays all projects you have access to. Each project contains a list of associated styles.
Inside a project view, a search bar is available at the top.
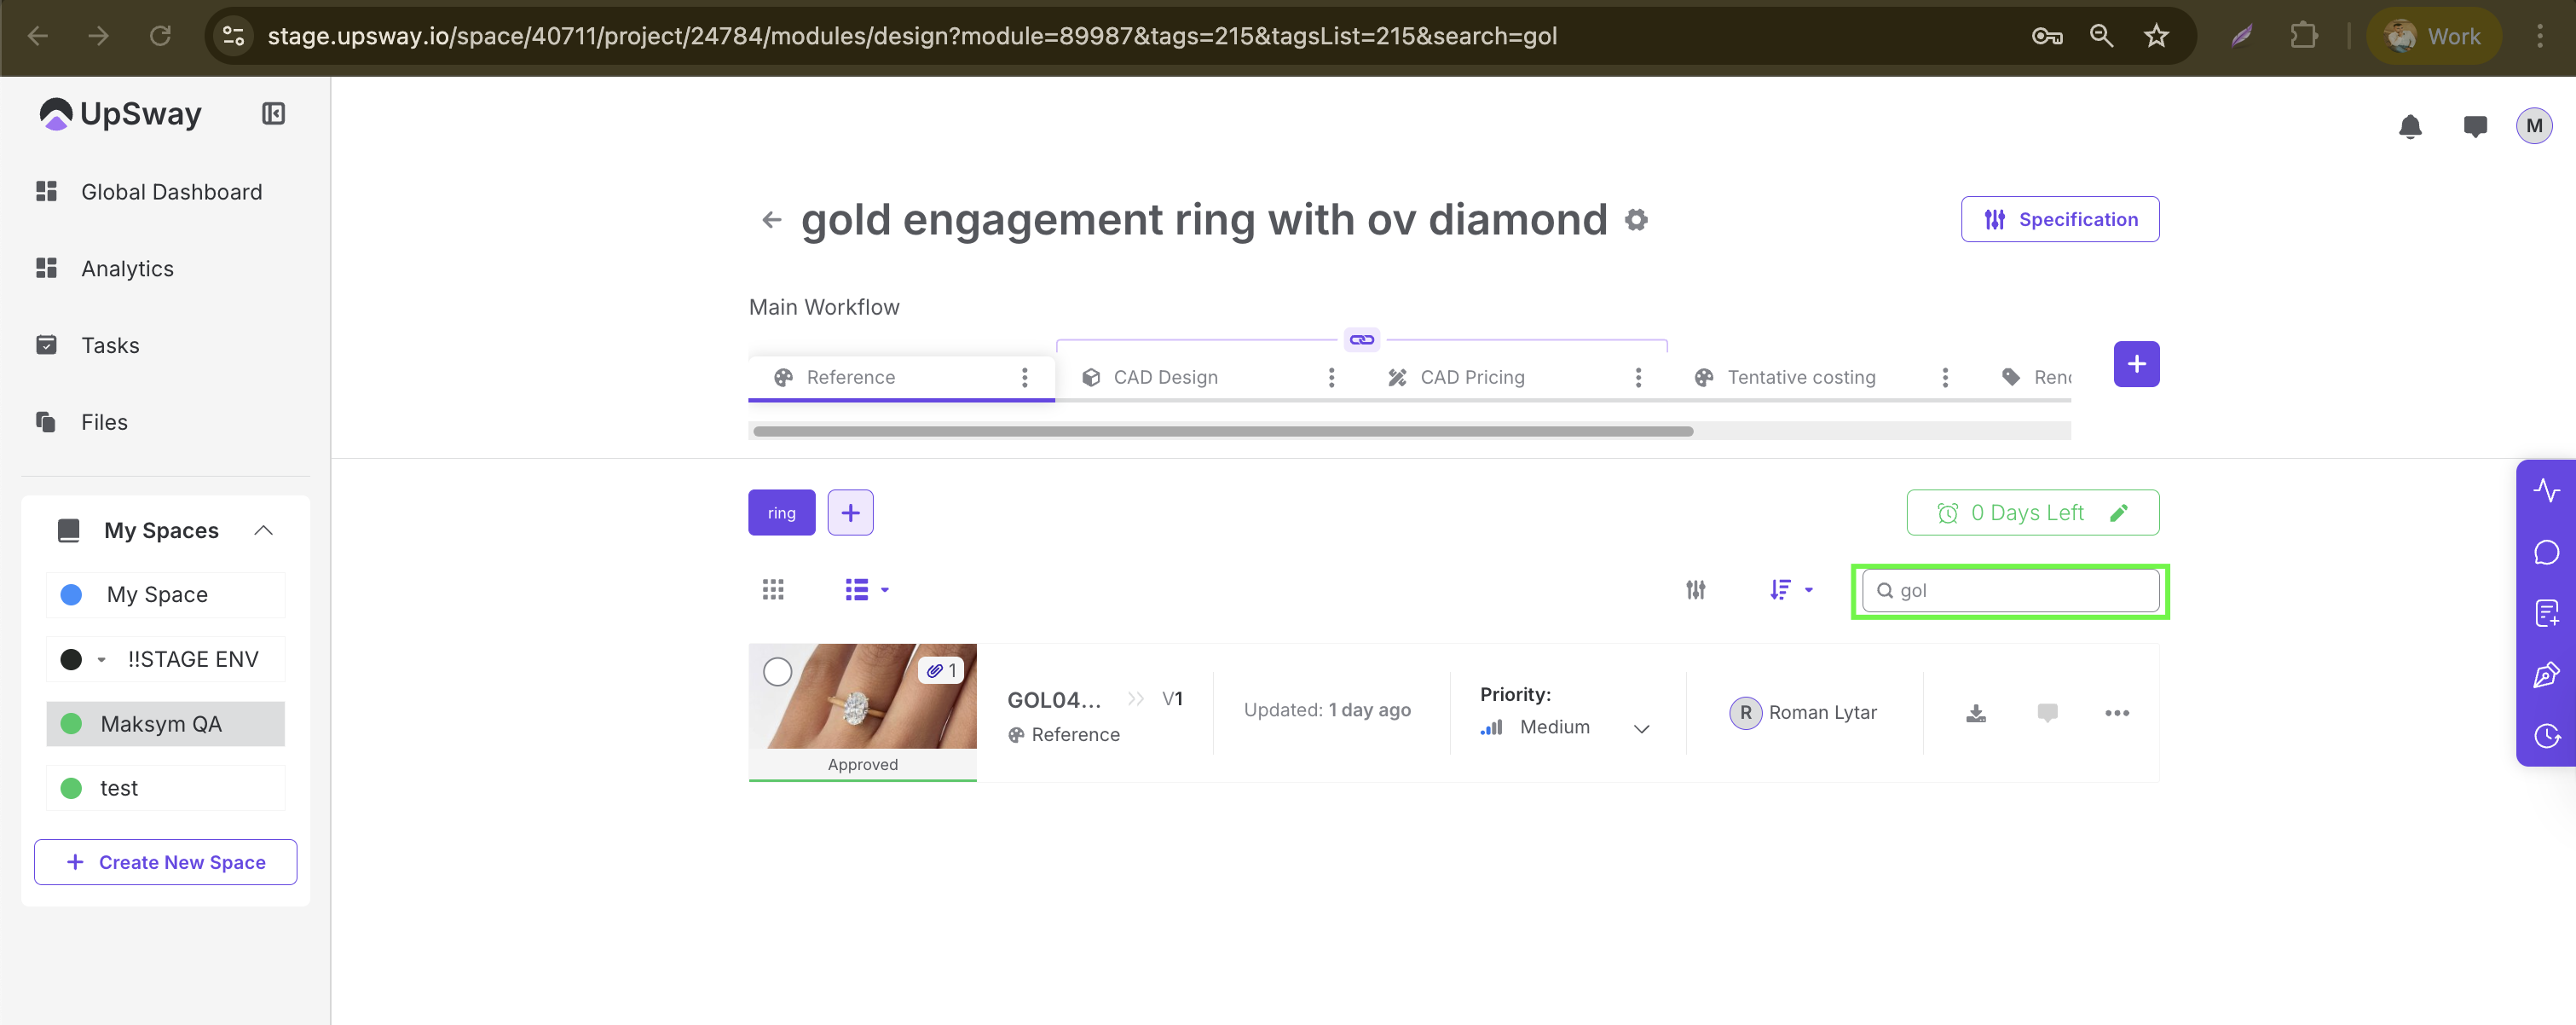
You can enter either:
A single letter or partial style name/number to see all matching results.
The full style name to directly open the exact style.
Press Enter after typing, and the system will return the relevant styles. This flexibility makes it easy to find what you’re looking for, even if you only remember part of the style name.
Tip: Use at least one unique letter or number combination from the style name to quickly filter results.
If a style cannot be found:
Confirm that it belongs to the selected project.
Double-check the name for typos.
Client - Create New Project
Table of Contents
Table of Contents
Overview
The Create New Project feature in Upsway is designed to help you set up a new product initiative inside a Space. A project acts as a structured container for all relevant details — from product information and vendor data to manual specifications, briefs, and supporting files.
Creating a project ensures your team has a single, shared reference point for product development and collaboration.
Create New Project
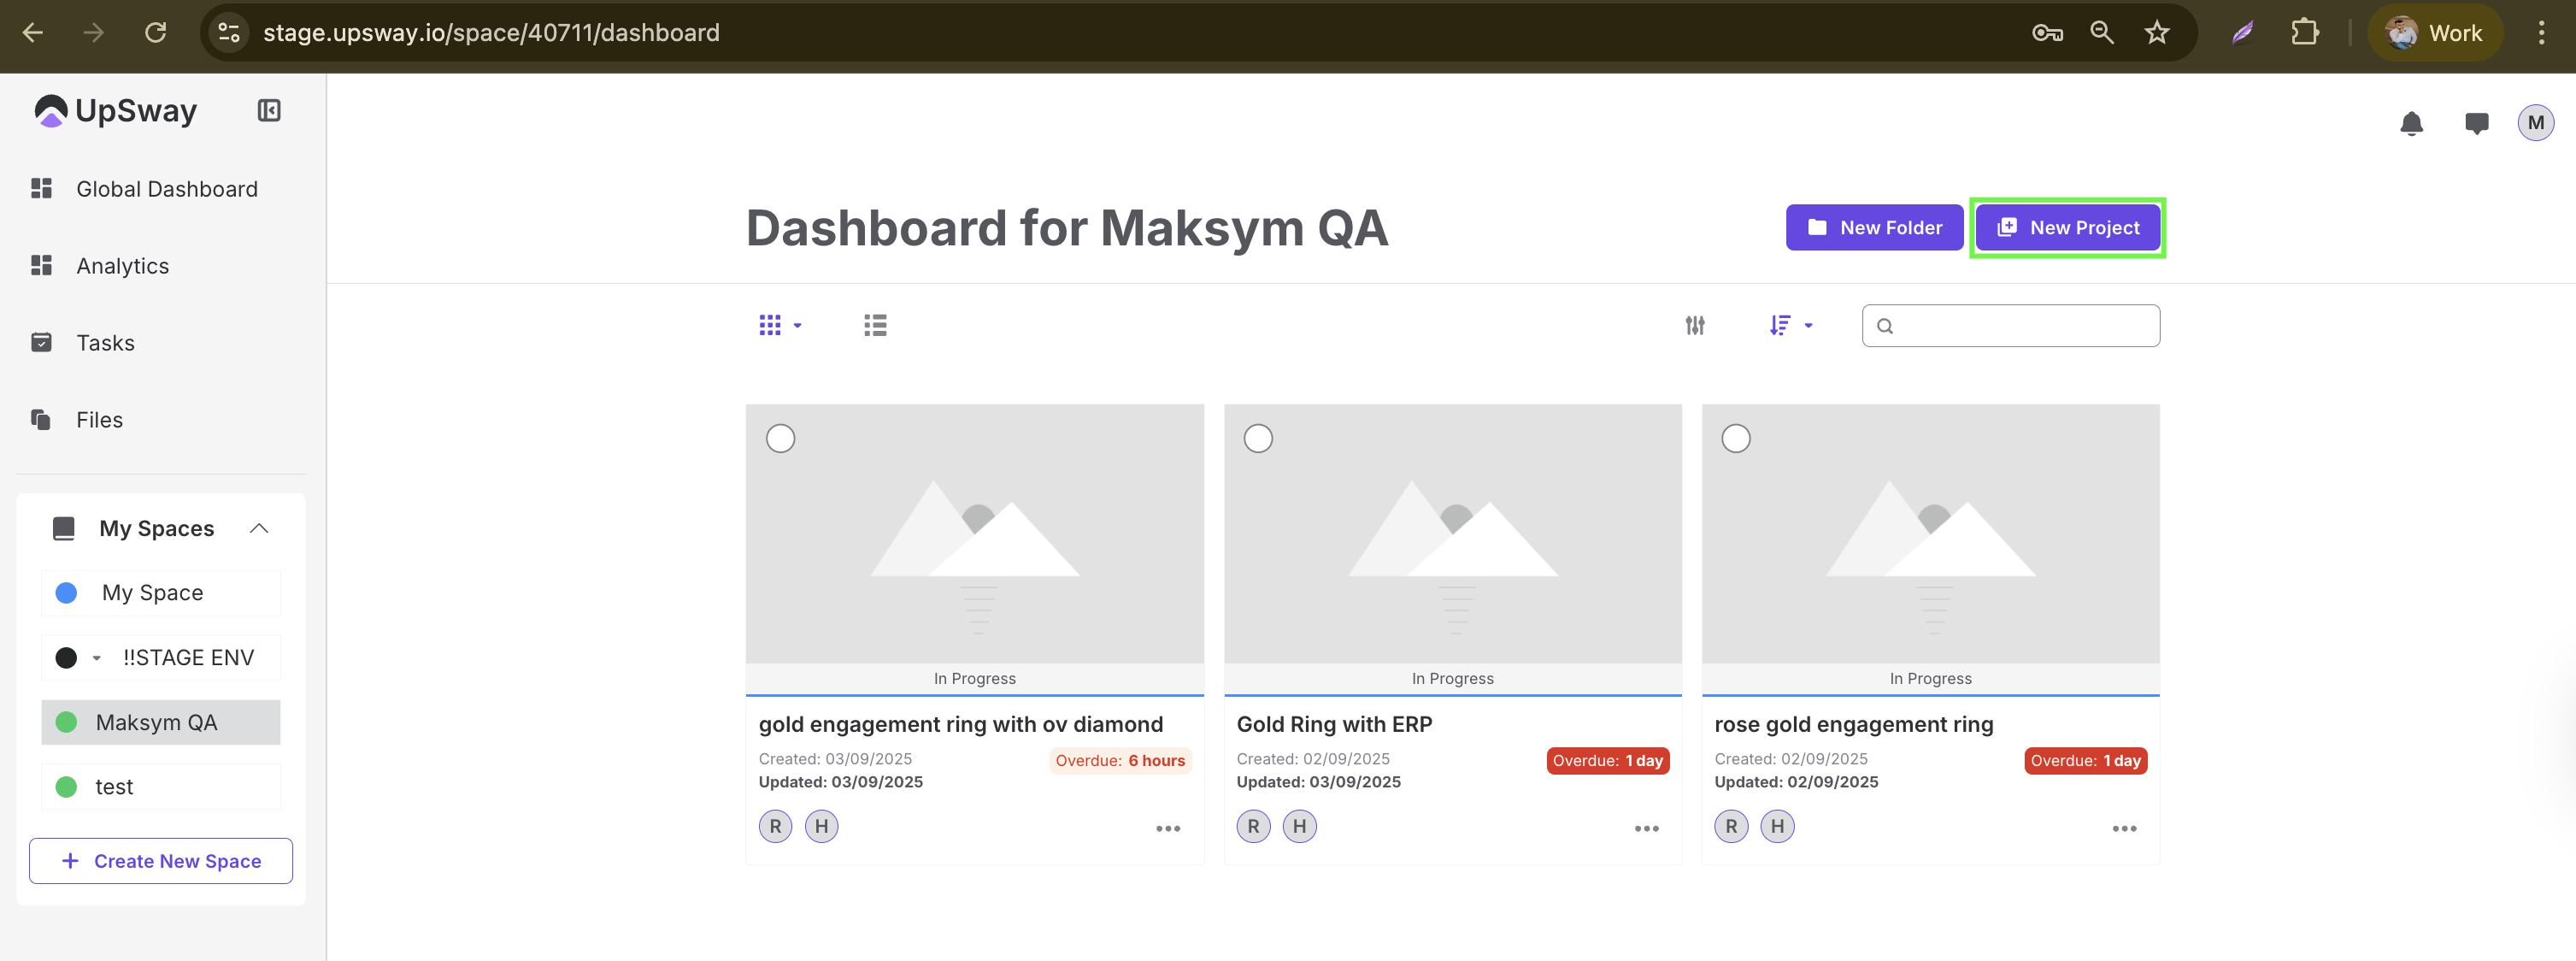
To create a new project, navigate to the desired Space and click the New Project button at the top.
When creating a project, you will see a form divided into several sections. Each section captures specific details about your new project.
Project Information
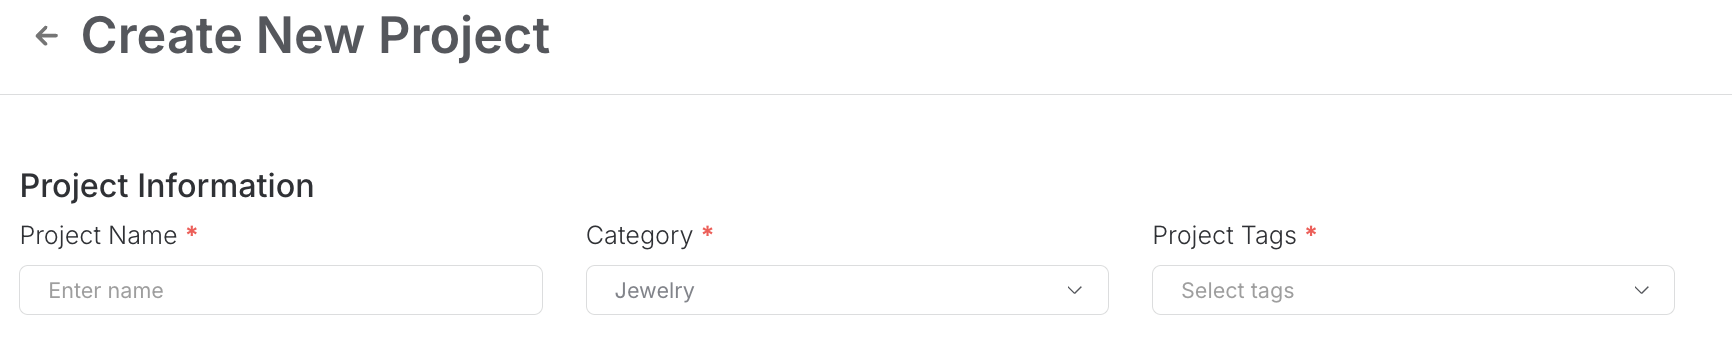
Project Name* – the official name of your project.
Category* – select the category (e.g., Jewelry).
Project Tags* – choose tags that help classify and filter your project later.
Vendor Settings
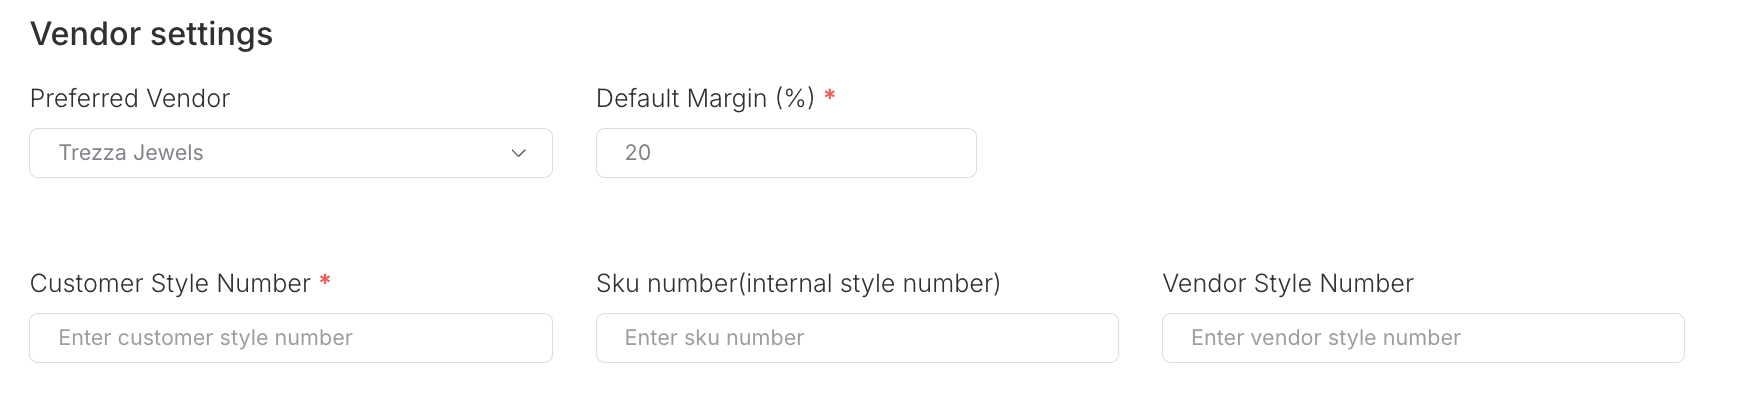
Preferred Vendor – pick a vendor from the dropdown list.
*Default Margin (%) – define the default margin for pricing.
Customer Style Number* – a required field for customer reference.
SKU Number – the internal style identifier used in your system.
Vendor Style Number – the identifier provided by the vendor.
Jewelry Type

Select the type of jewelry your project belongs to (e.g., Engagement Ring, Eternity Band, Necklace, etc.). If your product type is not listed, select Other.
Note: Project Tags and Jewelry Type should always match. If they differ, you won’t get correct pricing when working with the CAD pricing module.
Project Details
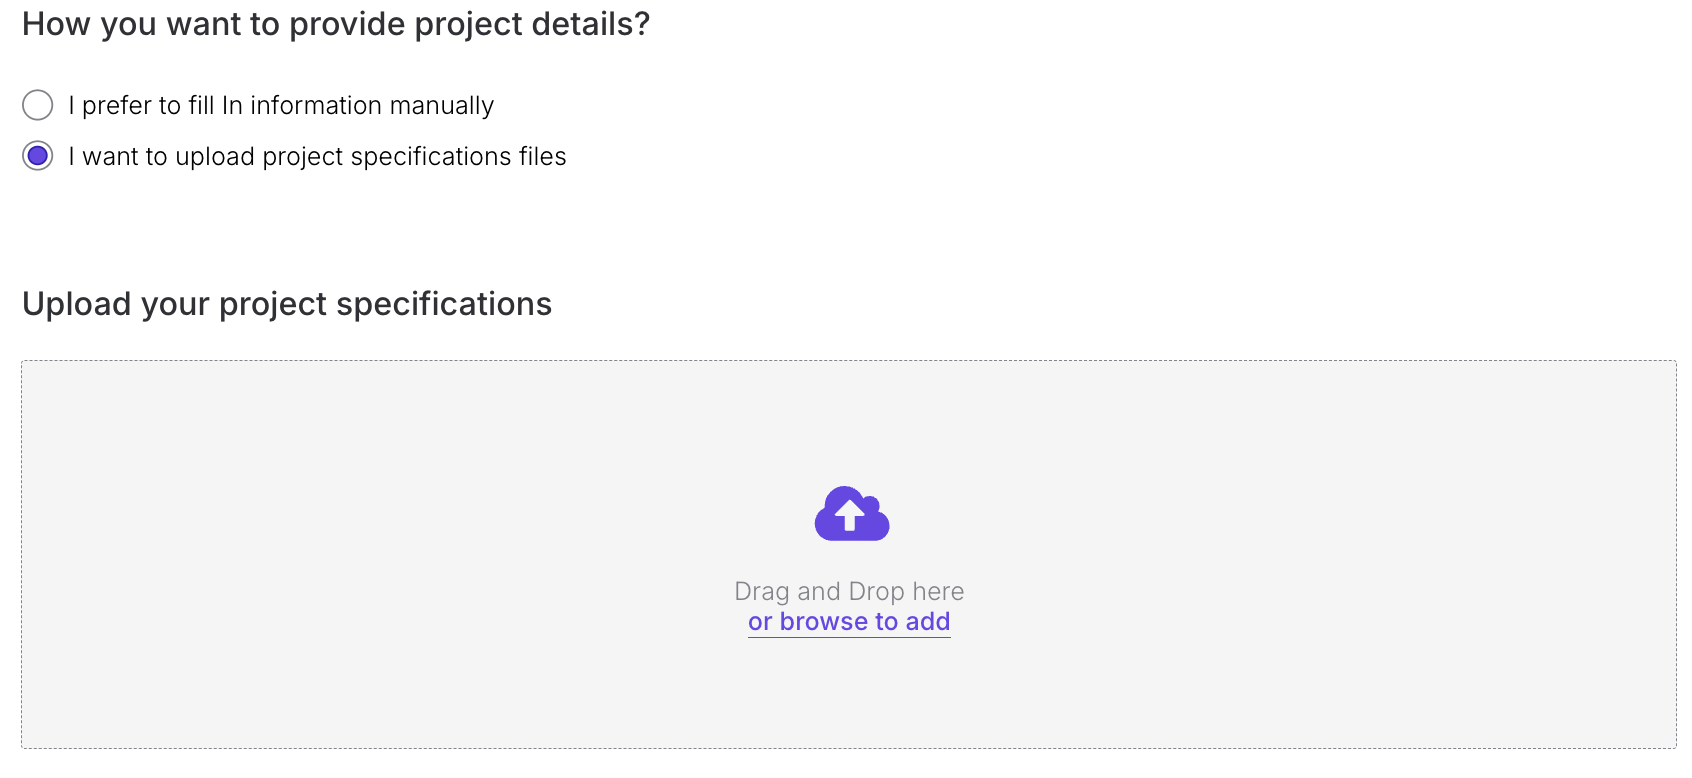
You can decide how to provide project details:
Manual entry – fill in fields directly in the form.
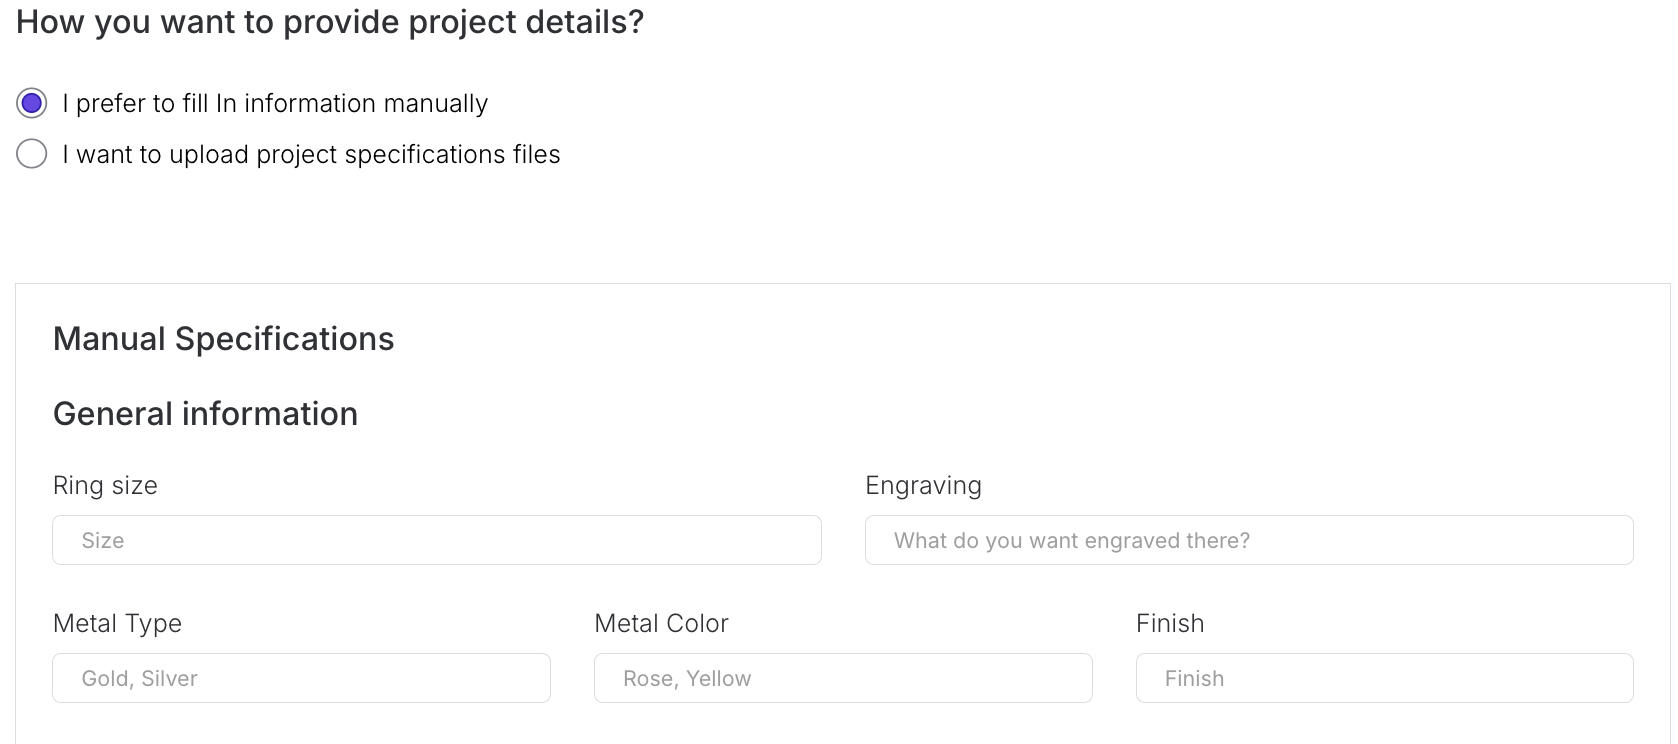
Upload specifications – attach specification files if you already have them prepared.
Manual Specifications
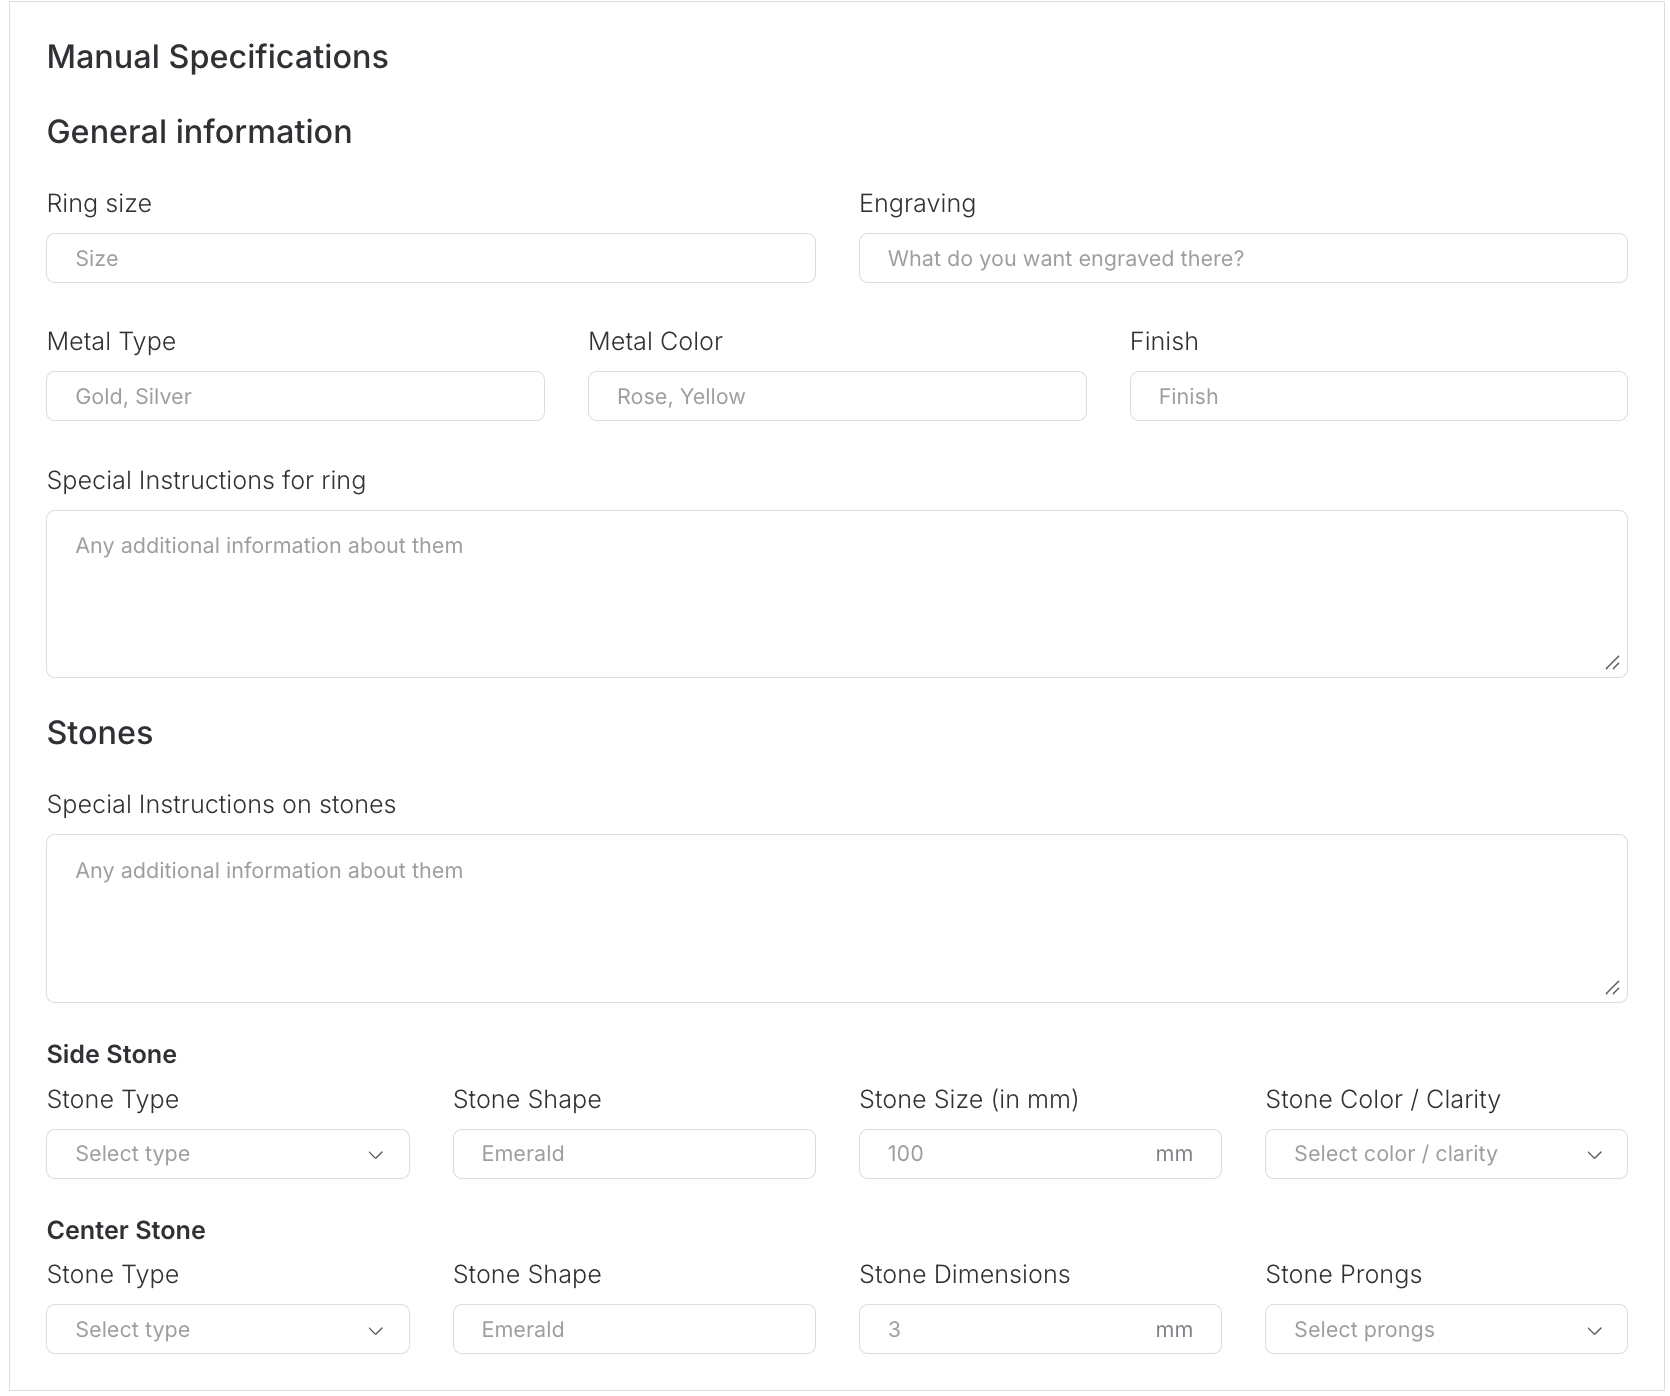
If you choose to enter details manually, you can specify:
General information – ring size, engraving text, metal type, color, and finish.
Special instructions – add notes for the ring or other components.
Stones section – describe side stones and center stones, including type, shape, size, color/clarity, dimensions, and prong settings.
This section ensures the design requirements are captured in detail.
Project Brief
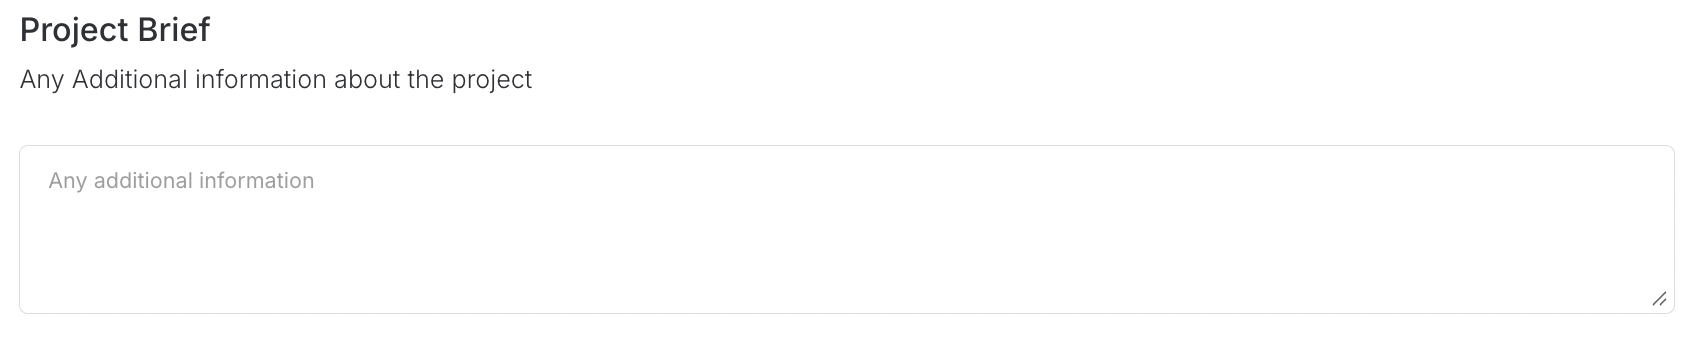
Use this field to summarize the overall goals, context, or any additional information about the project.
Attachments
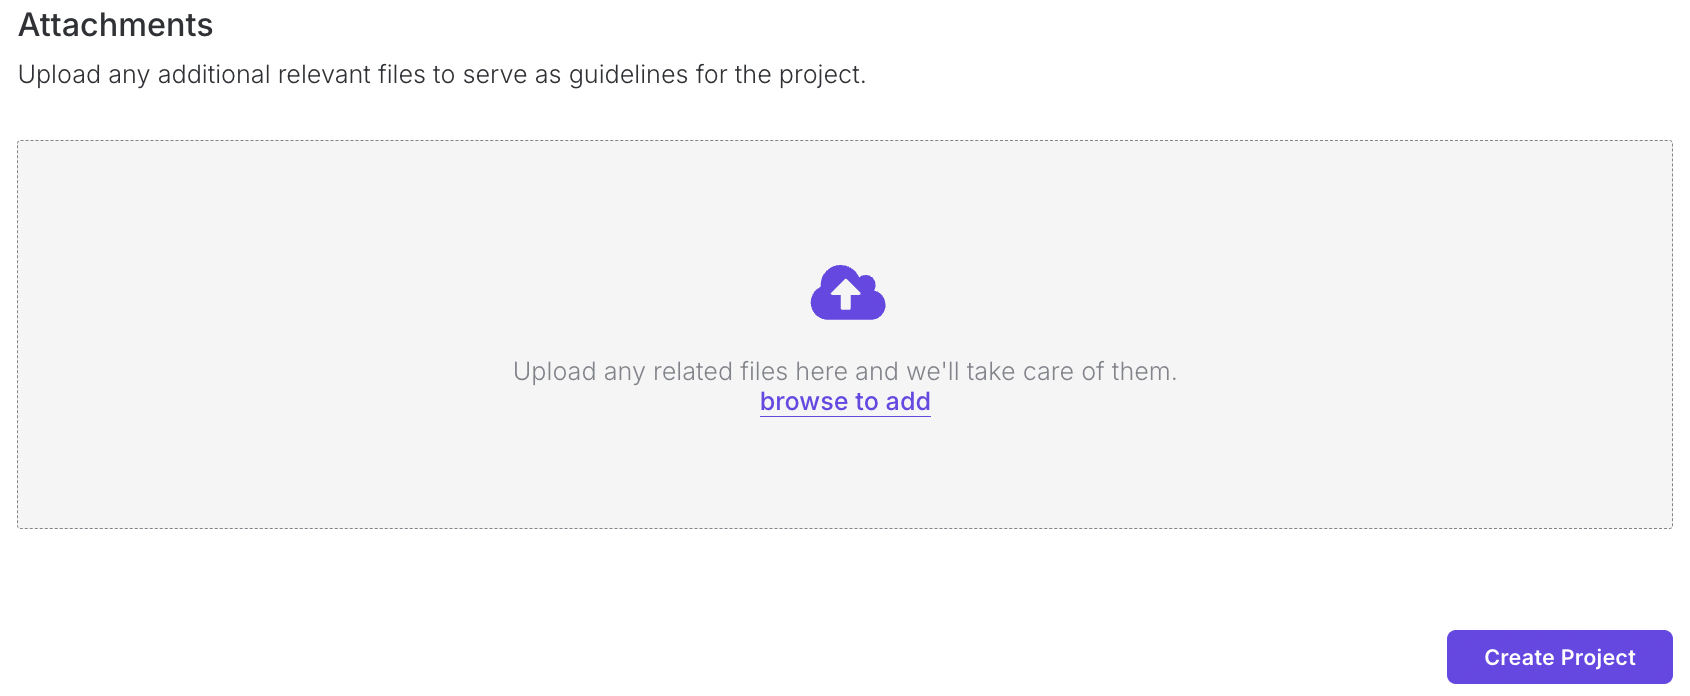
Upload supporting files, such as sketches, technical drawings, or references. These attachments serve as guidelines for the team.
Finalizing the Project
Once all information is filled in:
Click Create Project.
The project will be created successfully, and you will be redirected to the Style View page, where you can start defining styles.
Notes
Provide as much detail as possible in the Manual Specifications section — this reduces back-and-forth during the design phase.
Attachments are optional, but uploading reference files (sketches, images) makes it easier for your team to align on requirements.
Fields marked with an asterisk () are mandatory and must be filled in before you can create the project.*
Client - View Existing Project
Table of Contents
Table of Contents
Overview
The View Existing Project feature in Upsway allows you to access projects that have already been created. From the dashboard or your Space, you can open a project to see its details, designs, pending assets, and related comments. This ensures you always have visibility into the current status of your work and can quickly collaborate with your team.
View Existing Project
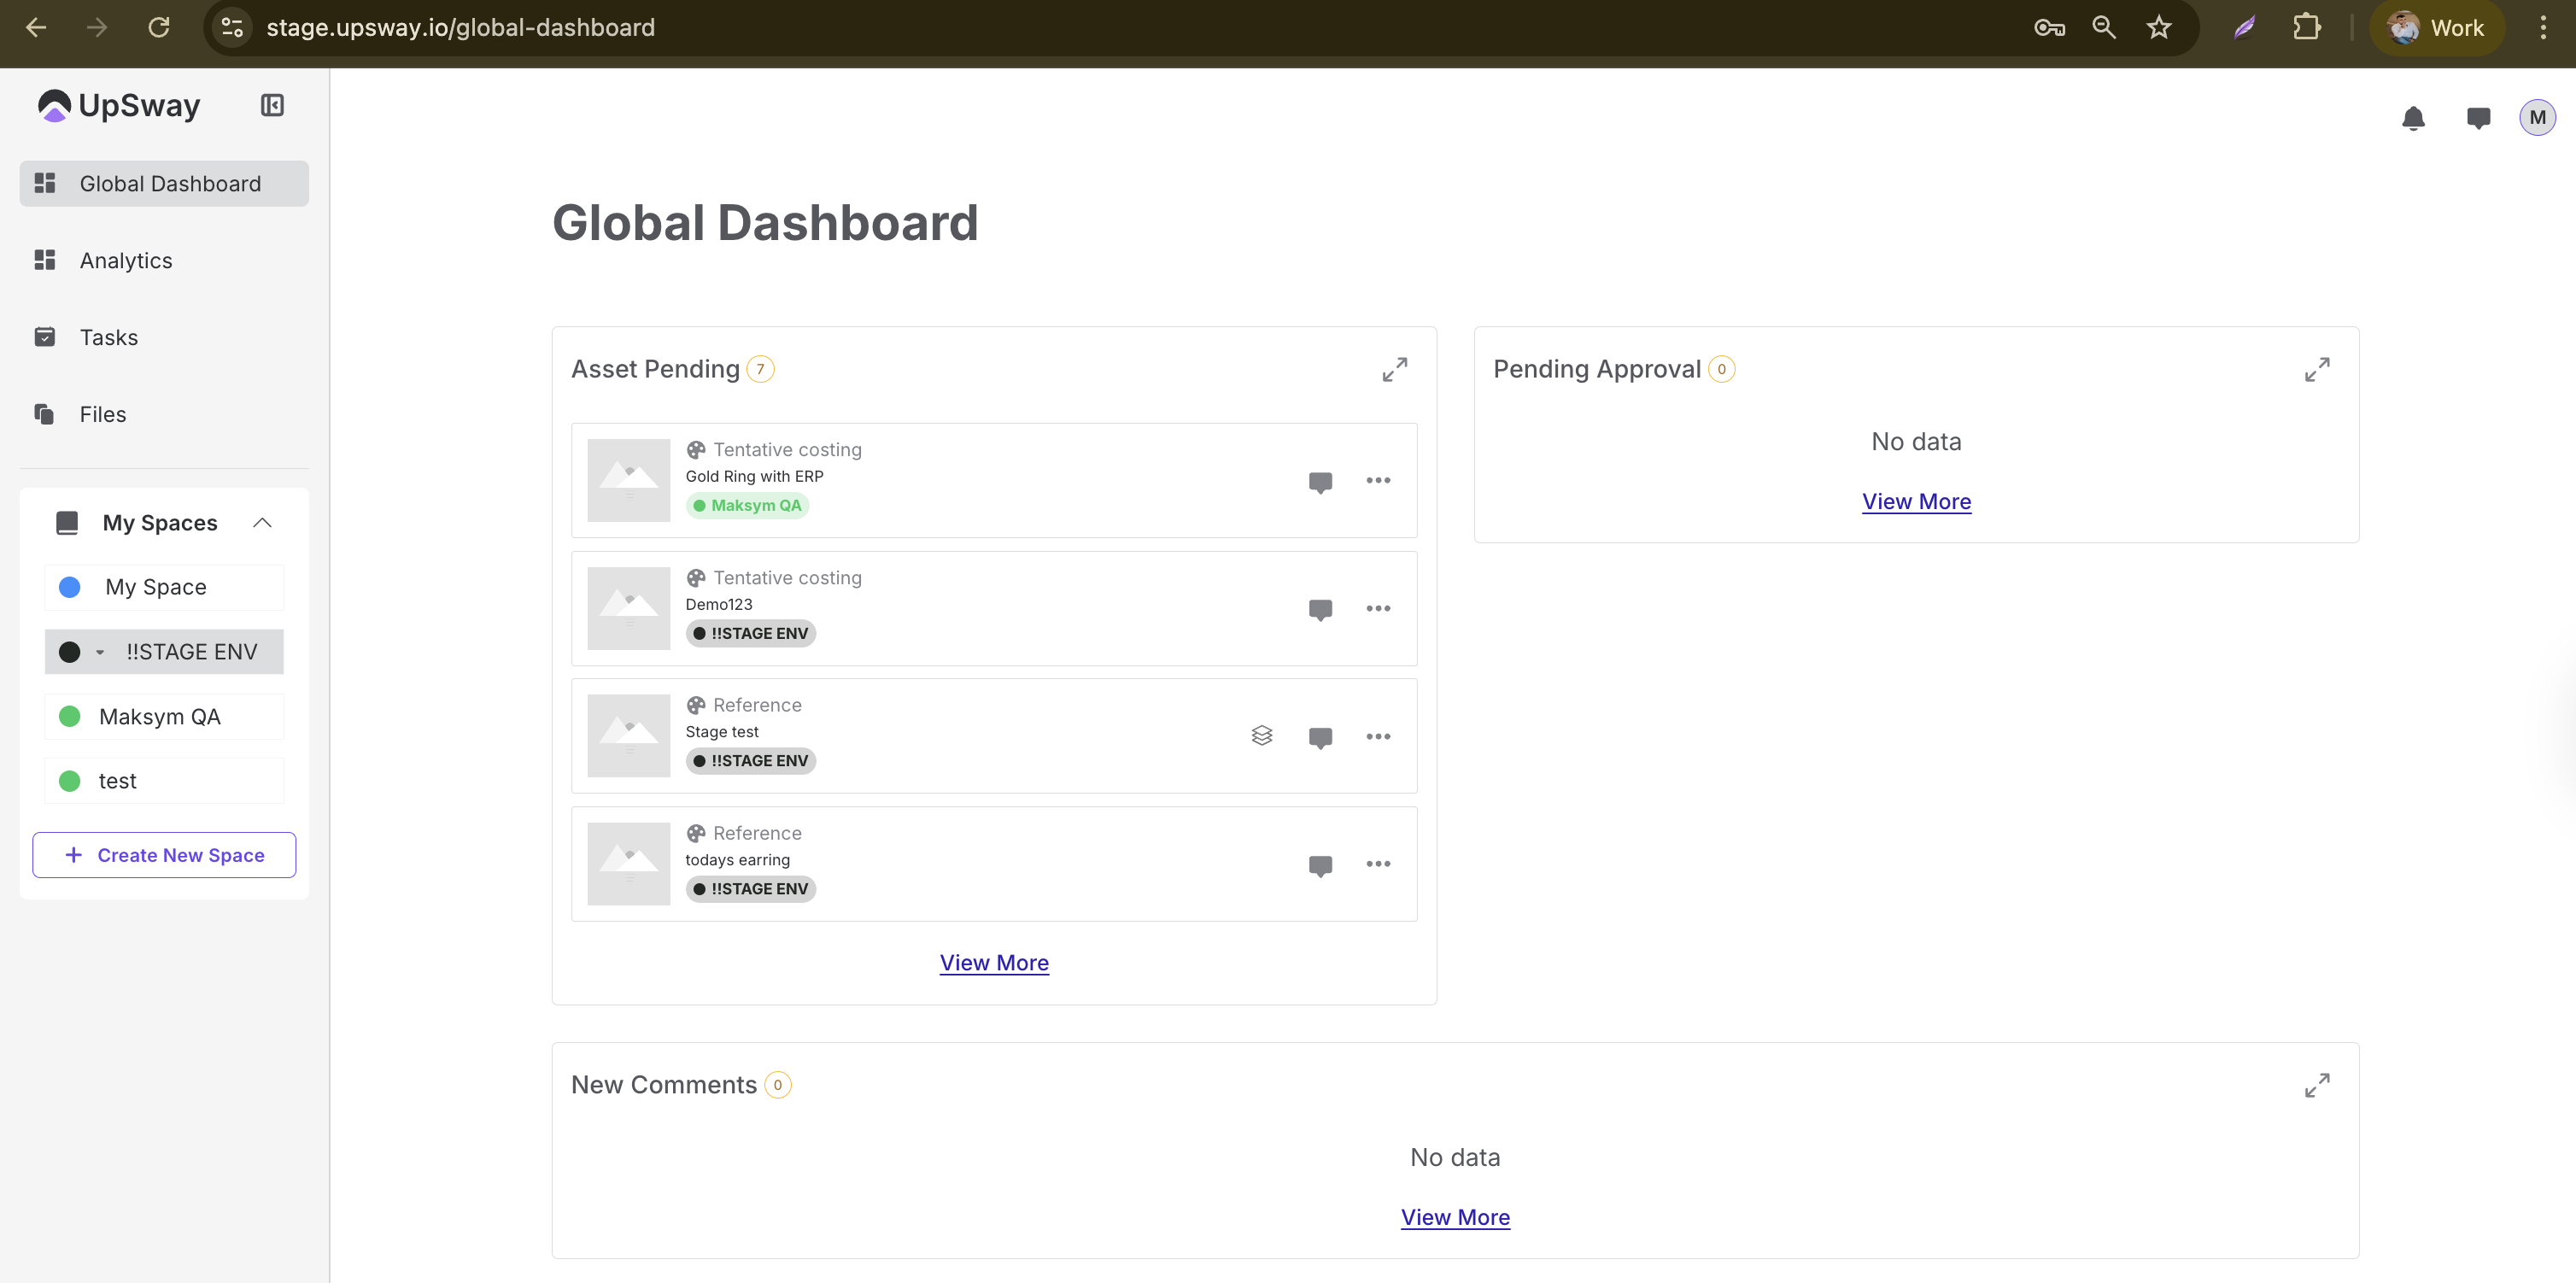
After logging in, the Global Dashboard is the central hub where you can monitor project activity. Here you will see:
Asset Pending – items waiting to be completed or uploaded.
Pending Approval – files and tasks requiring review before progressing.
New Comments – recent feedback or discussions on your projects.
To access a specific project:
Navigate to any Space you are part of.
A list of projects will be displayed.
Click on any project to open it.
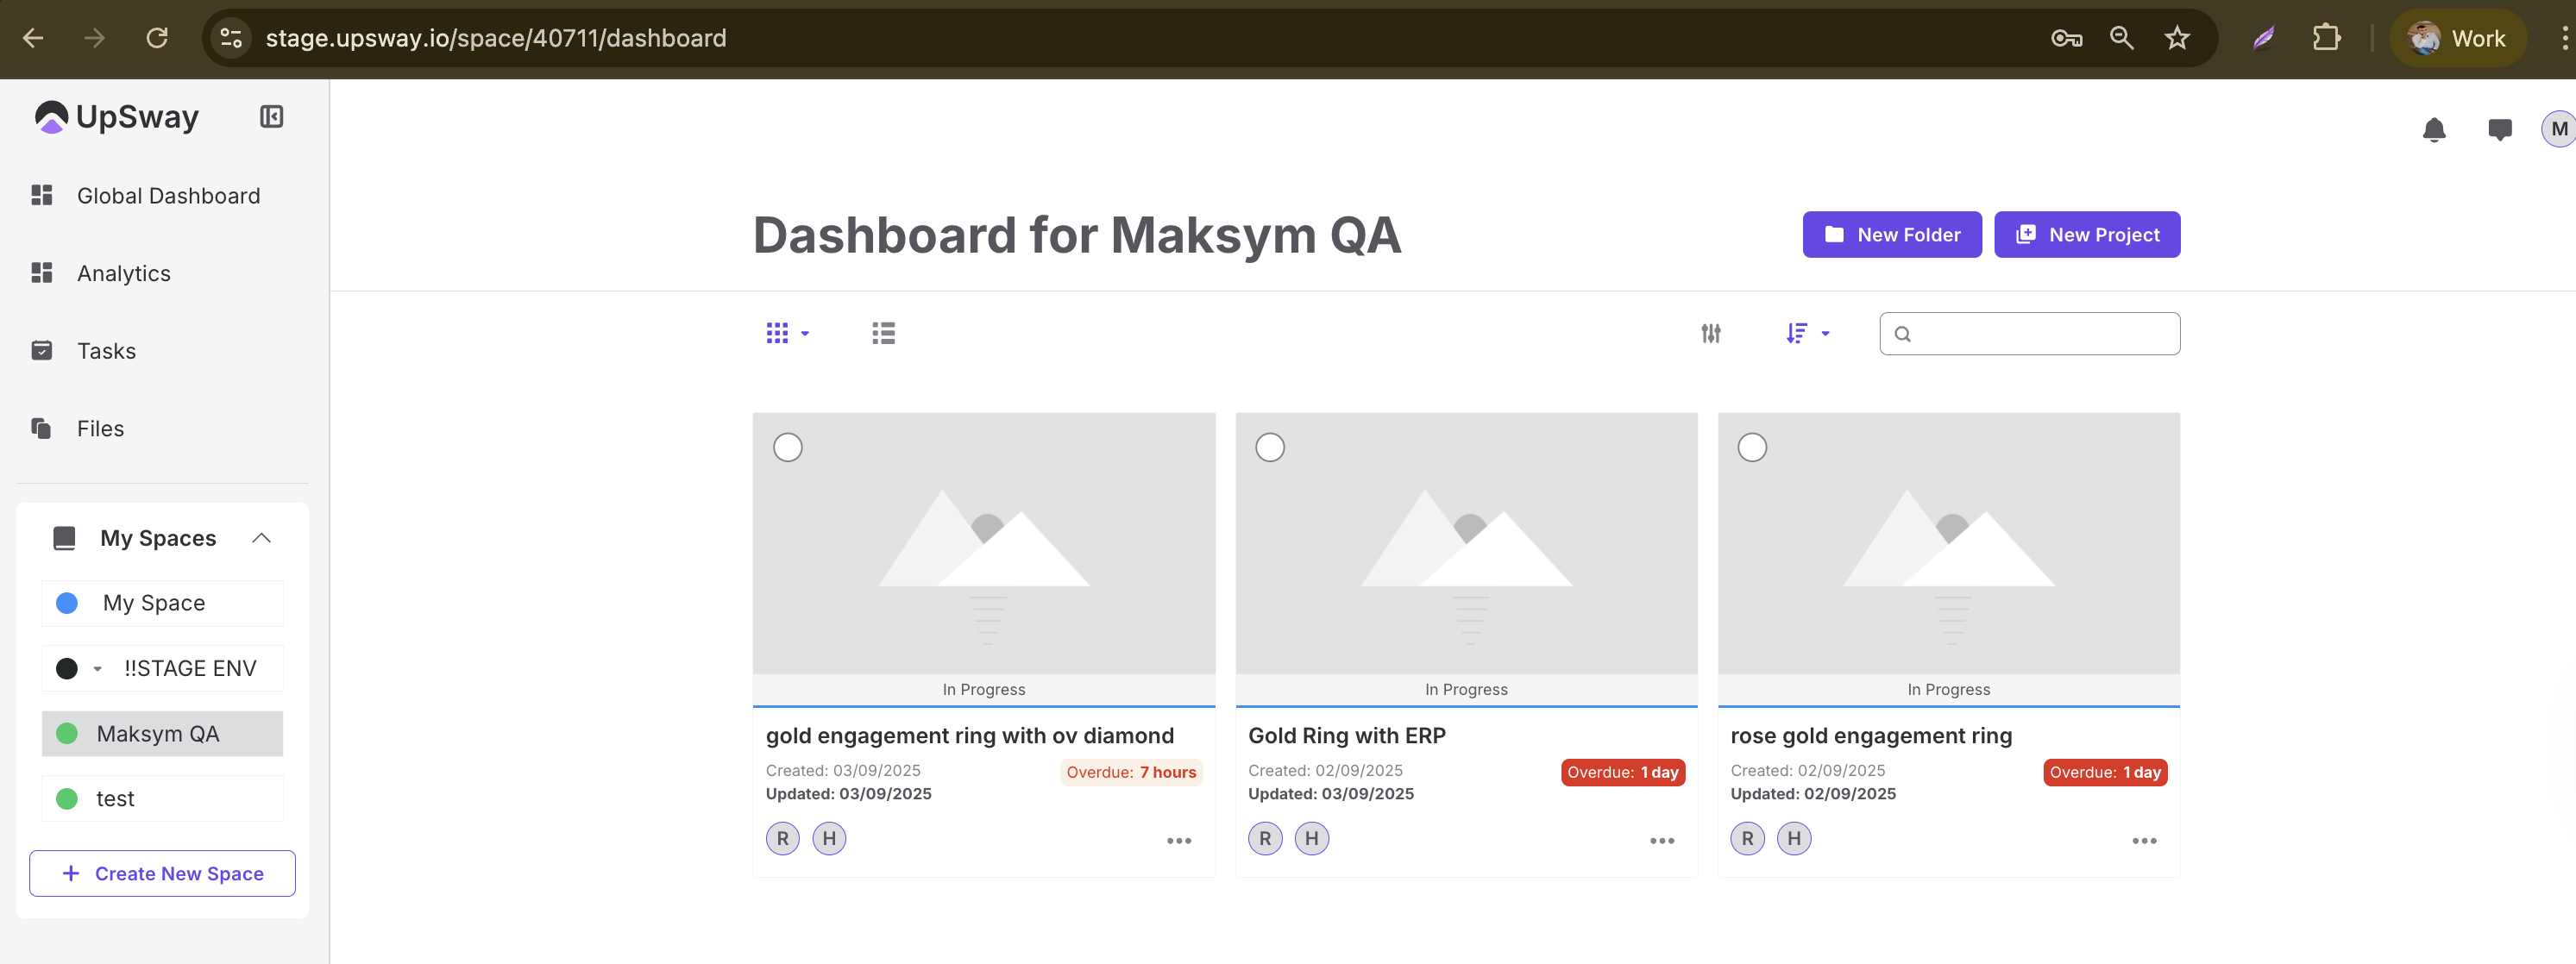
Inside a project, you can review its designs, specifications, and any attached files. This view provides a complete picture of the project’s progress and allows you to stay up to date with approvals and collaboration.
Notes
Use the dashboard overview to quickly identify which projects need your attention (e.g., approvals or pending assets).
Comments are linked directly to projects, making it easy to track feedback without switching tools.
If you don’t see your project in the list, ensure you are looking in the correct Space and that you have access permissions.
Client - Upload Asset/Asset Version in the Project
Table of Contents
Table of Contents-
Overview
The upload style feature in the project allows users to upload a style file, such as a PDF, image, or document, to a project in Upsway. This ensures that project stakeholders can access design/style references directly within the project.
Upload Asset in Style
Go to the project and upload the supporting file formats like (PDF, PNG, JPG, JPEG, DOCX, etc.). After uploading, you will see your file in the module. Like this, you can upload multiple files in the other modules as well.
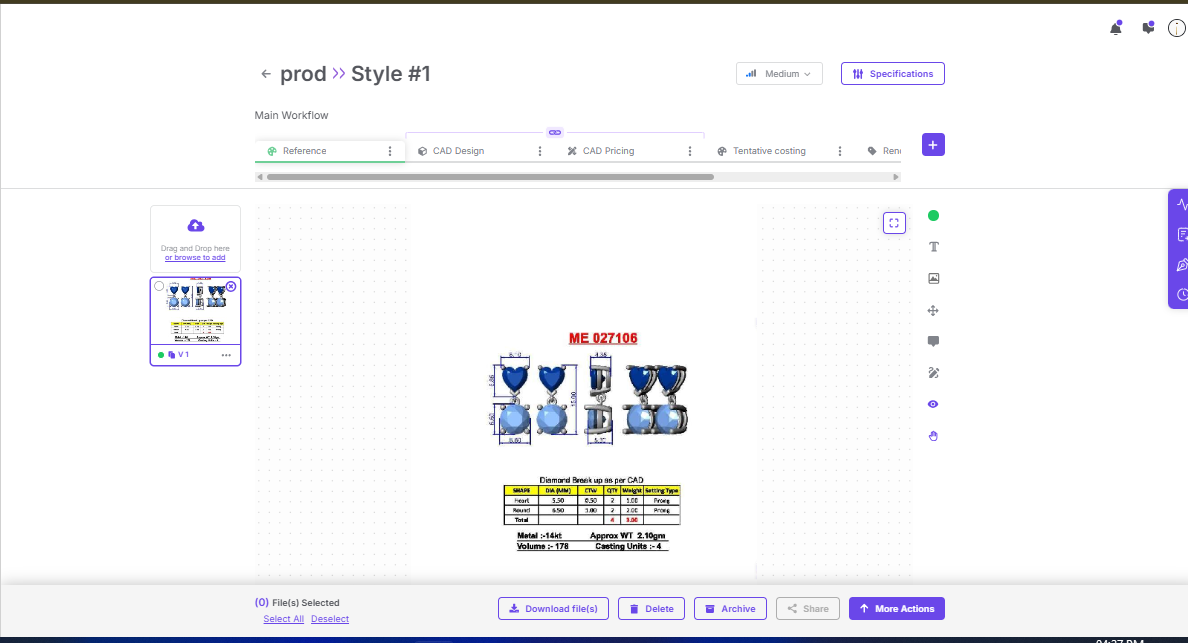
Upload Multiple Assets in Style
The user can upload asset version by using following steps:
Click on Browse> Select multiple files> Upload
Here you’re tracking a collection of files that together define the style.
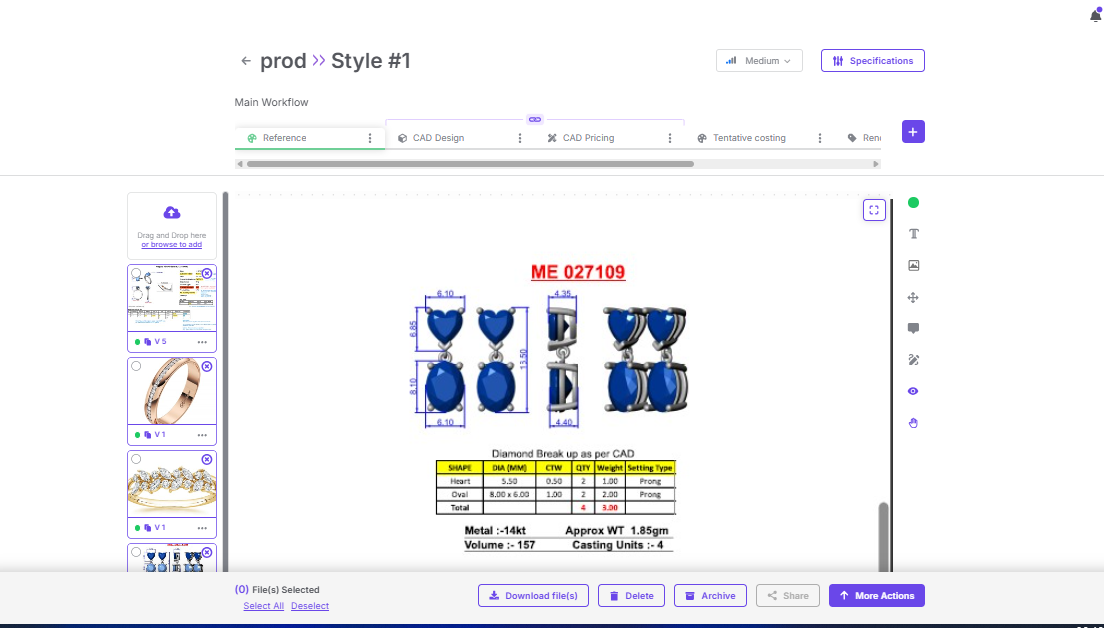
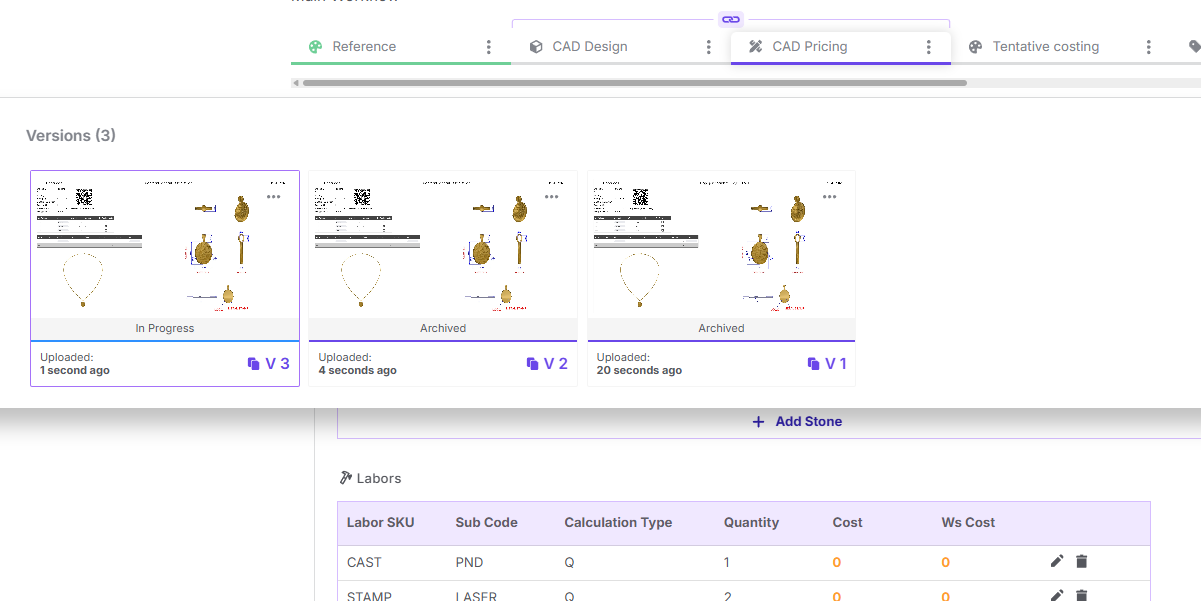
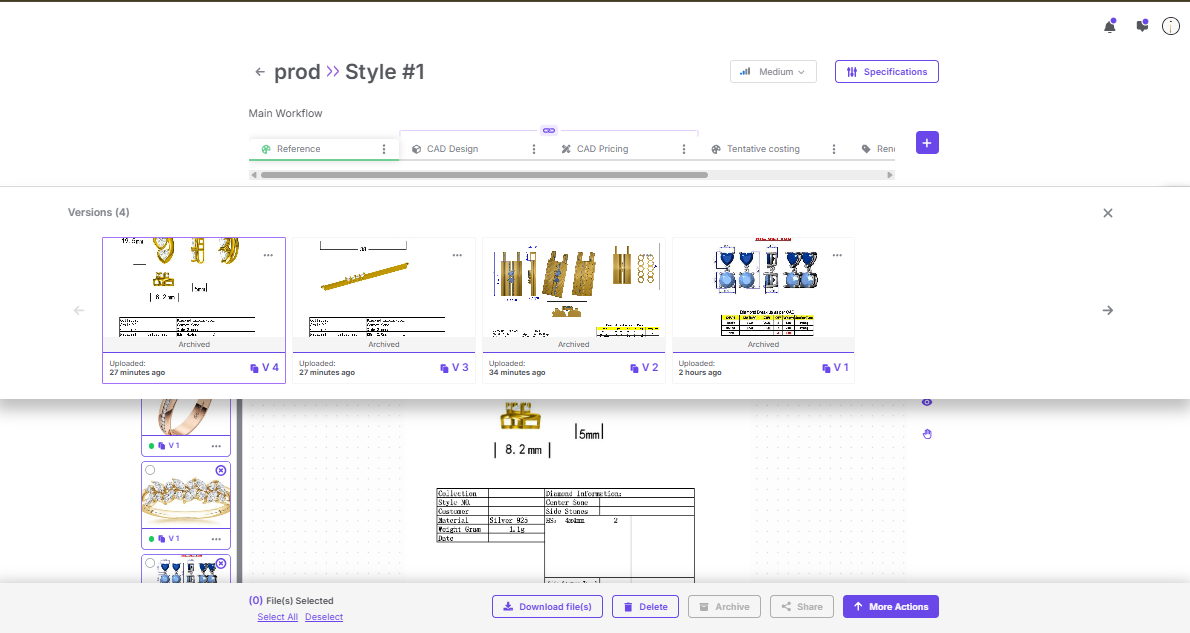
Asset Version
The user can upload asset version by using following steps:
Open asset> Click on 3 dots> Upload Fix/New version
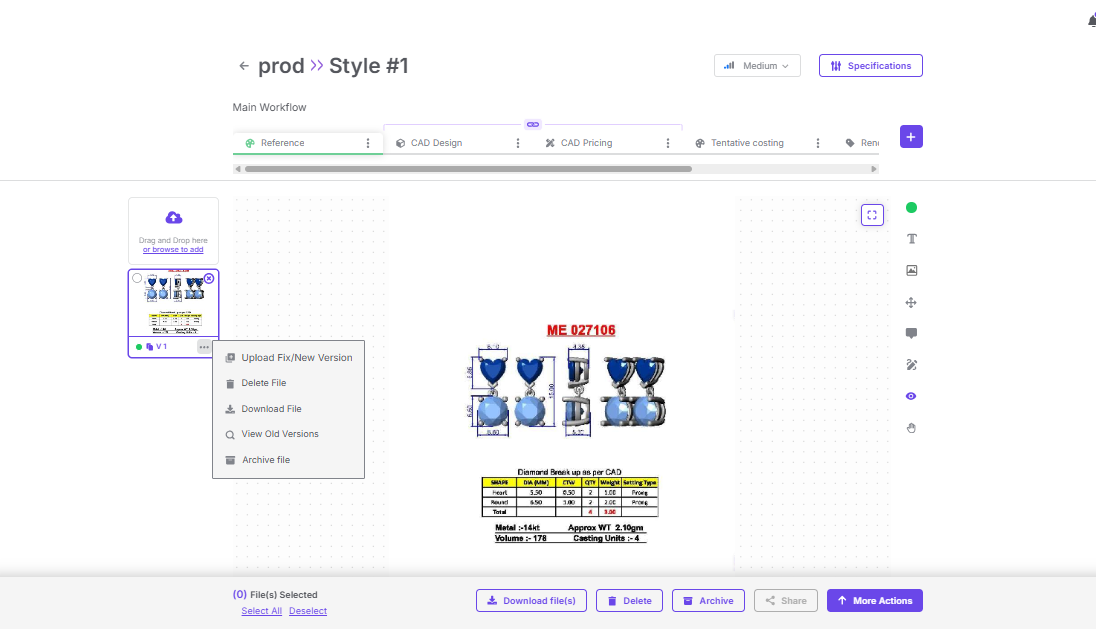
Once you upload a new asset, Upsway does not overwrite the old one. Instead, it saves it as a new version such as (V2, V3,…), while keeping the older ones as history.
So, Current = Approved, Old = Archived.
And once you click on view old versions you will see all old versions as shown in screenshot.
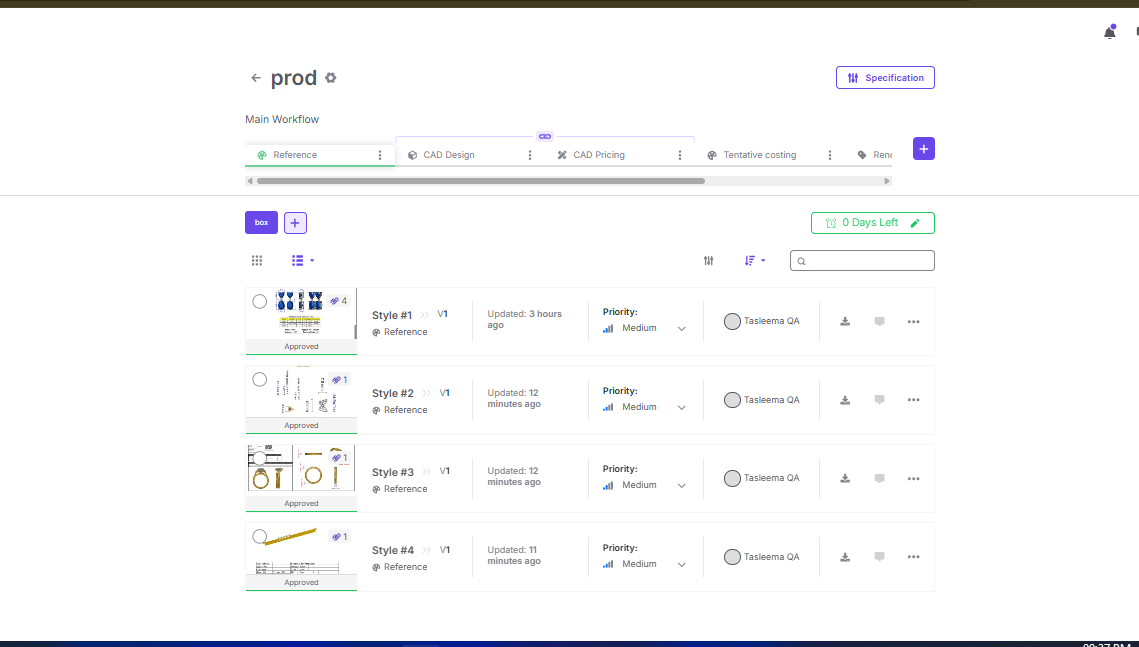
Multiple Style Upload in Project
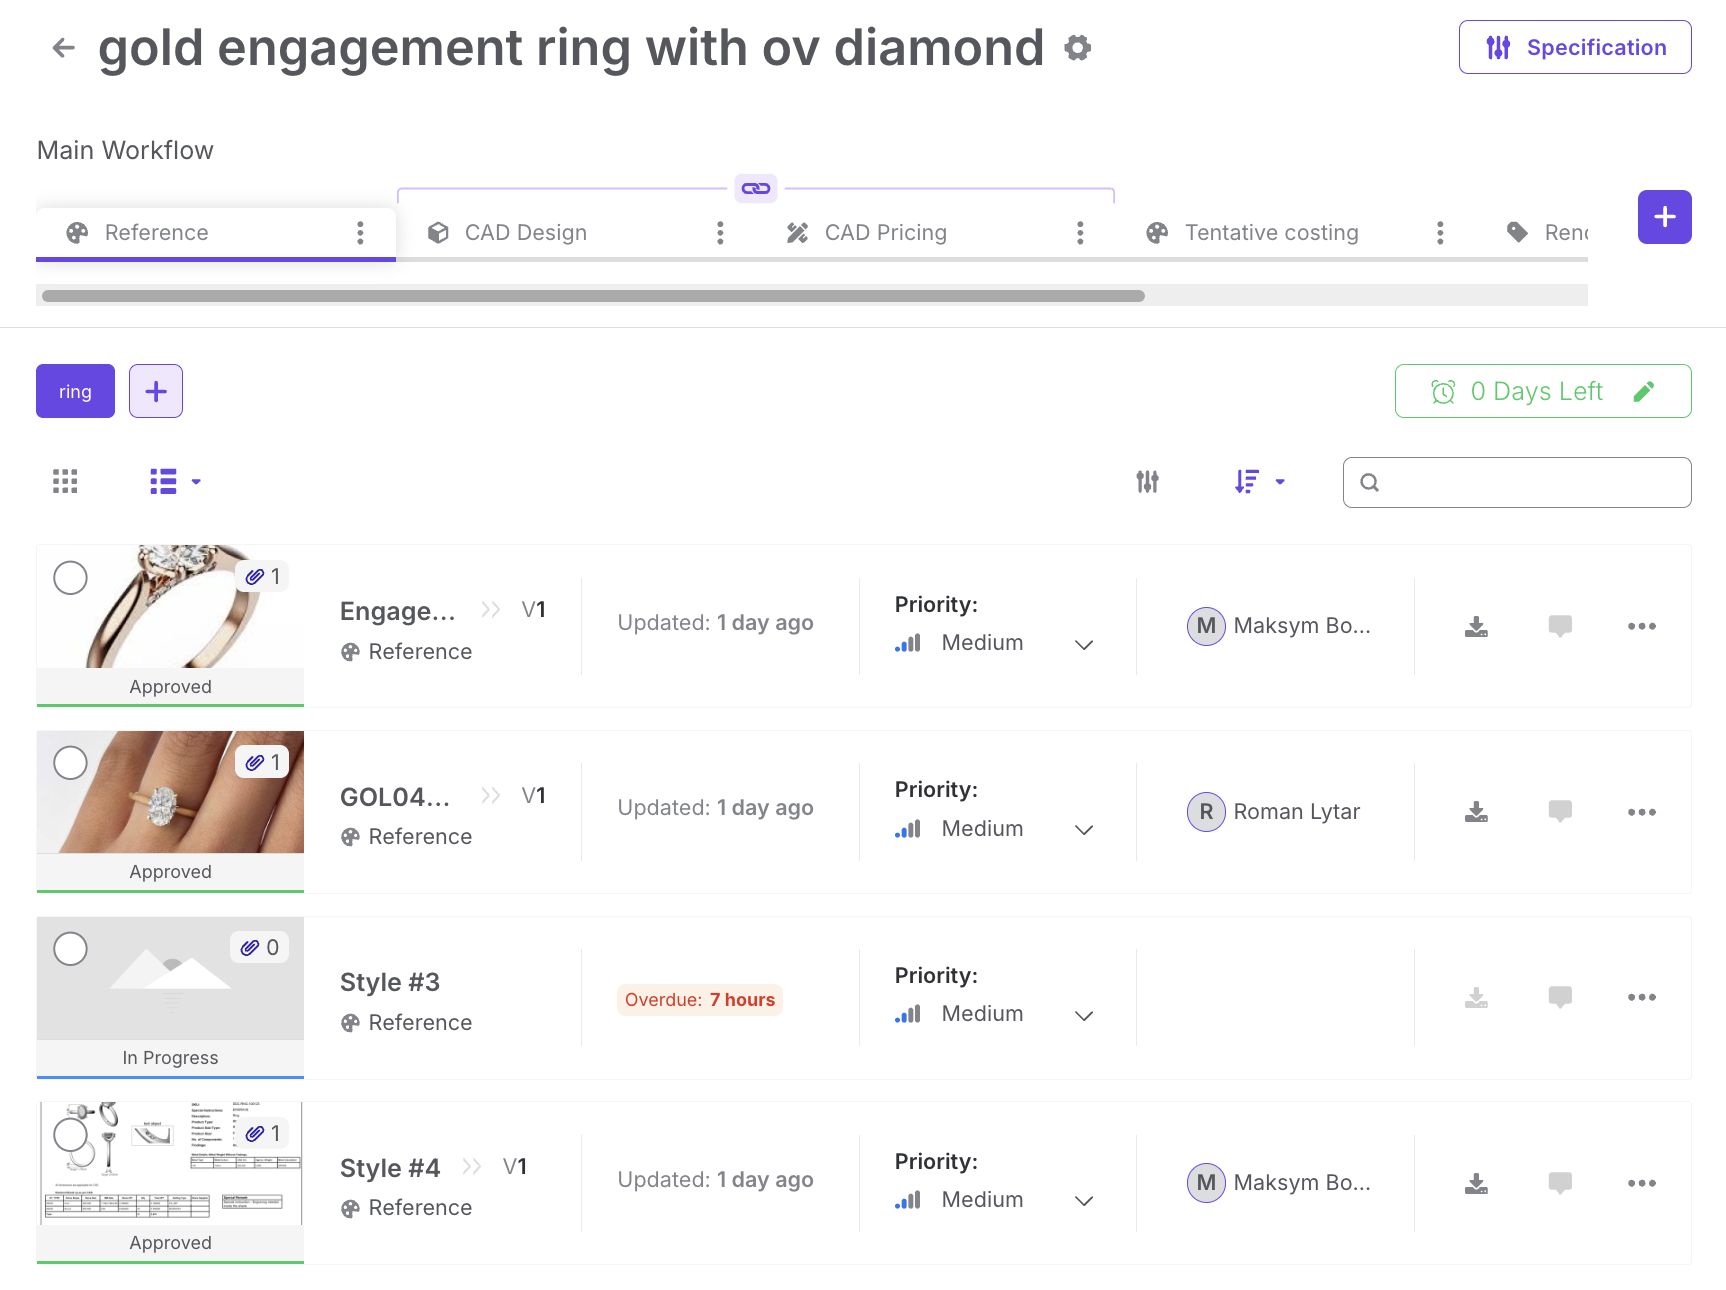
The user can upload many styles together in one go. And each uploaded file will becomes its own style entry in the project.

A style means a design (like one ring, pendant, or earring design). In your project, you can have more than one style and each style is listed separately (Style #1, Style #2, Style #3, etc.).
Every style can have:
Its own reference files (design images, CADs, pricing docs, etc.)
Its own status (In Progress, Approved, etc.)
Its own priority (Low/Medium/High)
Its own assignee (PM, Designer, Reviewer, etc.)
Its own versions (V1, V2, etc.)
Example:
If you are making a jewelry collection with 5 different designs, you upload them as 5 styles under the same project. This way, you can track and manage each design separately without mixing them up.
So basically, Multiple Styles = Multiple Designs inside one project.
Client - Creation of Task & Sub-Task
Table of Contents
Table of Content-
Overview
The task creation feature allows users to assign, manage, and track work items within a project. Tasks can be linked to specific styles, prioritized, assigned to space members, and tracked until completion.
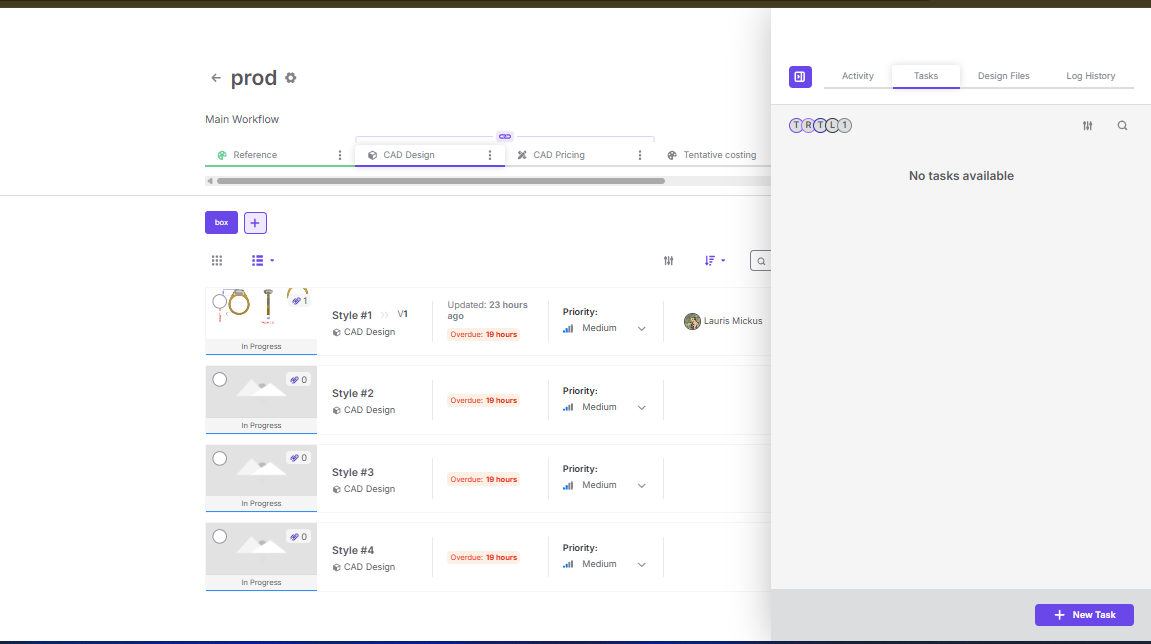
Steps to Create a Task
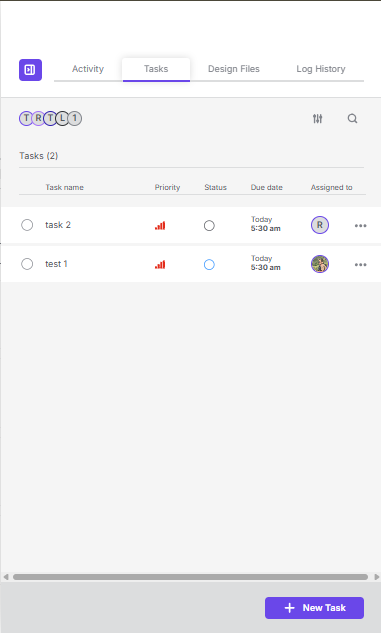
Open the Tasks Tab (you will see it right side panel)> Click on New Task> Fill in Task Details> Create the Task
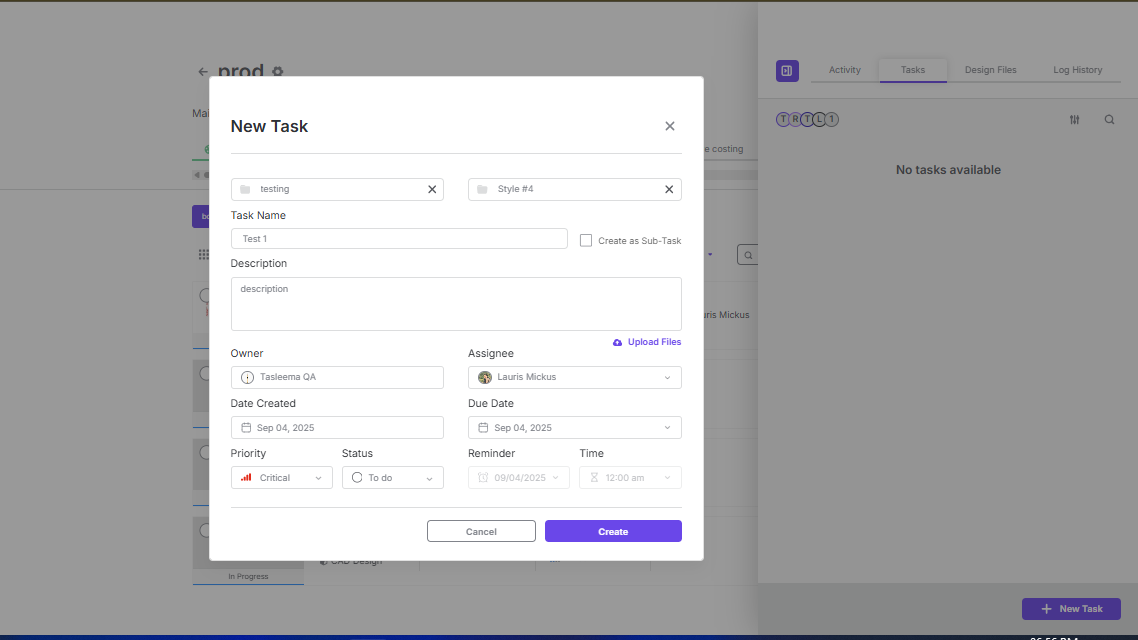
Detailed description of fields:
Style: Select the style to which the task belongs (mandatory)
Task Name: Enter a clear name for the task
Description: Add details or instructions (optional)
Owner: The person responsible for overseeing the task
Assignee: The person who will complete the task
Priority: Choose the urgency level: (Critical, High, Medium, Low)
Status: Select the current state: (To do, In progress, In review, Done, etc.)
Due Date: Set the deadline for the task
Reminder: Optionally set a date and time for reminders
Upload Files: Attach any relevant documents or files (optional)
View Created Task
The new task will be listed under the Tasks tab.
Notes-
A task must be linked to a style.
Only users with the right permissions can create or assign tasks.
Tasks can be edited or updated later as needed.
Sub-Task
A Sub-Task is a smaller, dependent task linked to a main (parent) task. It helps break down larger tasks into manageable steps.
Steps to Create a Sub-Task
Go to Tasks Tab> Click on New Task> Select Style> Enable "Create as Sub-Task"> Select Parent Task> Choose the parent task you want this sub-task to be linked to> Fill Sub-Task Details as we filled above while creating task> Click Create
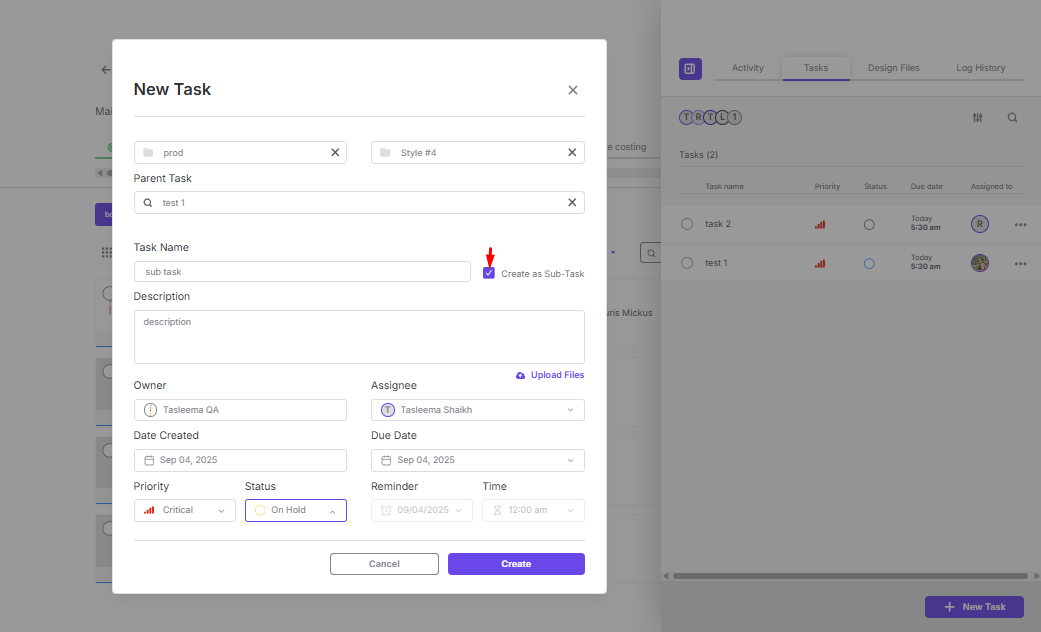
View Created Sub-Task
The sub-task will now appear under the selected Parent Task.
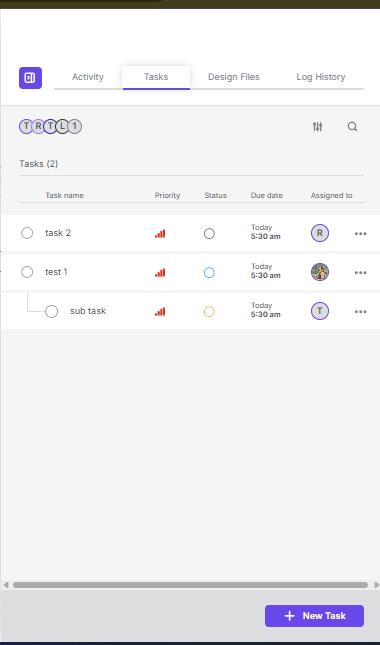
Notes-
A sub-task cannot exist without a parent task.
Multiple sub-tasks can be added under the same parent.
Sub-tasks inherit the style of their parent task but can have their own priority, status, and assignee.
Also you can create/view Tasks from Dashboard which behave the same way as those created inside a project.
Client - Deletion of Style & Style version
Table of Contents
Table of Content-
Overview
This document explains how to delete a Style and a Style Version in the project.
Delete a Style
A Style represents a complete design entry in the workflow. Deleting a style will remove the entire design entry and its associated files.
Steps to Delete a Style-
Navigate to the required Project
Locate the style you want to delete in the workflow list
Click on the three-dot menu (⋮) on the style view page
Select Delete style
Example:
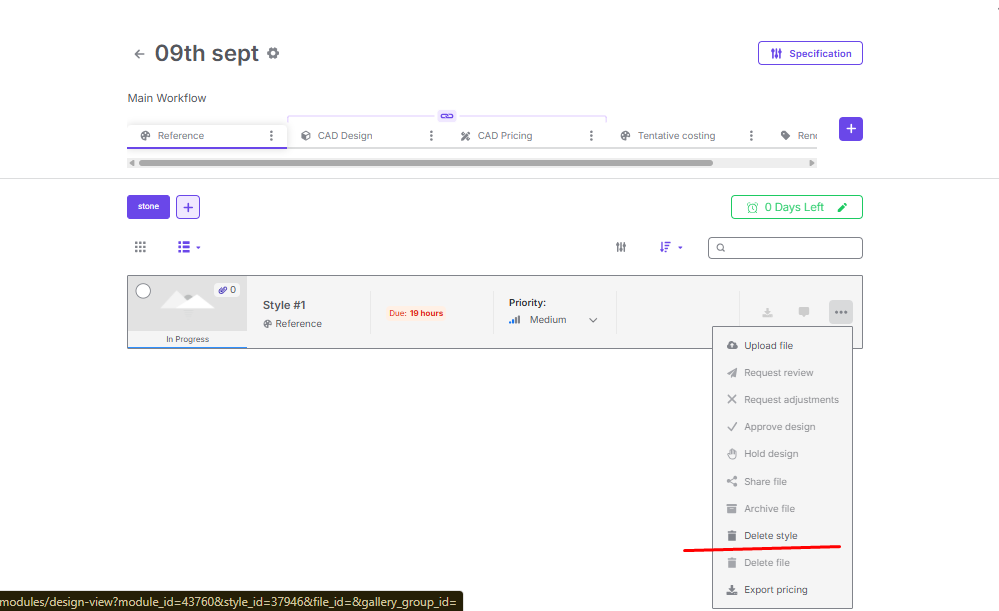
Note: Once a style is deleted, it cannot be restored. Ensure you confirm before proceeding.
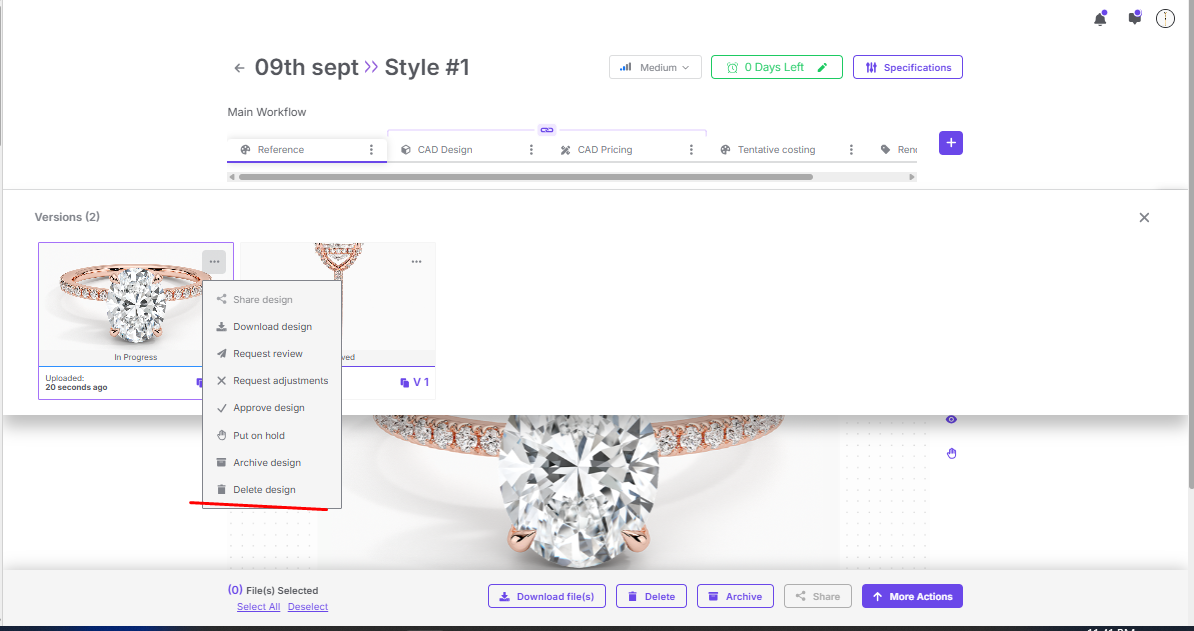
Delete a Style Version
A Style version represents a specific uploaded version of a design file (e.g., CAD file, image, or reference).
Steps to Delete a Style Version-
Open the required Style from the project.
Hover over the file thumbnail or version section.
Click on the three-dot menu (⋮) beside the version.
Select Delete File or Delete Design (depending on context).
Example:
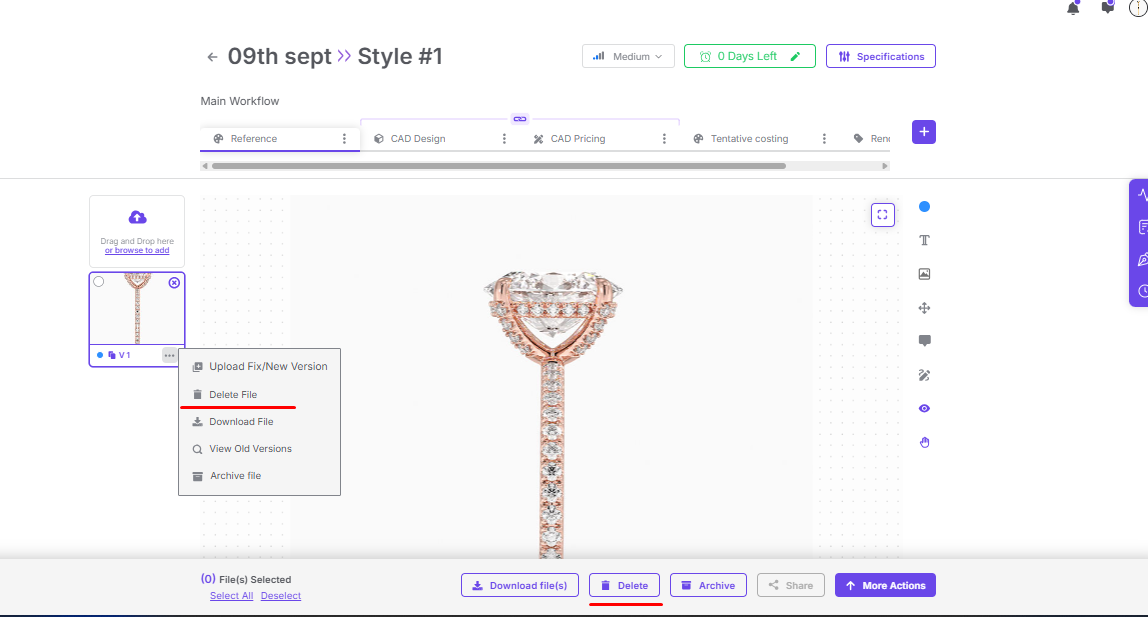
Delete File (within a Style)
If you only want to remove a specific uploaded file (and not the full style), you can delete it directly.
Steps to delete a file inside a Style-
Open the required Style.
Hover over the file and click on the three-dot menu (⋮).
Select Delete File.
Example:
Key Differences
Action | Effect |
|---|---|
Delete Style | Removes the entire style and all its associated files/versions. |
Delete File | Deletes a single uploaded file inside a style. |
Delete Version | Removes only that specific version of the design, not the full style. |
Client - Archive Style & Version
Table of Contents
Table of Content-
Overview
The Archive functionality allows users to move files or versions into an Archived state instead of deleting them permanently. This helps preserve design history while keeping the workspace clean and focused on active files.
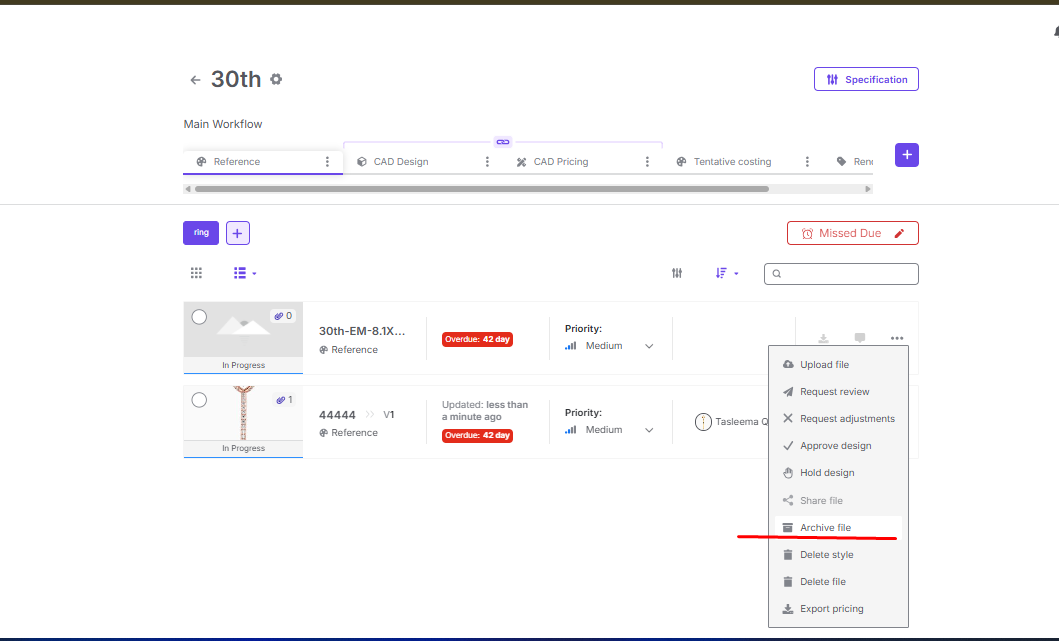
Where can you archive a file?
From File List View
Click on the
...(three dots) menu next to the file.Select the Archive file.
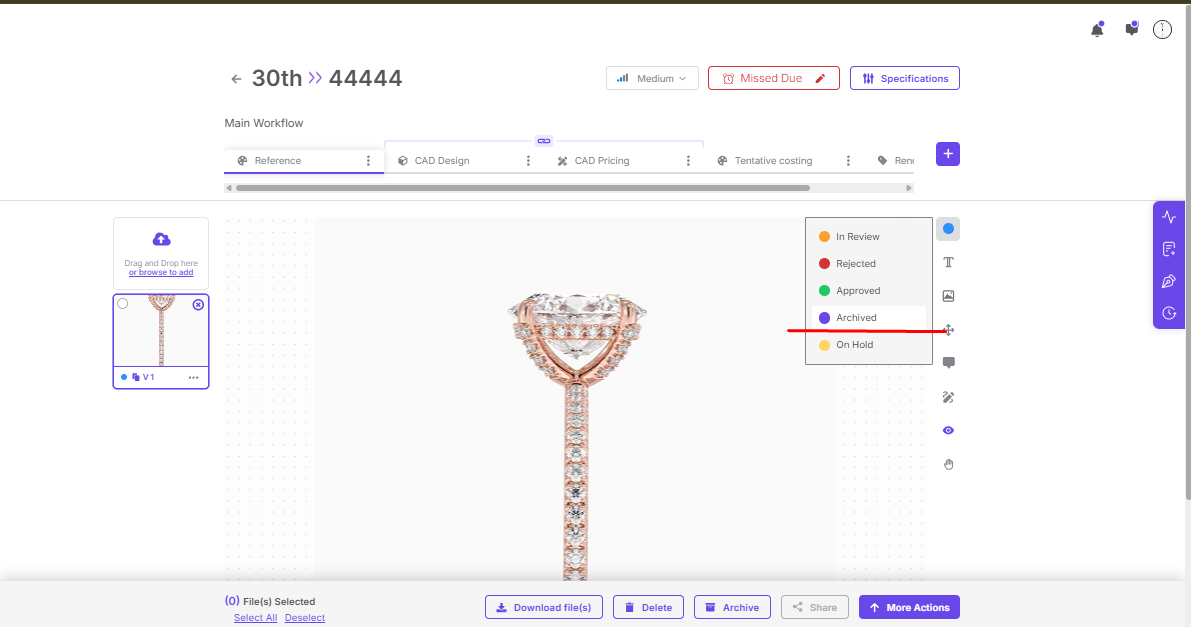
From File View
Open the file.
Use the status dropdown (In Review, Approved, Rejected, etc.).
Select Archived.
From Versions Panel
Upload multiple versions.
Old version status will change to Archived automatically(You can see it by clicking on view old versions).
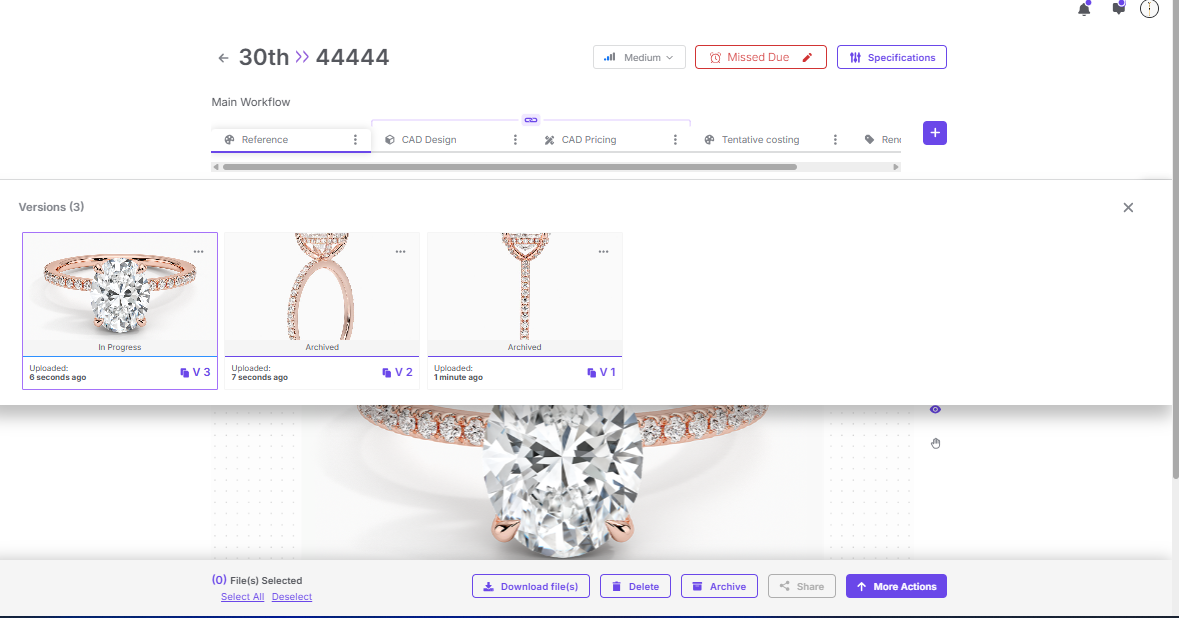
Behavior of Archived Files
Files marked as Archived will:
Show the Archived status (purple tag).
Be hidden from the active workflow.
Remain accessible in the versions/history panel.
Archived files are not deleted and can be restored if needed.
When to Use Archive
To clean up outdated file versions.
To preserve design history without cluttering the workflow.
To avoid accidental deletions when a file may be required later.
Example Workflow
Designer uploads a CAD design.
A new version is uploaded, making the old version outdated.
The old version is Archived.
The team can still view the archived file from the versions tab, but only the active file appears in the workflow.
Client - Due Date of Design
Table of Contents
Table of Contents
Overview
The Due Date of Design feature in Upsway allows you to set and manage deadlines for design tasks inside a project. By defining a due date, you ensure that your design team is aligned on delivery expectations and that the project workflow stays on track.
This feature is flexible: you can set a due date when creating a design or edit it later if timelines change.
Setting a Due Date
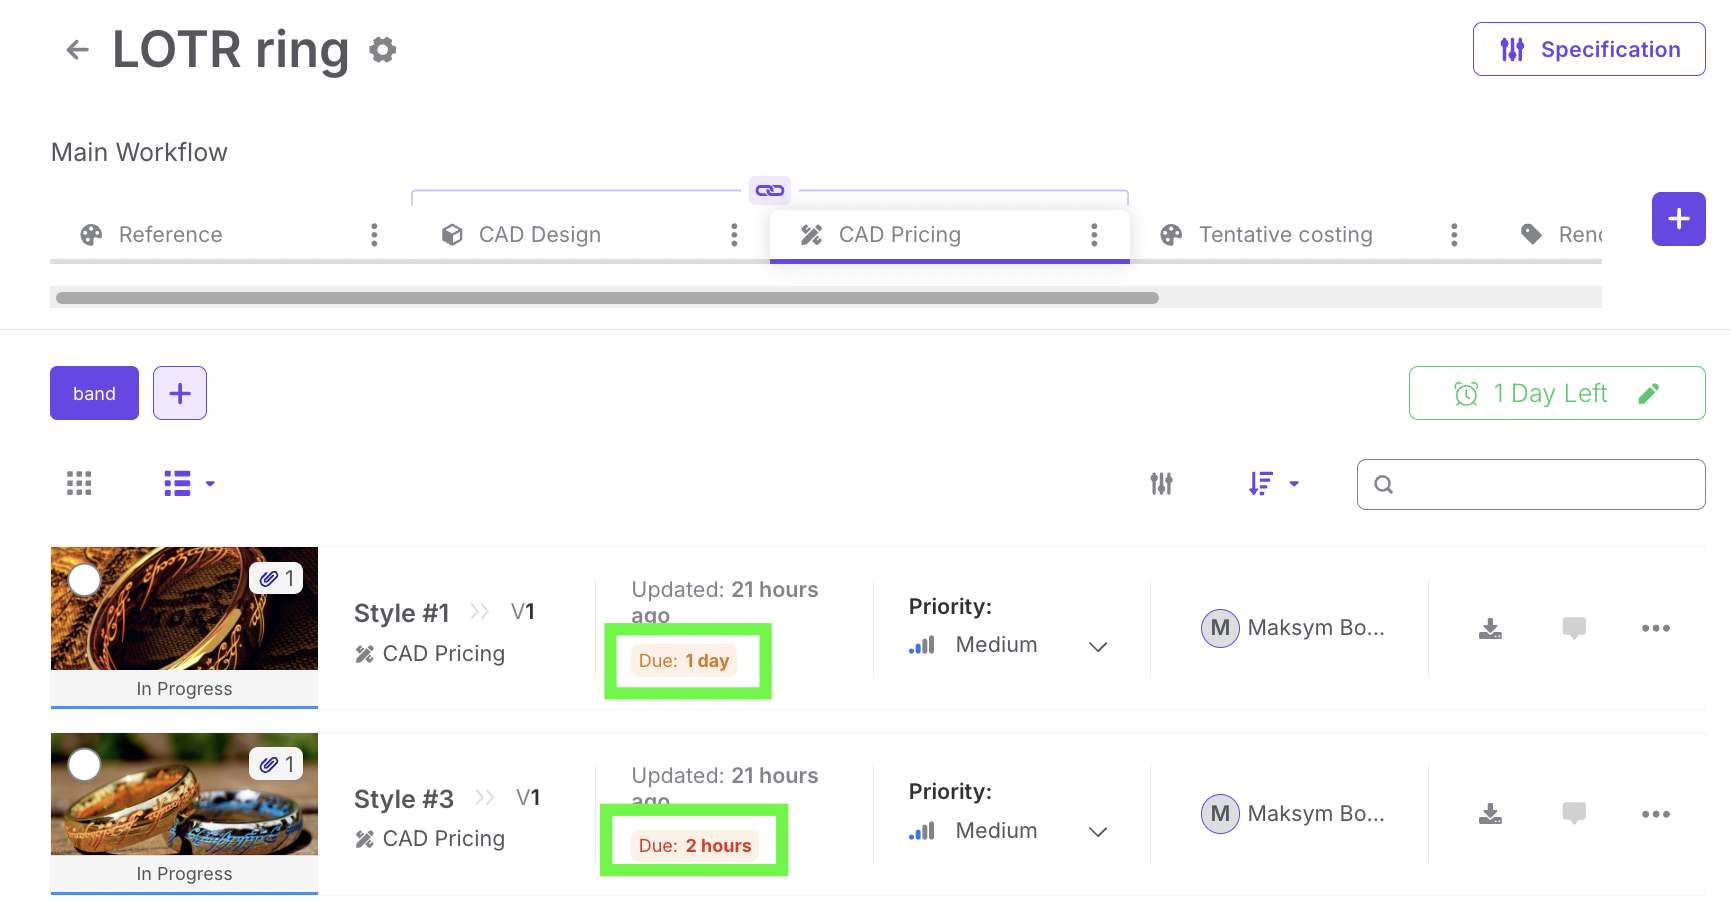
When viewing a project, each design can be assigned a due date:
You will see the due days indicator directly within the project view.
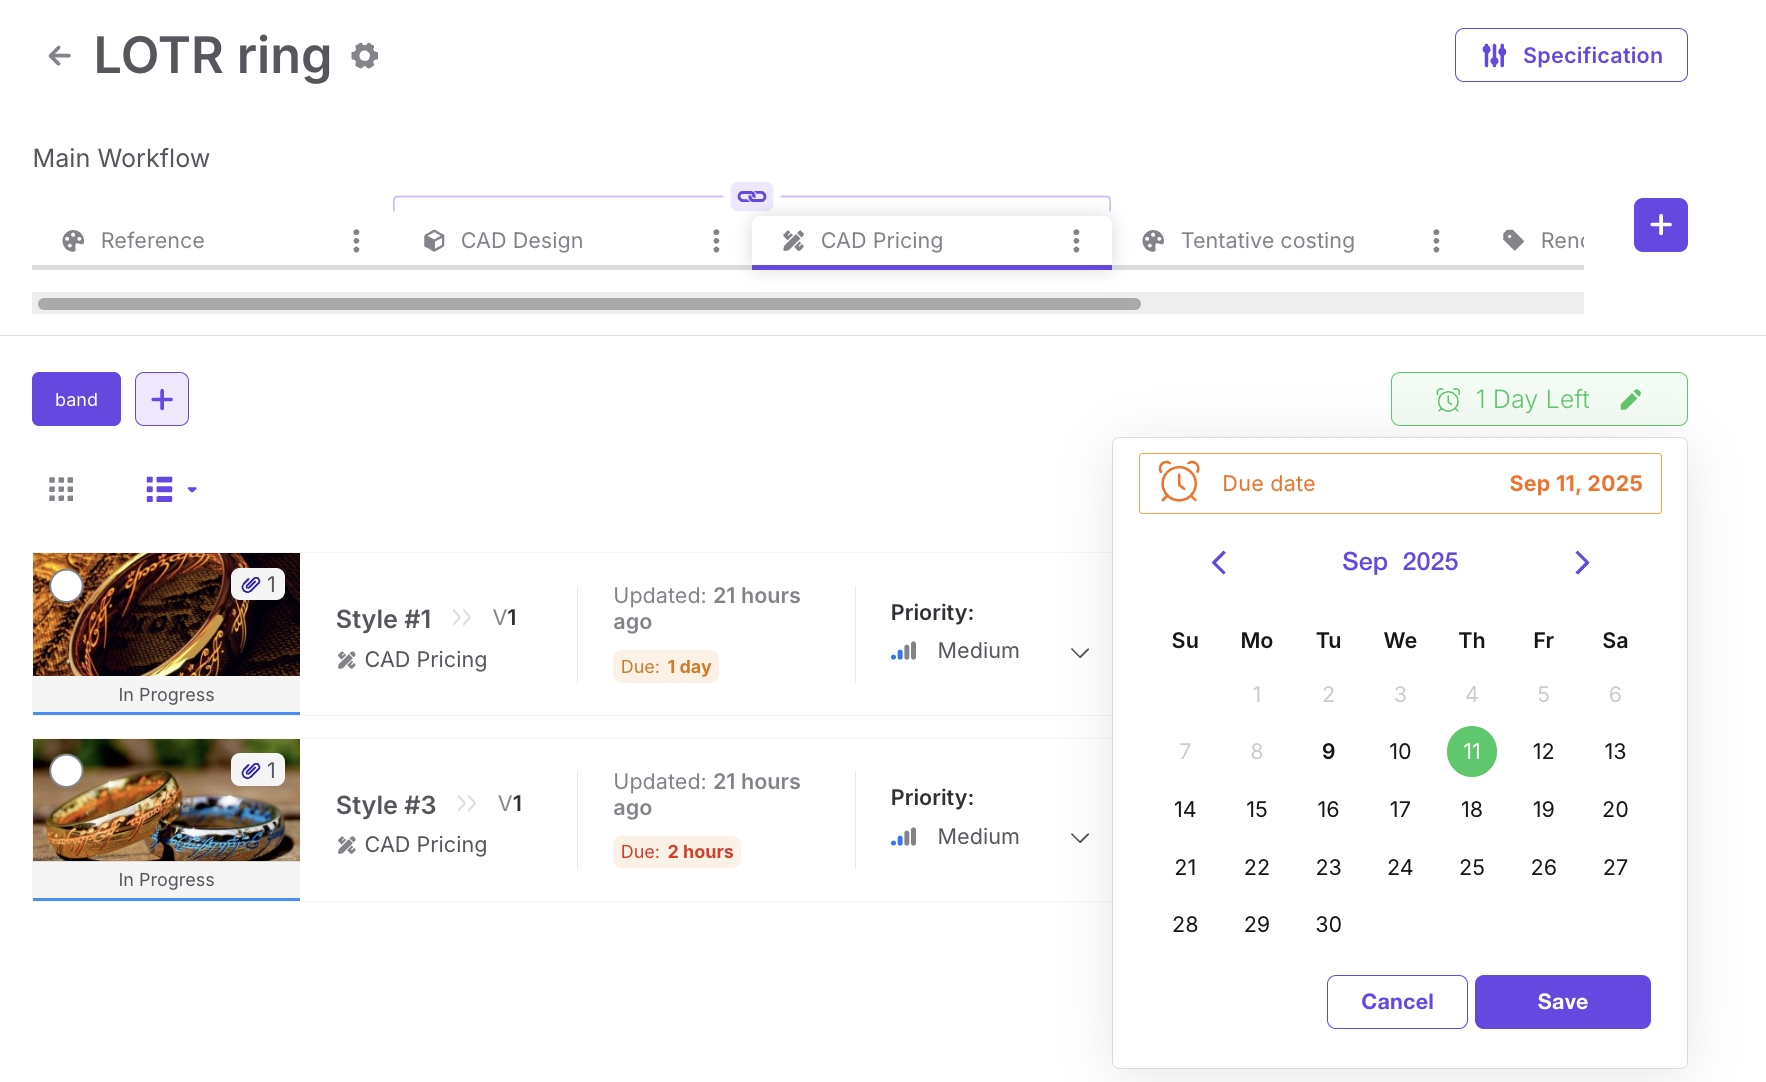
To assign a due date, click the clock icon next to the design.
A calendar will open, allowing you to select the required date.
After selecting the date, click Save.
The chosen due date will now appear in the project view.
Tip: Choose realistic deadlines based on team capacity to avoid bottlenecks in approvals and reviews.
Editing a Due Date
If the timeline changes, you can easily update the deadline:
Click again on the clock icon to reopen the calendar.
Select a new date.
Press Save.
The updated due date will replace the old one across the project.
Note: Only users with the appropriate project role (e.g., Project Owner, Project Manager) can edit due dates.
Notes
The due date is visible to all project members, helping the team stay aware of upcoming deadlines.
Editing a due date does not affect already completed tasks, but it shifts expectations for ongoing work.
Be consistent in updating due dates if project scope changes, to avoid confusion within the design team.
Client - Download Design
Table of Contents
Table of Contents
Overview
The Download Design feature in Upsway allows users to export design files or assets directly from a project. This ensures that designers, reviewers, and other stakeholders can easily access the most up-to-date versions of sketches, CAD files, or other project deliverables.
There are multiple ways to download a design or asset inside a project:
Download from the project view
Download via the “More Actions” menu
Download from the asset menu
Download from the project view
When you open a project, you will see the option Download file(s) at the bottom of the page. Clicking this button immediately downloads the design file(s) associated with the project.

Download via the “More Actions” menu
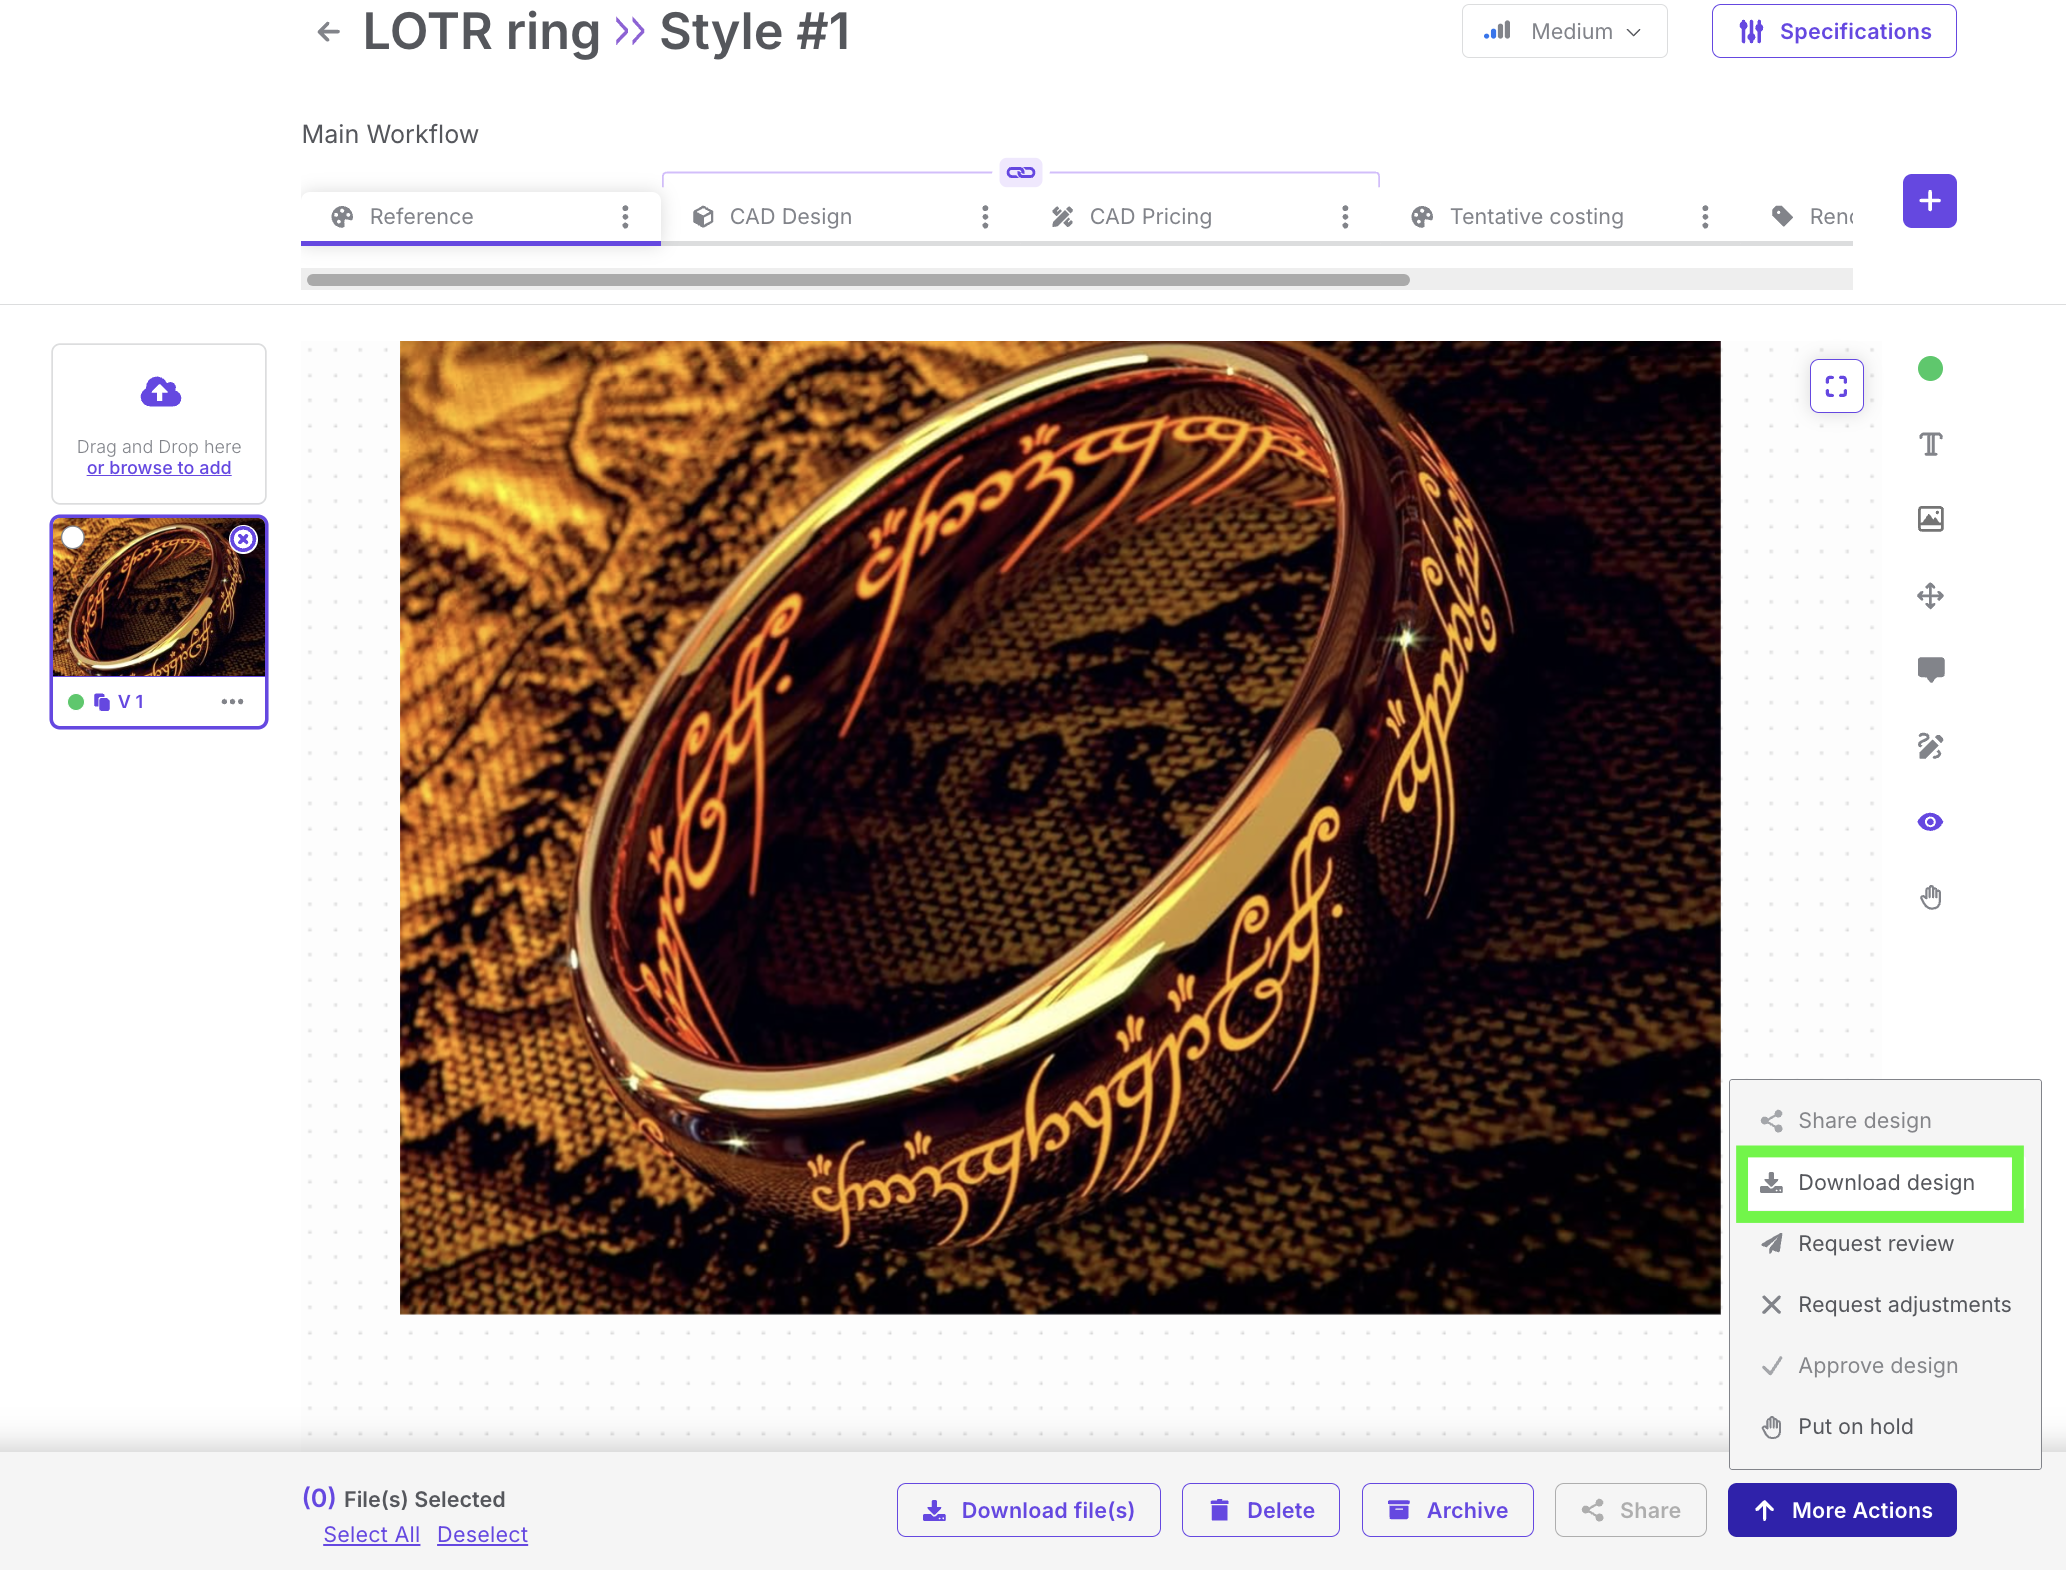
Inside the project, you can also access the More Actions menu at the bottom of the page. This menu contains several options:
Request Review
Download Design
Share Design
Approve Design
Reject Design
Selecting Download Design will trigger the file download.
Download from the asset menu
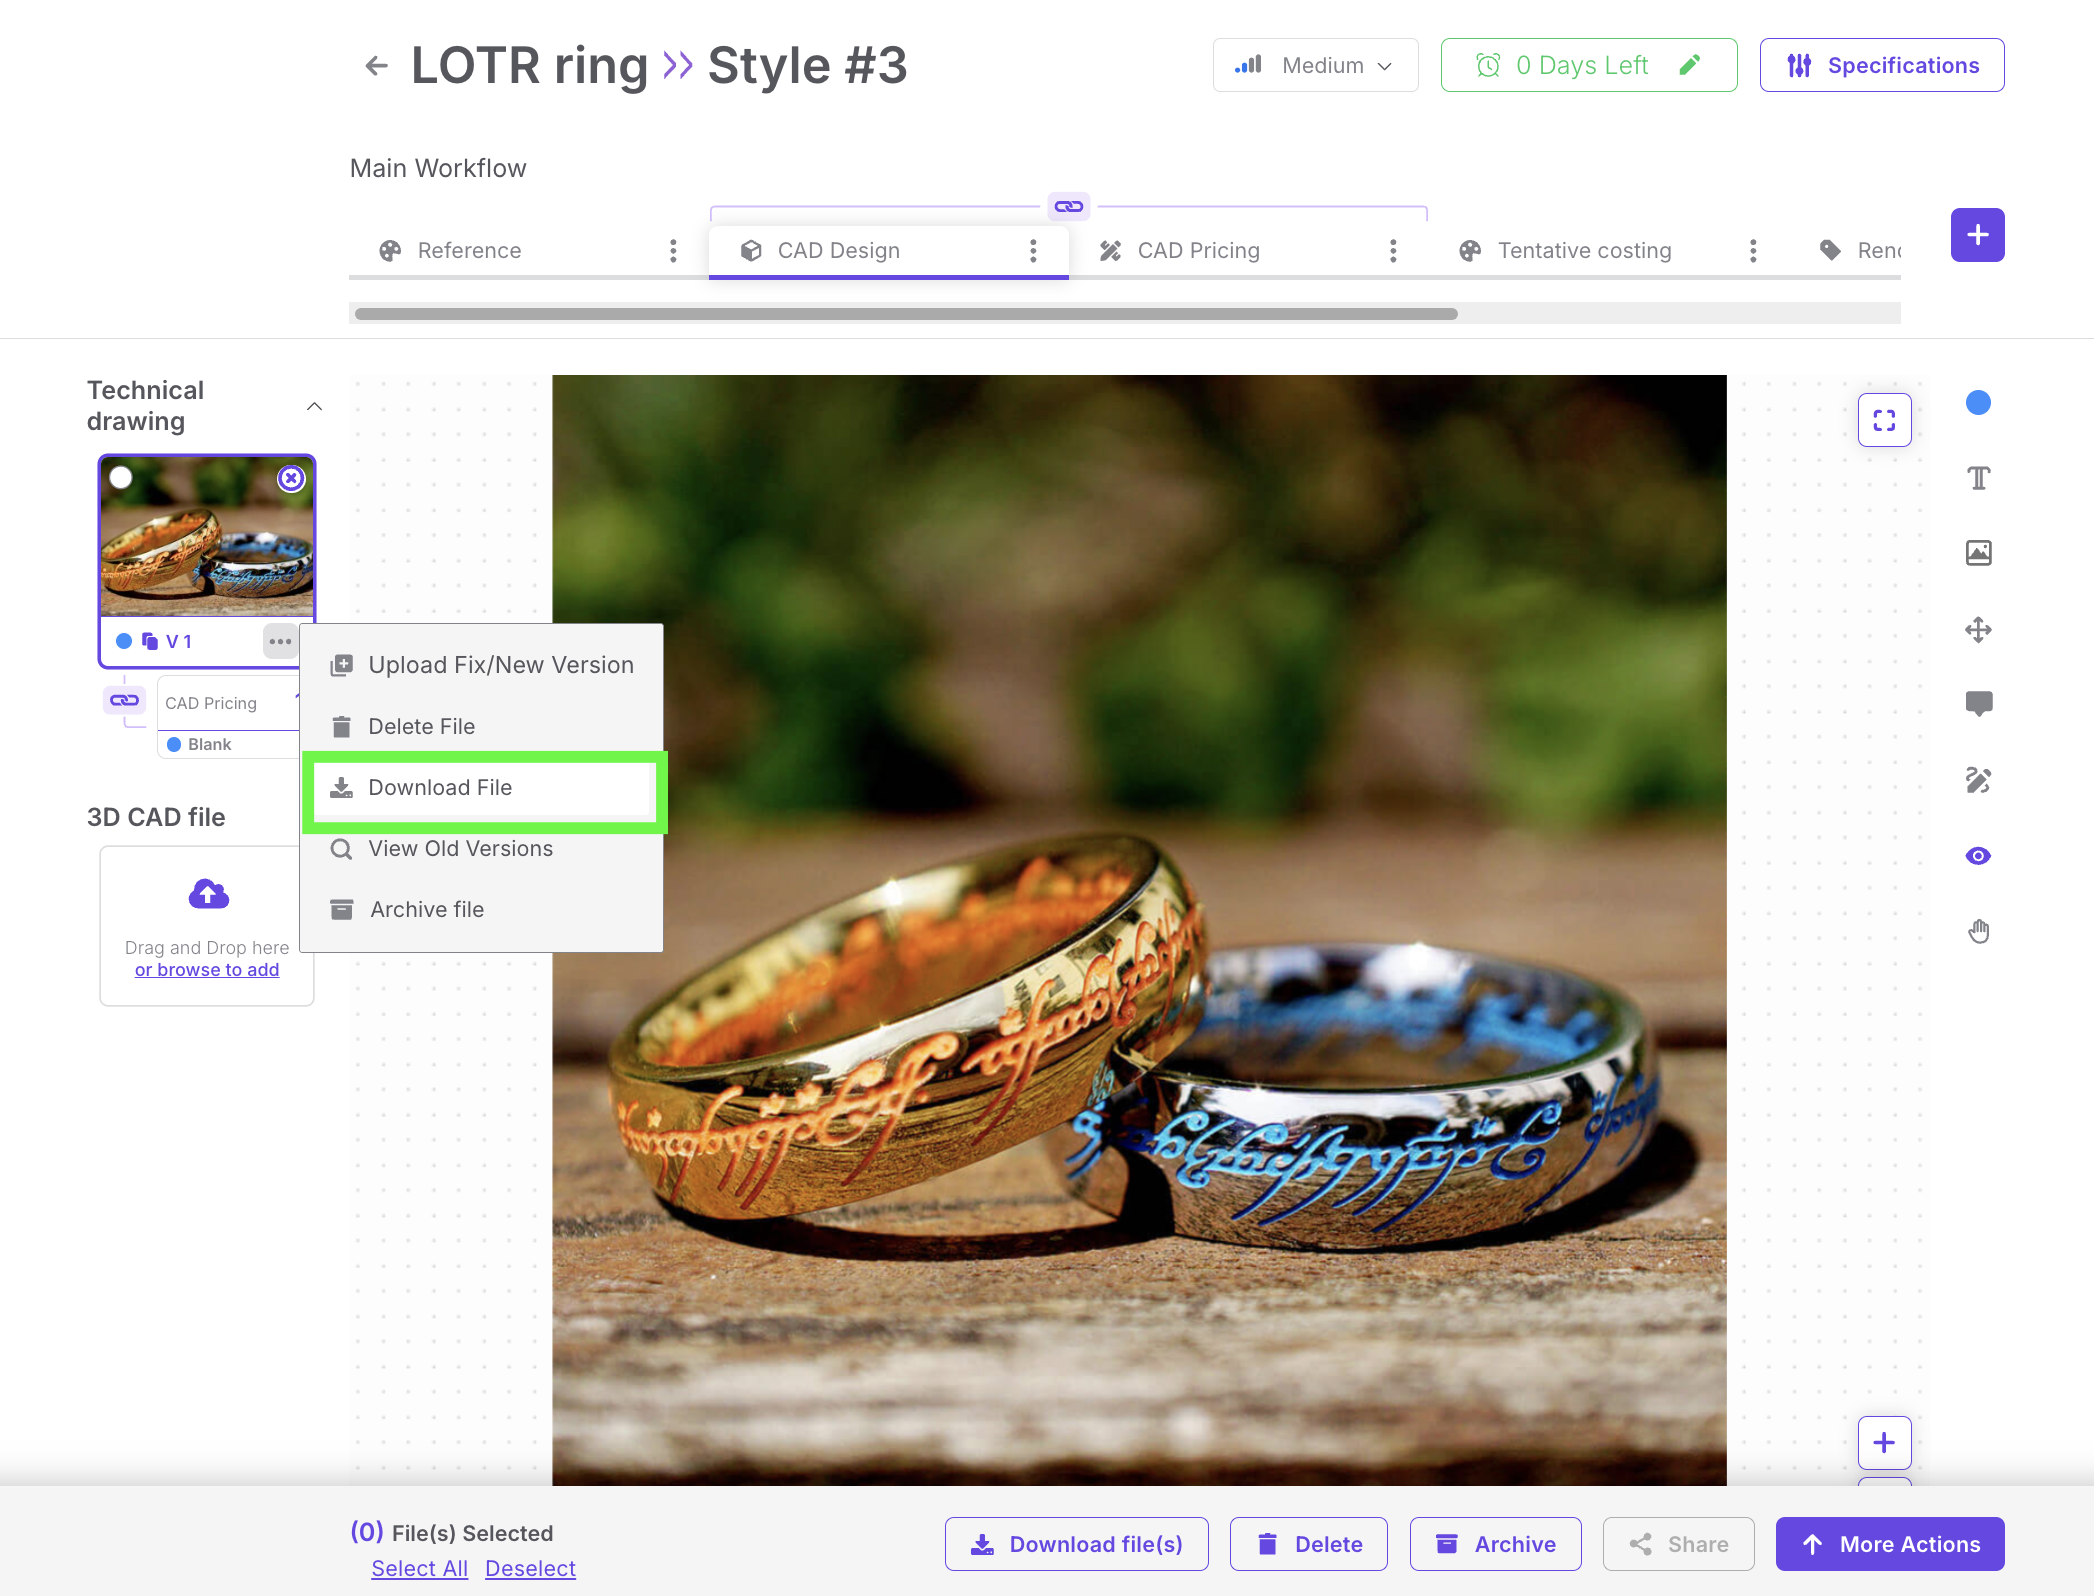
If you need a specific asset instead of the full design, you can:
Locate the asset within the project.
Click the three dots (⋮) menu next to the asset.
Select Download to export that individual file.
Notes
Only users with sufficient permissions (e.g., Project Owner, Project Manager, Designer) can download designs and assets.
Use the More Actions menu if you need additional context (e.g., sharing or approving) along with the download.
Make sure to always download the latest version of the design to avoid working with outdated files.
Client - Send Request Review
Table of Contents
Table of Contents
Overview
The Send Request for Review feature in Upsway allows you to formally request feedback on a specific style or version of a design. Reviews can be requested either from internal team members or from client representatives, ensuring all stakeholders are aligned before moving forward in the workflow.
Functional description
When working inside a project, you can request a review for any style version.
Open the style and select the version that needs review.
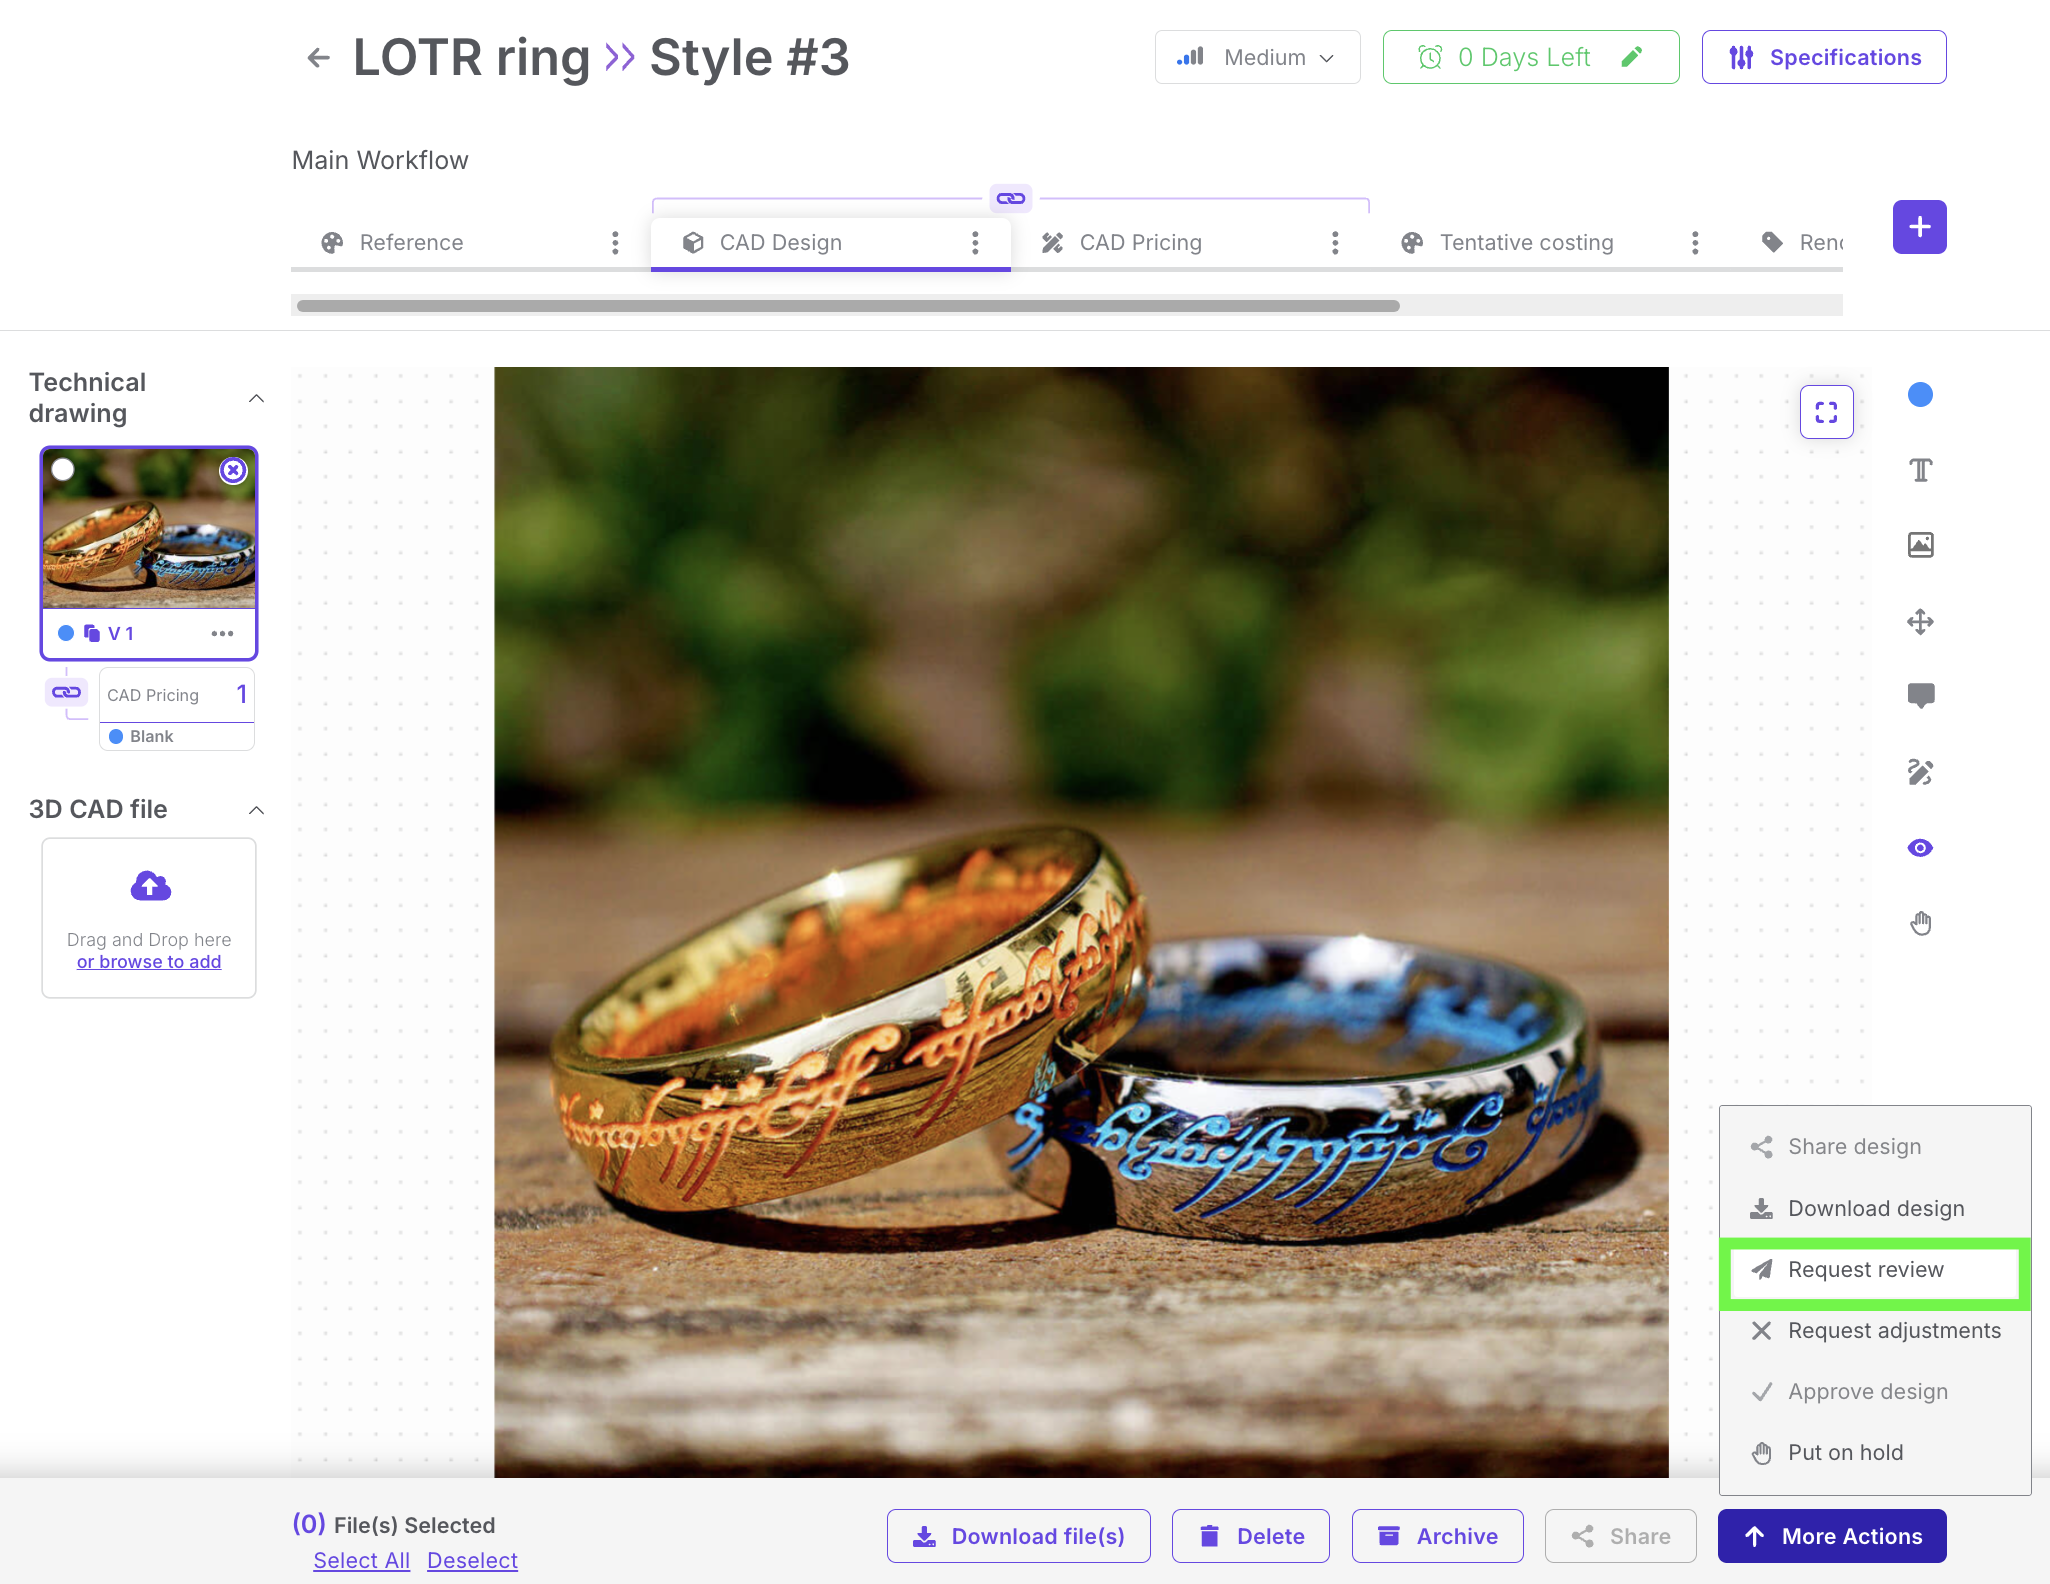
Use the More Actions menu, where options such as Download Design and Request Review are available.
Choose Request Review. A form will open where you can configure the review request.
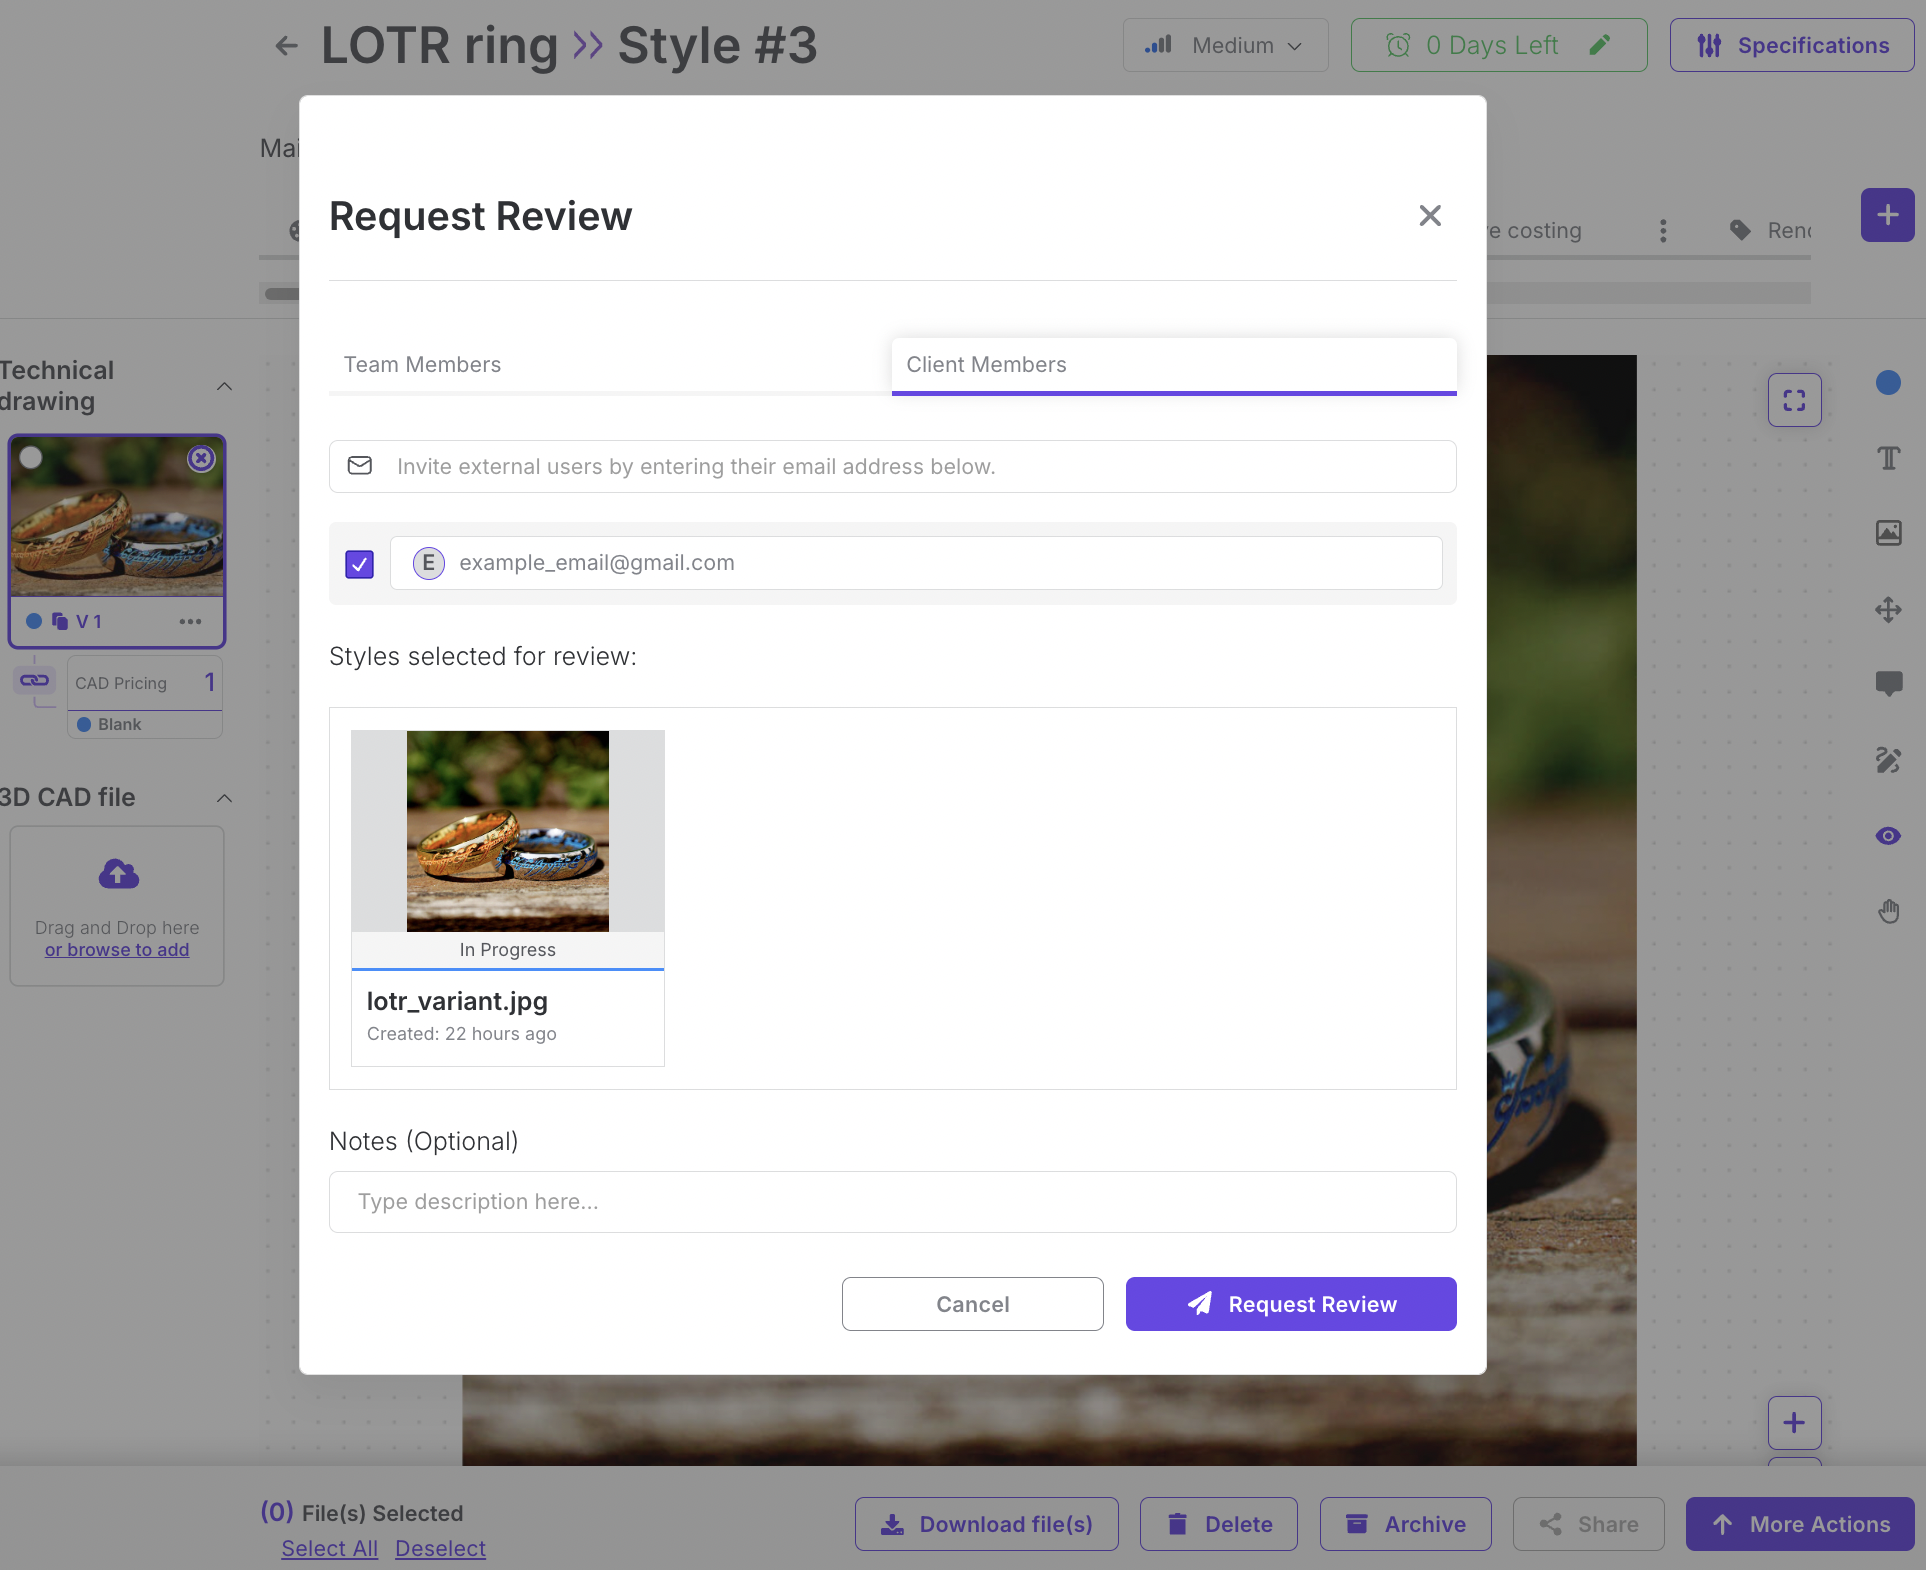
Within the form you can:
Select the reviewer type:
Team member – internal colleague responsible for verifying the design.
Client member – external client contact who needs to approve or provide feedback.
Add review notes with instructions, clarifications, or specific points of attention.
Submit the request to send a notification to the chosen reviewer.

Once submitted, the selected reviewer will receive the request and can respond within Upsway.
Notes
Always specify the correct style version before sending the review request to avoid confusion.
Use notes to highlight exactly what needs attention (e.g., “Check prong setting dimensions”).
Only users with the appropriate project roles (e.g., Project Owner, Project Manager, Reviewer) can send review requests.
Client - Approve/ Reject Design
Table of Contents
Table of Contents
Overview
The Approve/Reject Design feature in Upsway allows team members and clients to make final decisions on submitted designs. Approval confirms that the design meets expectations and allows the project to progress. Rejection signals that changes are needed before moving forward. This review step ensures that only validated designs move further in the workflow.
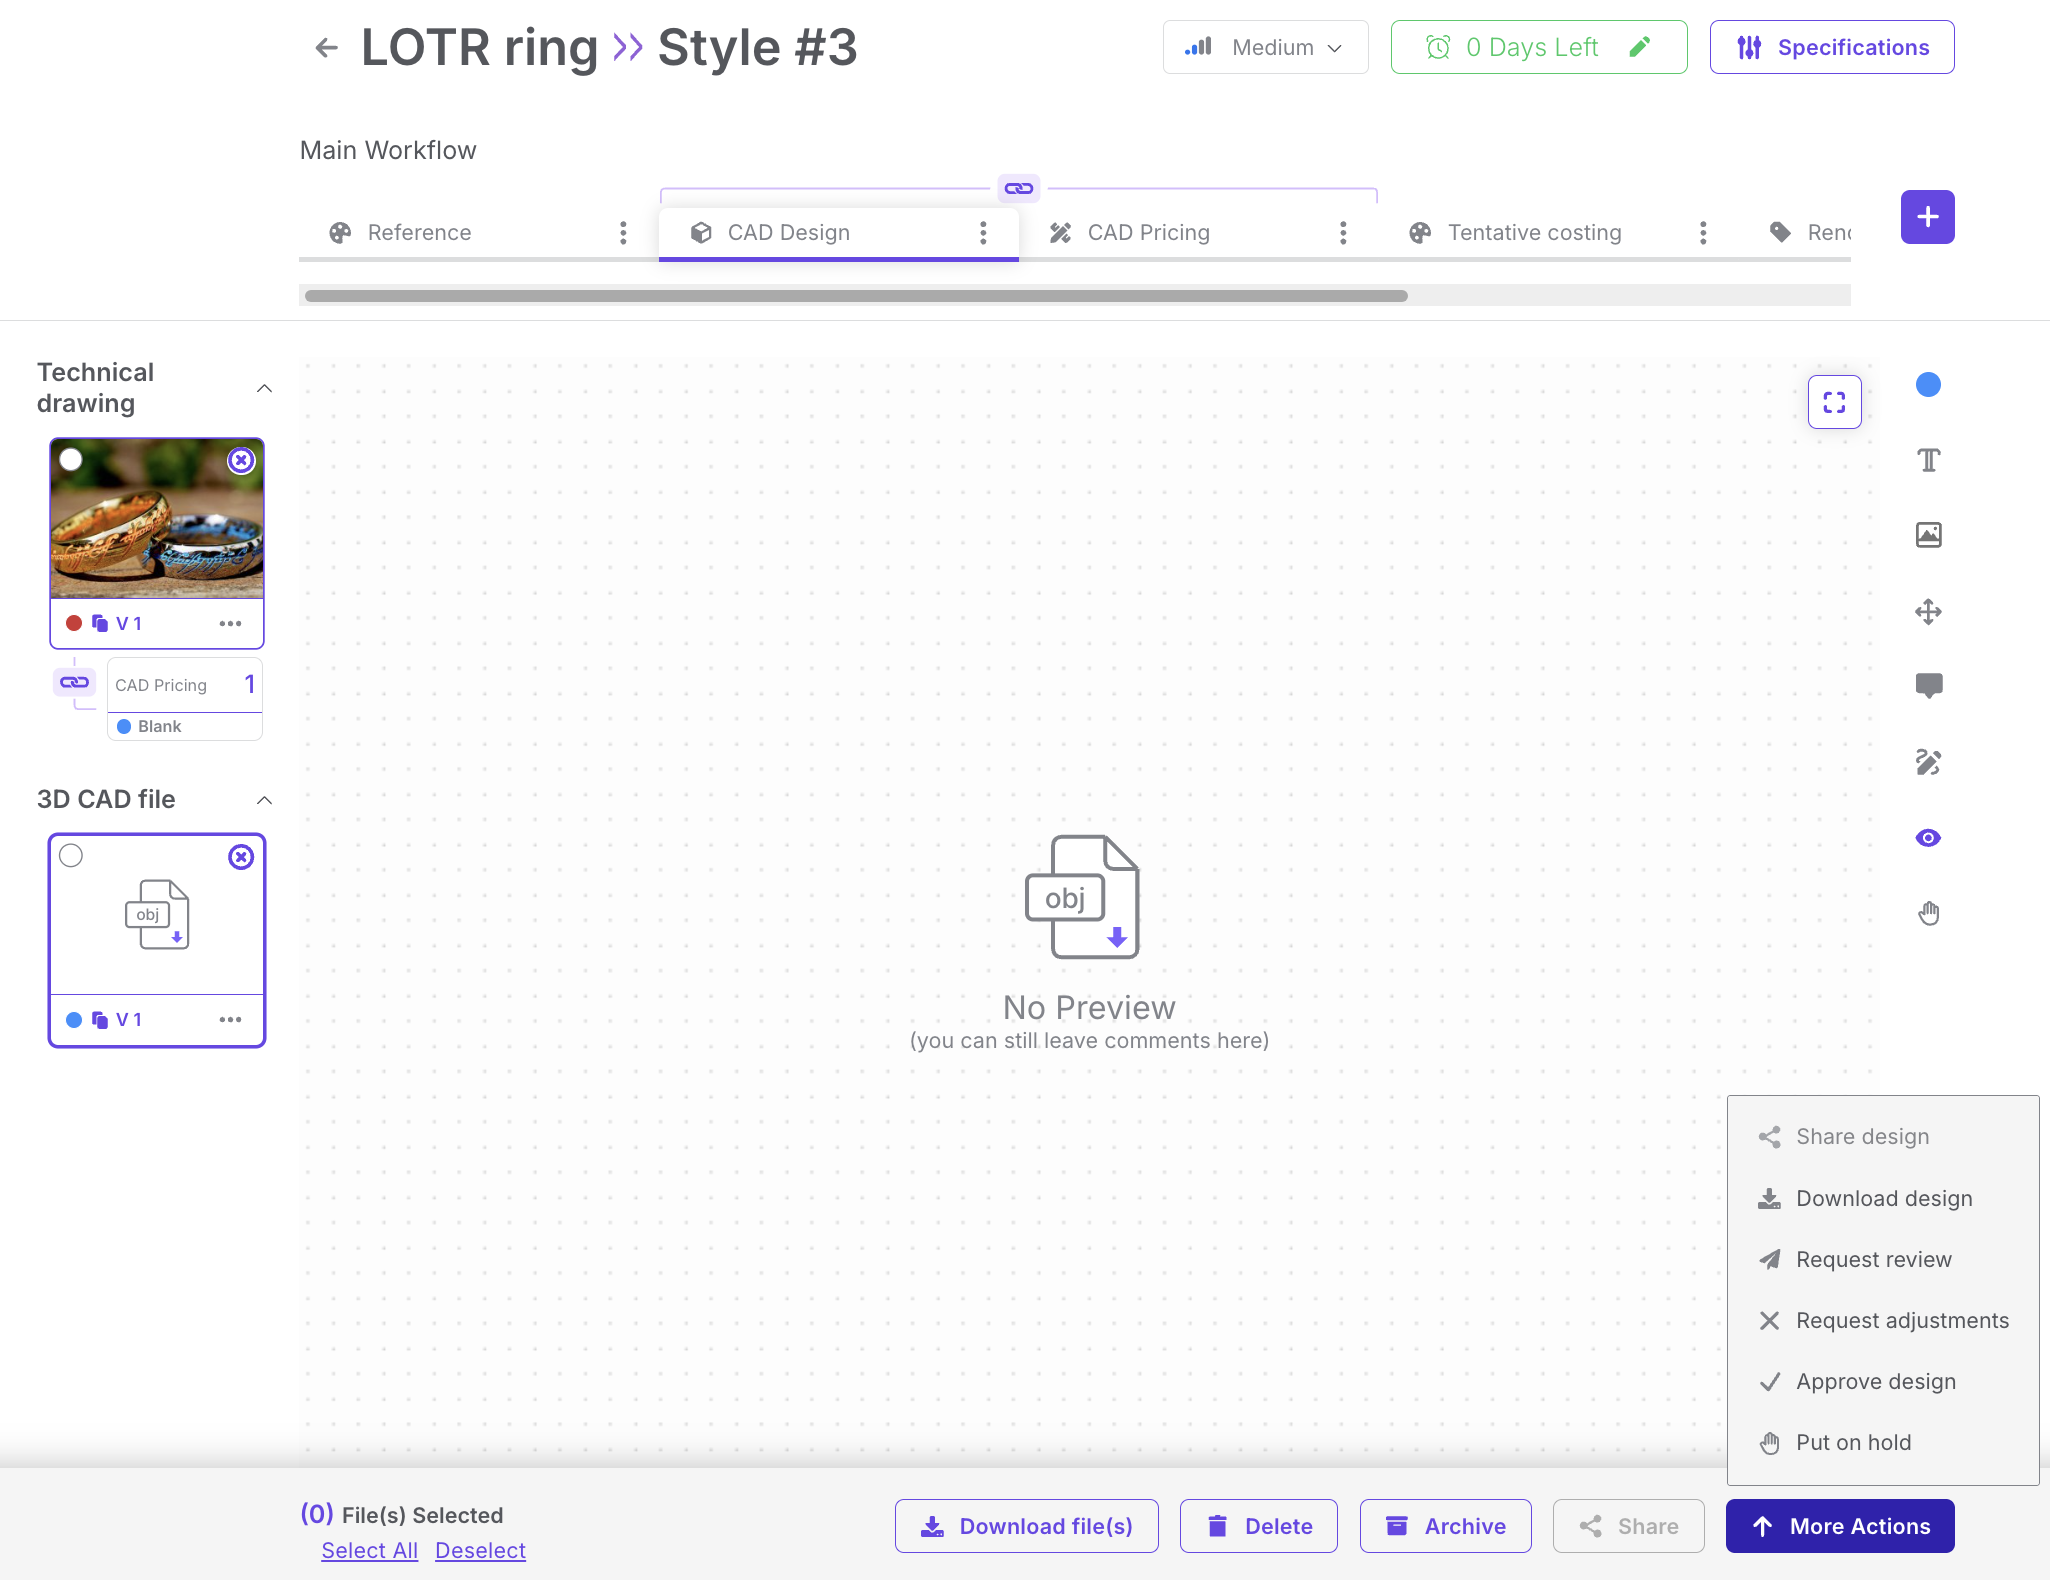
Functional description
When a design is submitted for review, a notification appears in the system (bell icon in the header).
Open the notification to access the review request.
The project containing the design will open.
Use the More Actions menu to see available options:
Download Design
Approve Design
Request adjustments
Share Design
Request Review
Put on hold
Approving a Design
Select Approve Design.
The window Design Review will be opened. There, you can write a comment or change the design status and then click Submit button.
The design will be marked as approved.
The project can now progress to the next stage in the workflow.
Request adjustments
Select Request adjustments.
The window Design Review will be opened. There, you can write a comment or change the design status and then click Submit button.
The design will be marked as rejected.
The project will not move forward until revisions are made and the design is resubmitted for approval.
Notes
Always review the correct style version before approving or rejecting.
When rejecting a design, provide clear feedback in comments or notes so the designer knows what needs to be fixed.
Approvals are final. Once a design is approved, it moves forward and cannot be reverted to “pending” without creating a new review cycle.
Client - Search Projects
Table of Contents
Table of Contents
Overview
The Search Projects feature in Upsway helps you quickly locate projects within your Space. Instead of manually scrolling through long lists, you can use the search bar to filter and find the project you need. This is especially useful when working across multiple Spaces or when projects are grouped inside folders.
Searching for a Project
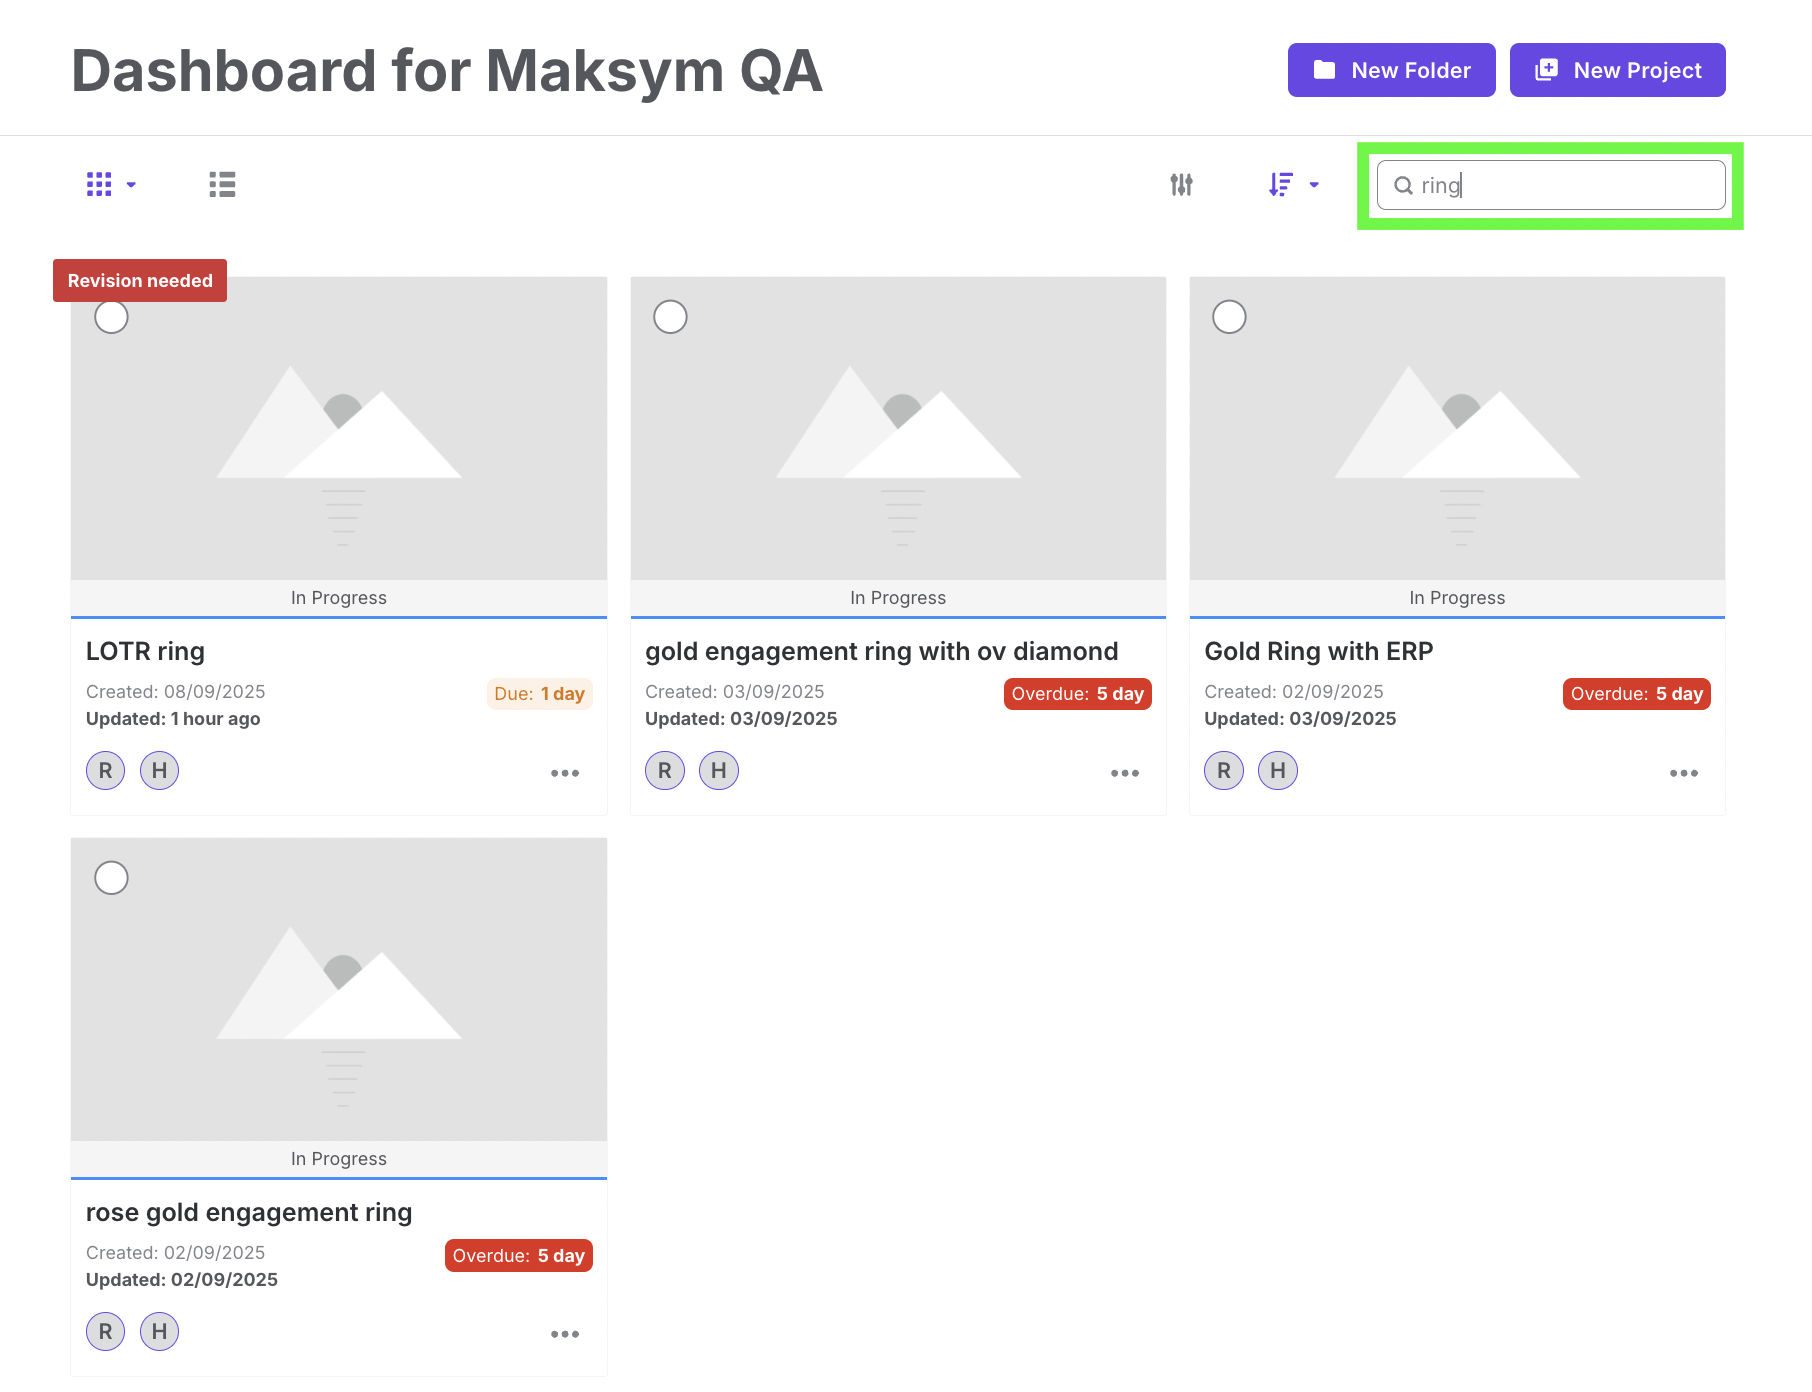
When you log in and access the Space Dashboard, all your projects are displayed. At the top of the project list, you will see a search bar.
Enter the project name (or part of it).
Press Enter.
Matching results will appear, showing only the projects that meet your search criteria.
Tip: You don’t need to type the full project name. Searching by a single letter or part of the name will also display relevant matches.
Searching Inside Folders
If your projects are organized in folders within a Space, you can also search inside a specific folder. The search results will then be limited to projects stored in that folder, helping you narrow down results.
Notes
Use clear and consistent project names so they are easier to find later via search.
If you can’t find a project, make sure you are searching within the correct Space or folder.
Client - Settings
Table of Contents
Table of Contents
Overview
The Settings section in Upsway allows each user to personalize their workspace and manage account preferences. From here, you can configure general options like time zone and theme, as well as review role-related settings.
Currently, the Settings menu includes three sections:
General Settings
Authentication (under development)
Members (under development)
Accessing Settings
To open Settings:
Click on your profile icon in the top-right corner of the dashboard.
From the dropdown menu, select Settings.
General Settings
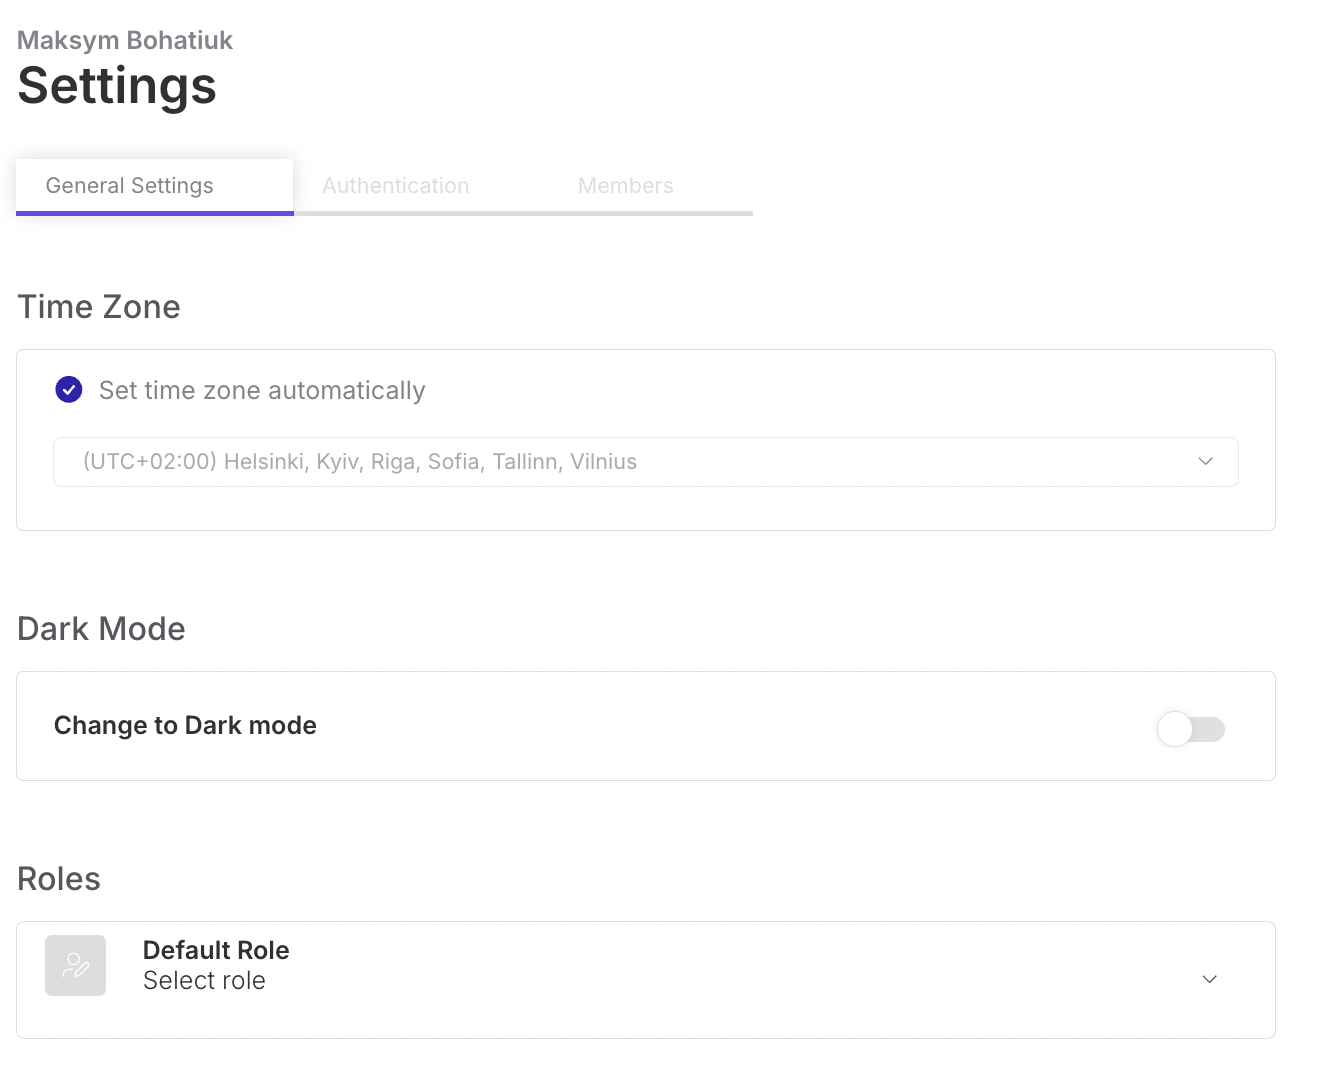
General Settings let you adjust how Upsway looks and behaves for your account:
Time Zone
You can either let the system automatically detect your time zone or manually set it to a preferred region.
This ensures that due dates, deadlines, and notifications display correctly in your local time.
Dark Mode
Toggle between light mode and dark mode depending on your preference.
Dark mode helps reduce eye strain and provides an alternative UI style.
Roles
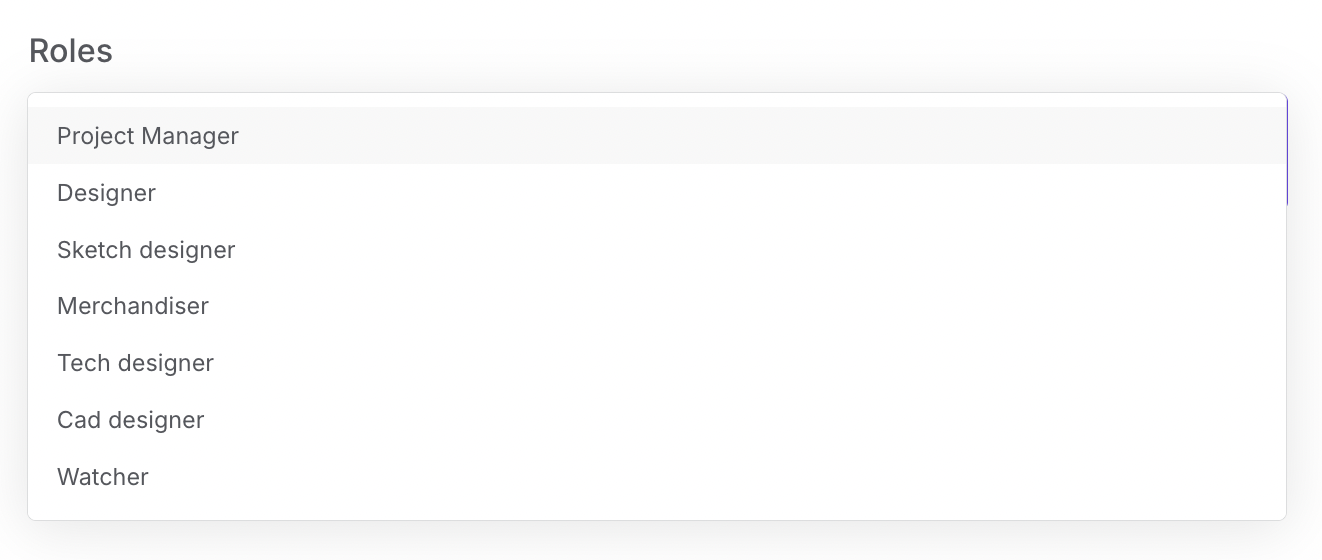
Here you can see a list of roles relevant to design and project workflows, such as:
Sketch Designer
Merchandiser
Tech Designer
CAD Designer
Watcher
(Note: Role assignment typically happens at the project level. This section provides visibility of available role types.)
Authentication (under development)
This section will allow users to manage authentication preferences (e.g., two-factor authentication, login methods). Currently, it is not yet available.
Members (under development)
This section will allow for management of members associated with your account or Space. It is also currently under development.
Notes
General Settings are user-specific and do not affect other members of your Space or project.
Always check your time zone after traveling or if project deadlines seem misaligned.
Authentication and Members settings are placeholders at this stage and will be enabled in future updates.
Client - Notifications
Table of Contents
Table of Contents
Overview
The Notifications feature in Upsway keeps you informed about all key activities in your projects and Spaces. Notifications include updates such as review requests, approvals, rejections, comments, and other important actions. By checking and filtering notifications, you ensure nothing is missed and can quickly respond to pending tasks.
Checking Notifications
Notifications are accessed through the bell icon in the top-right corner of the dashboard.
When you click the bell icon:
A panel opens showing your most recent notifications.
Each notification links directly to the related project or style, allowing you to quickly review the context.
All notifications are displayed here, organized chronologically.
Unread notifications are highlighted until you open them.
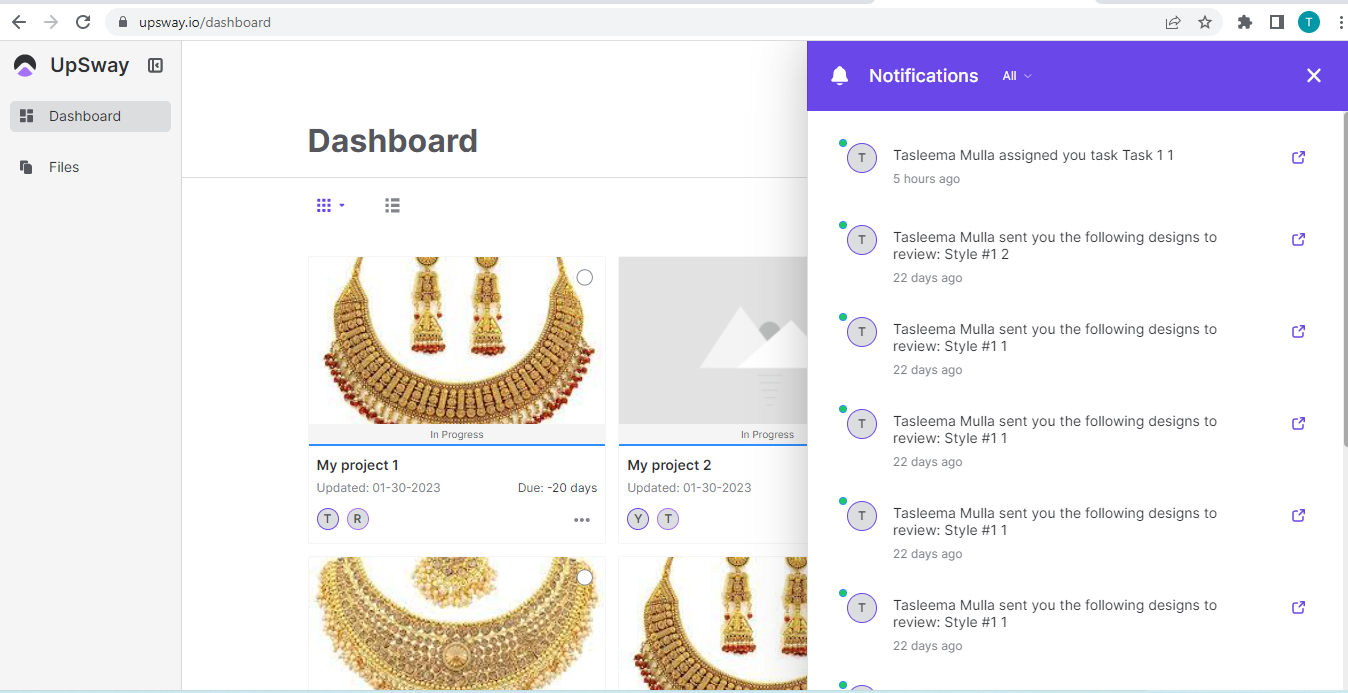
Filtering Notifications
To manage the volume of updates, Upsway provides a simple filter inside the notifications panel:
Unread – shows only the notifications you haven’t checked yet.
All – displays the full list of notifications, including those you’ve already read.
Use the Unread filter to quickly catch up with pending reviews, approvals, or comments during busy days.
Notes
Notifications are user-specific: you only see updates for projects and Spaces where you are a member.
Filtering does not remove notifications — it only changes how they are displayed.
Always check unread notifications to avoid delays in approvals or missed feedback.
Client - Account Preferences
Table of Contents
Table of Contents
Overview
The Account Preferences section in Upsway allows you to manage your personal information, security settings, billing details, and notification options. From here, you can keep your profile up to date, adjust how you receive updates, and review your account activity.
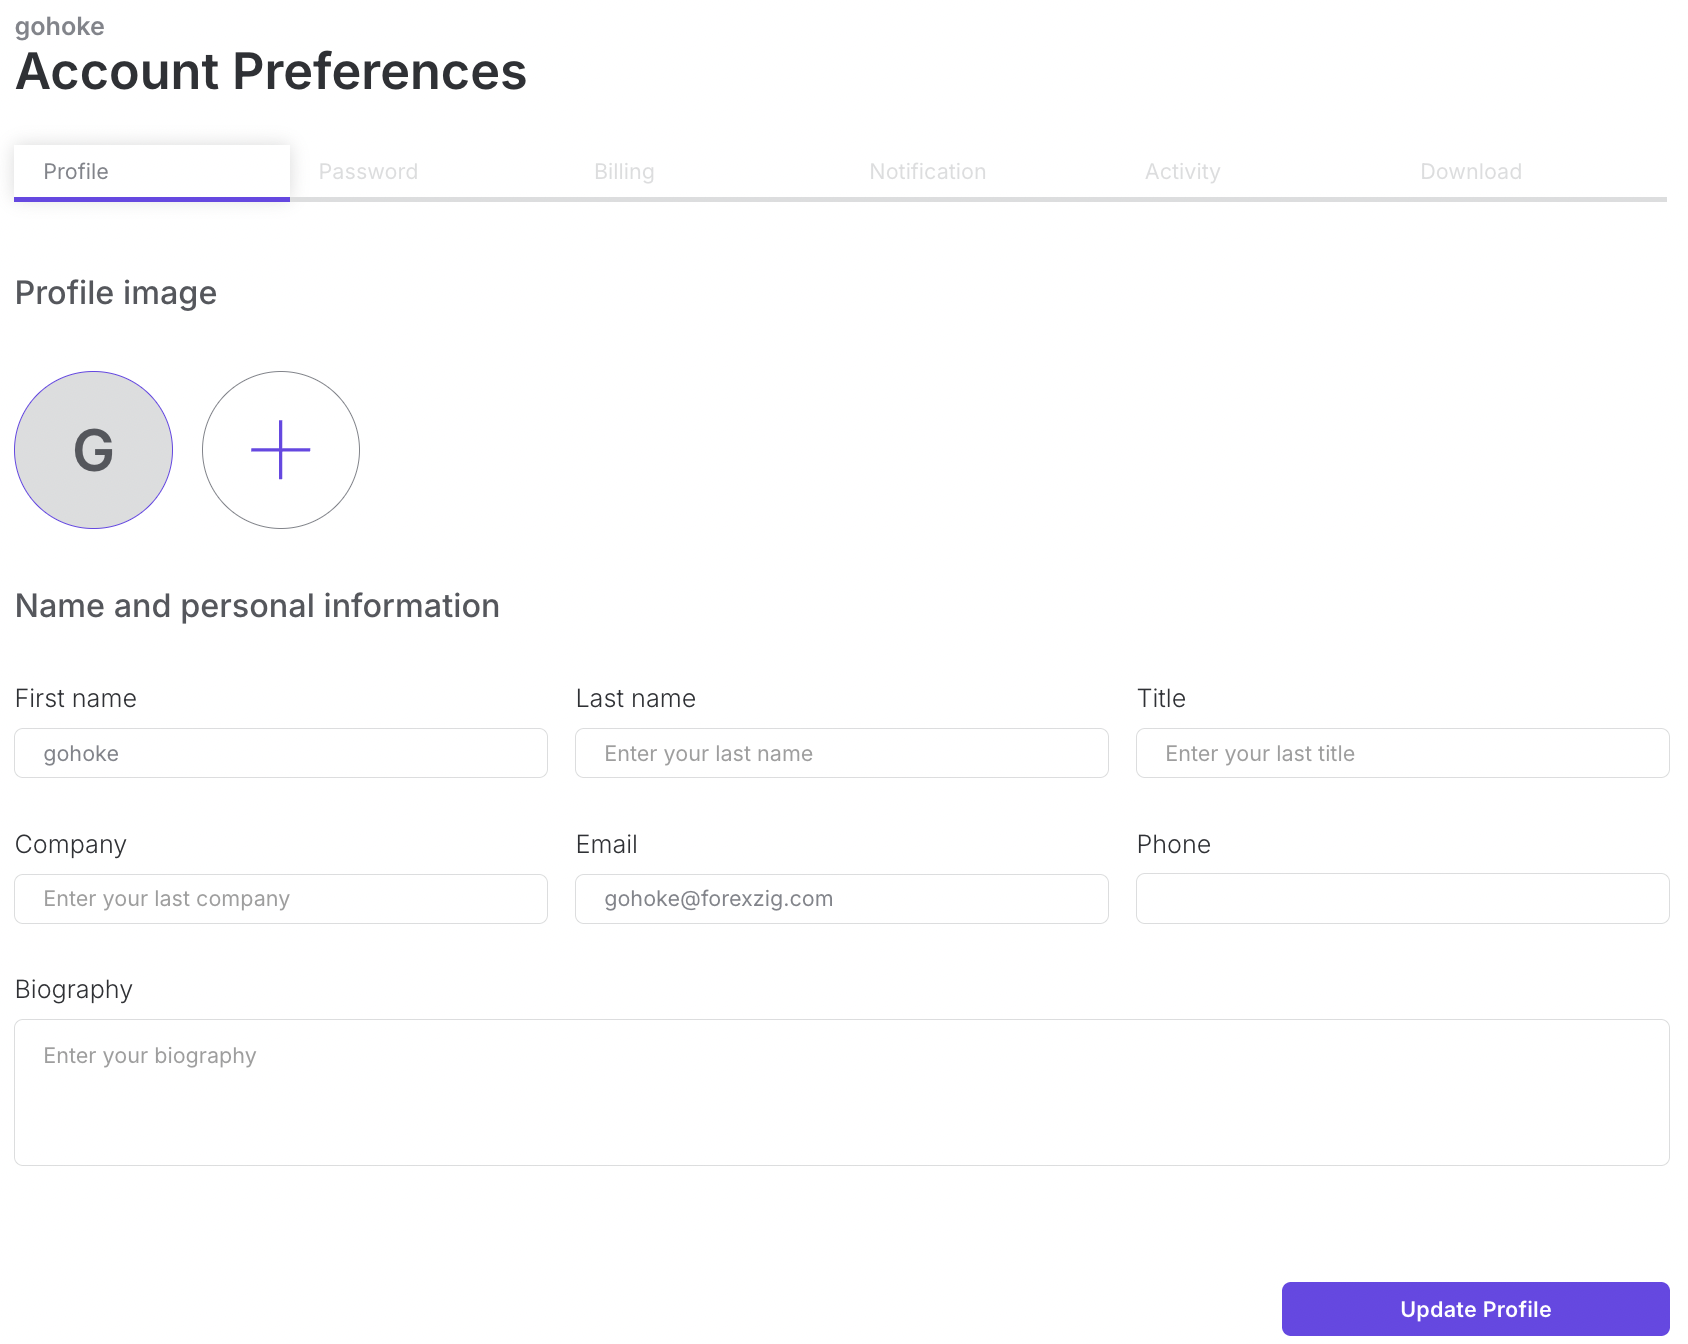
Profile
In the Profile section, you can manage your personal and company details:
Profile picture
First name, Last name
Title and Company
Email and Phone number
Biography
To update, edit any field and click Update Profile. Changes will be saved immediately.
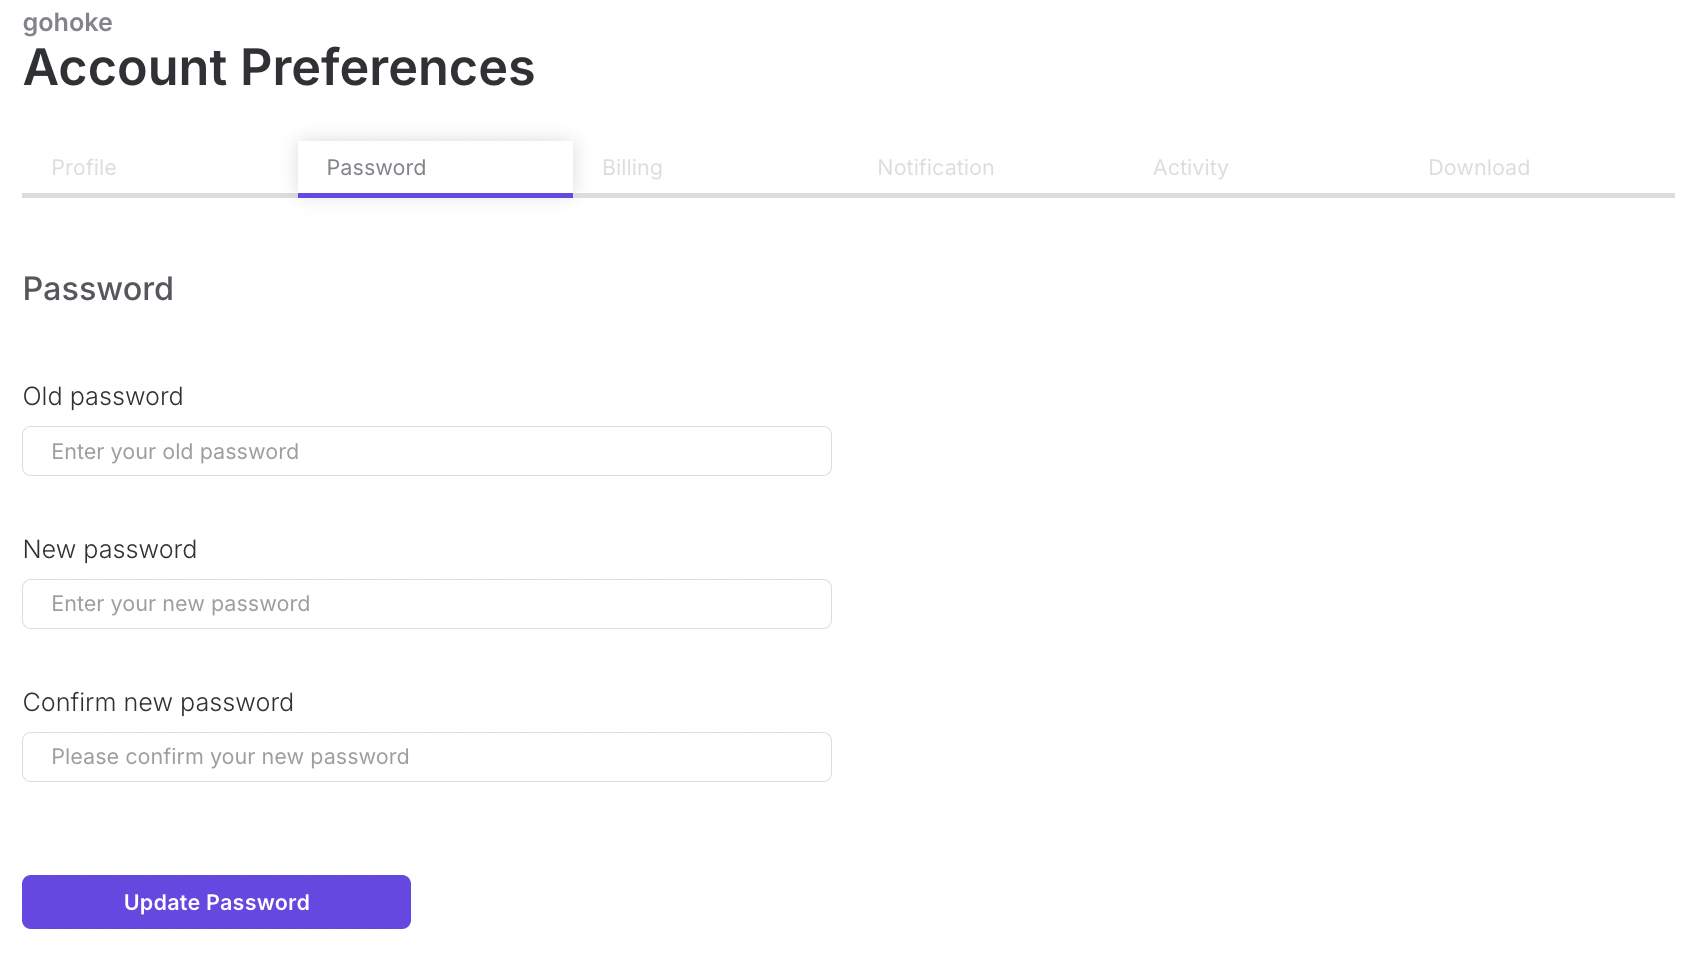
Password
In the Password section, you can change your account password:
Enter your new password.
Confirm it by retyping.
Click Update Password to save.
Choose a strong password that includes letters, numbers, and symbols for better security.
Billing (under development)
The Billing section manages your subscription plan and payment methods:
Upgrade or cancel your plan.
View your current payment method.
Add a new card by clicking the plus symbol and filling in:
Cardholder’s name
Card number
Expiration date (month/year)
CVV
Set a card as the default payment method by checking the appropriate box.
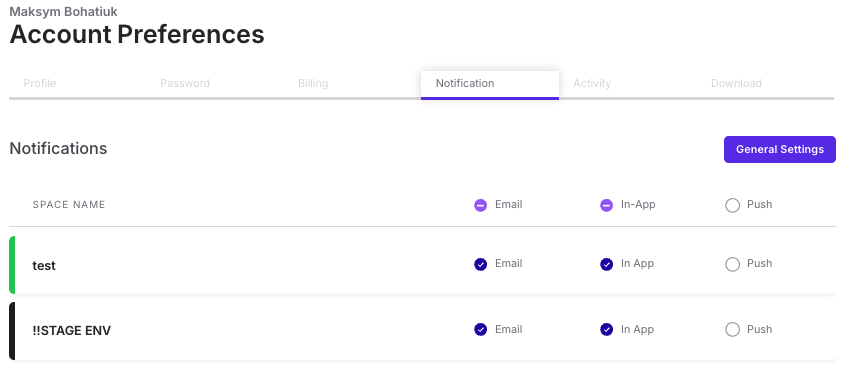
Notifications
In the Notifications section, you can configure how you want to receive updates about your projects. Options include:
Email notifications
In-app notifications
Browser notifications
Each notification entry also shows the related project name and thumbnail for easier reference.
Activity (under development)
The Activity section provides a log of your account activity, including:
Projects created or deleted
Review requests
Approvals or rejections
This helps you track your recent actions and stay aware of project changes.
Downloads (under development)
In the Downloads section, you can view and access projects you have downloaded. This acts as a history of exported files for reference.
Notes
Keep your profile up to date so team members can easily recognize your account.
Enable multiple notification channels to make sure you never miss an important update.
Updating billing details requires valid card information; ensure all fields are filled correctly.
Client - View Project In Files
Table of Contents
Table of Contents
Overview
The Files section in Upsway provides an alternative way to access your projects. Instead of navigating through Spaces or dashboards, you can go directly to the Files page, where all projects are listed in one place. This makes it easier to quickly locate and open a project without switching contexts.
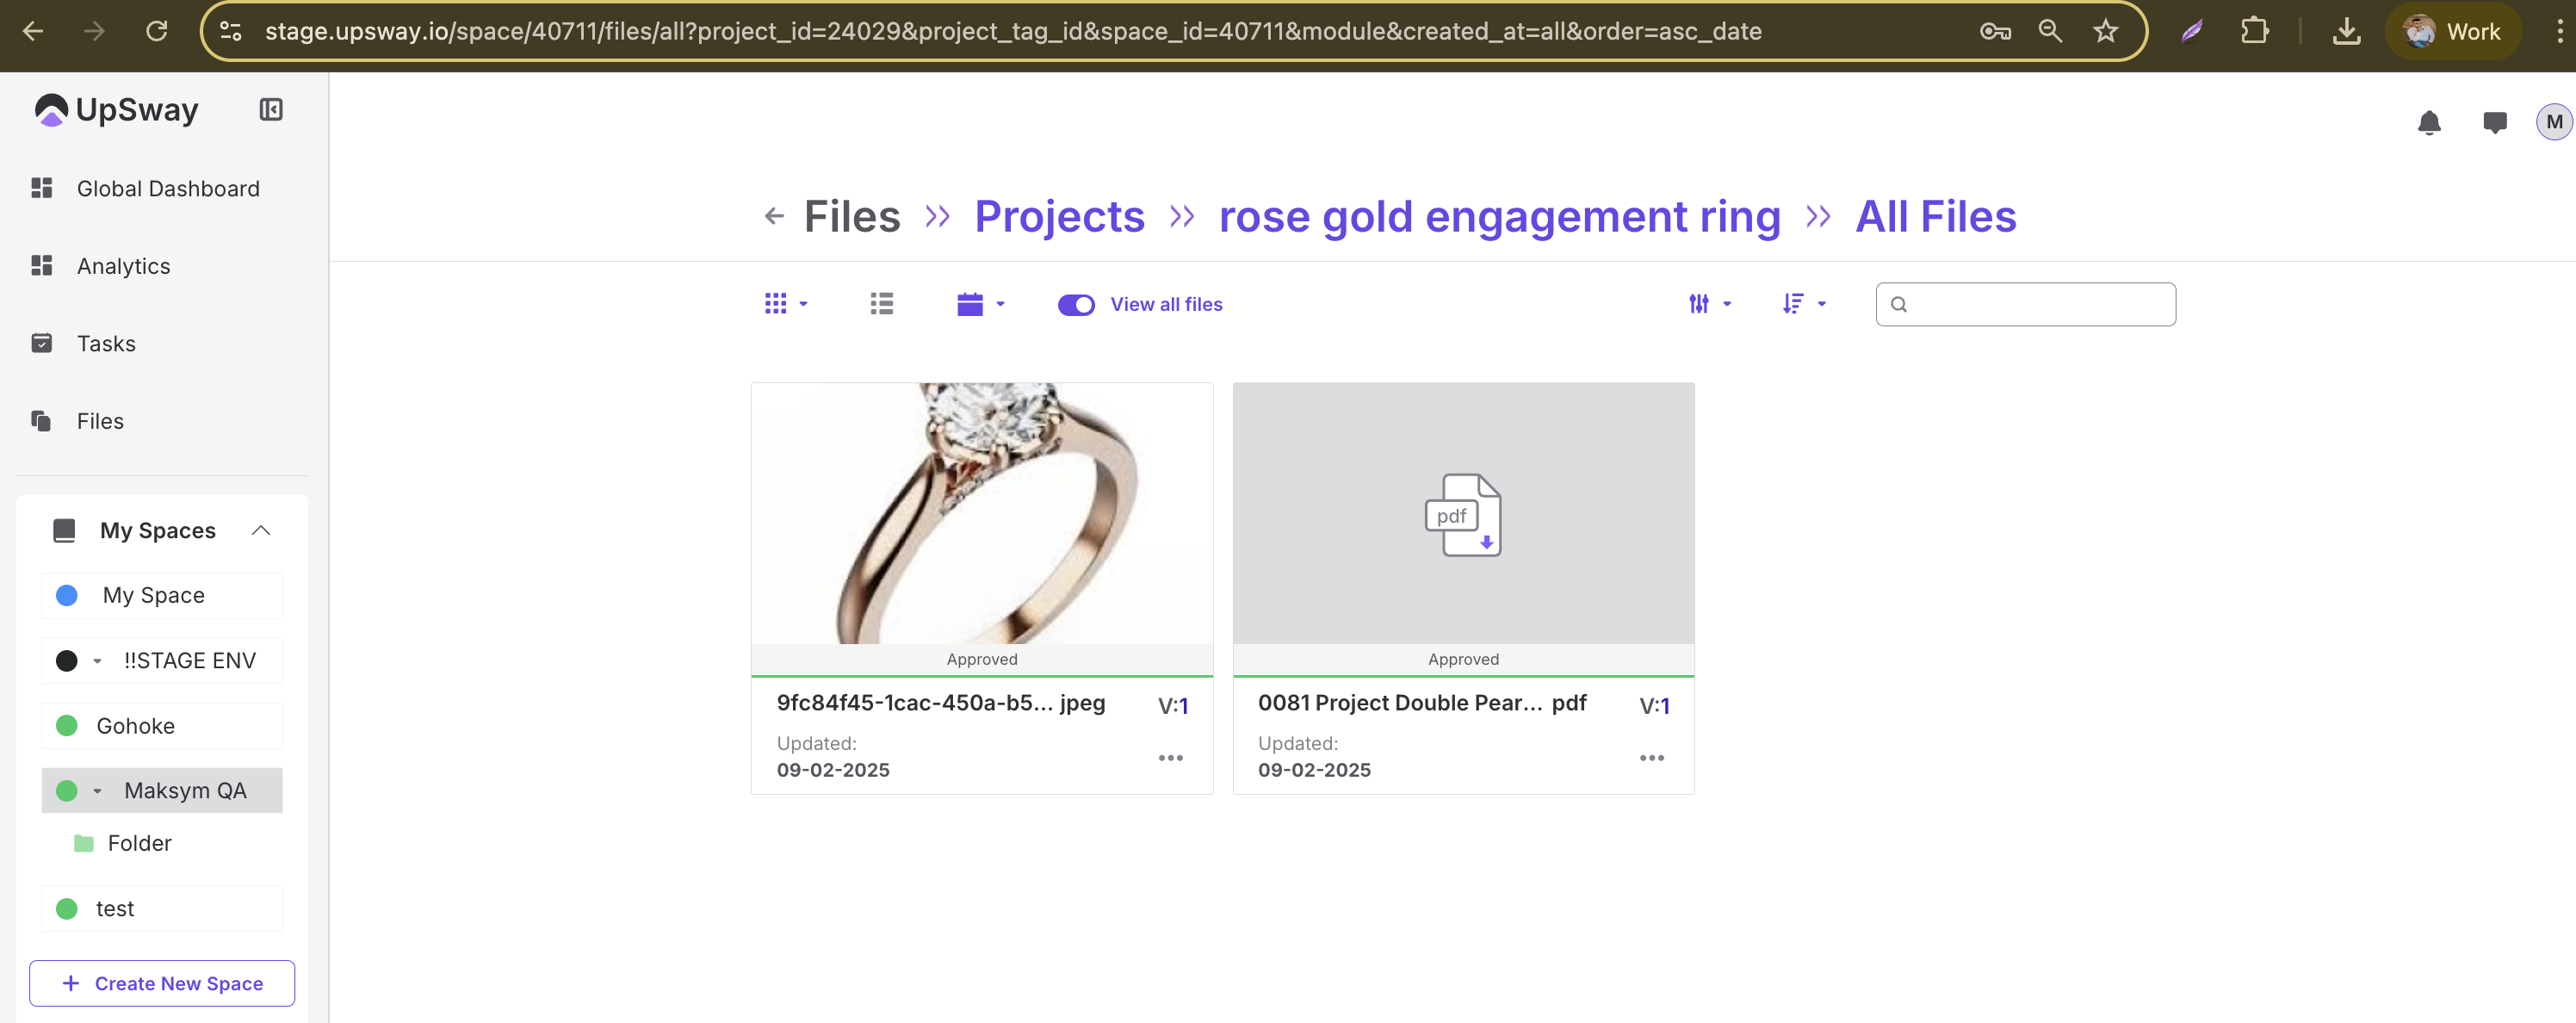
Viewing a Project in Files
From the main menu, select Files. This opens a page that displays all projects associated with your account.
Each project is listed with its name and details.
Clicking on a project opens it, allowing you to view its content, styles, and related assets.
This centralized view helps you manage projects more efficiently, especially when working across multiple Spaces.
Notes
Projects in the Files page are displayed regardless of whether they belong to My Space or a shared Space.
Use the Files section if you want a quick overview of all projects you are part of without navigating through individual Spaces.
Client - Select Projects on Dashboard & Files Page
Table of Contents
Table of Contents
Overview
The Select Projects feature in Upsway allows you to choose one or more projects directly from the Dashboard or the Files page. Once selected, you can perform actions such as deleting, archiving, or sharing projects. This makes bulk management of projects easier and faster.
Selecting Projects on the Dashboard
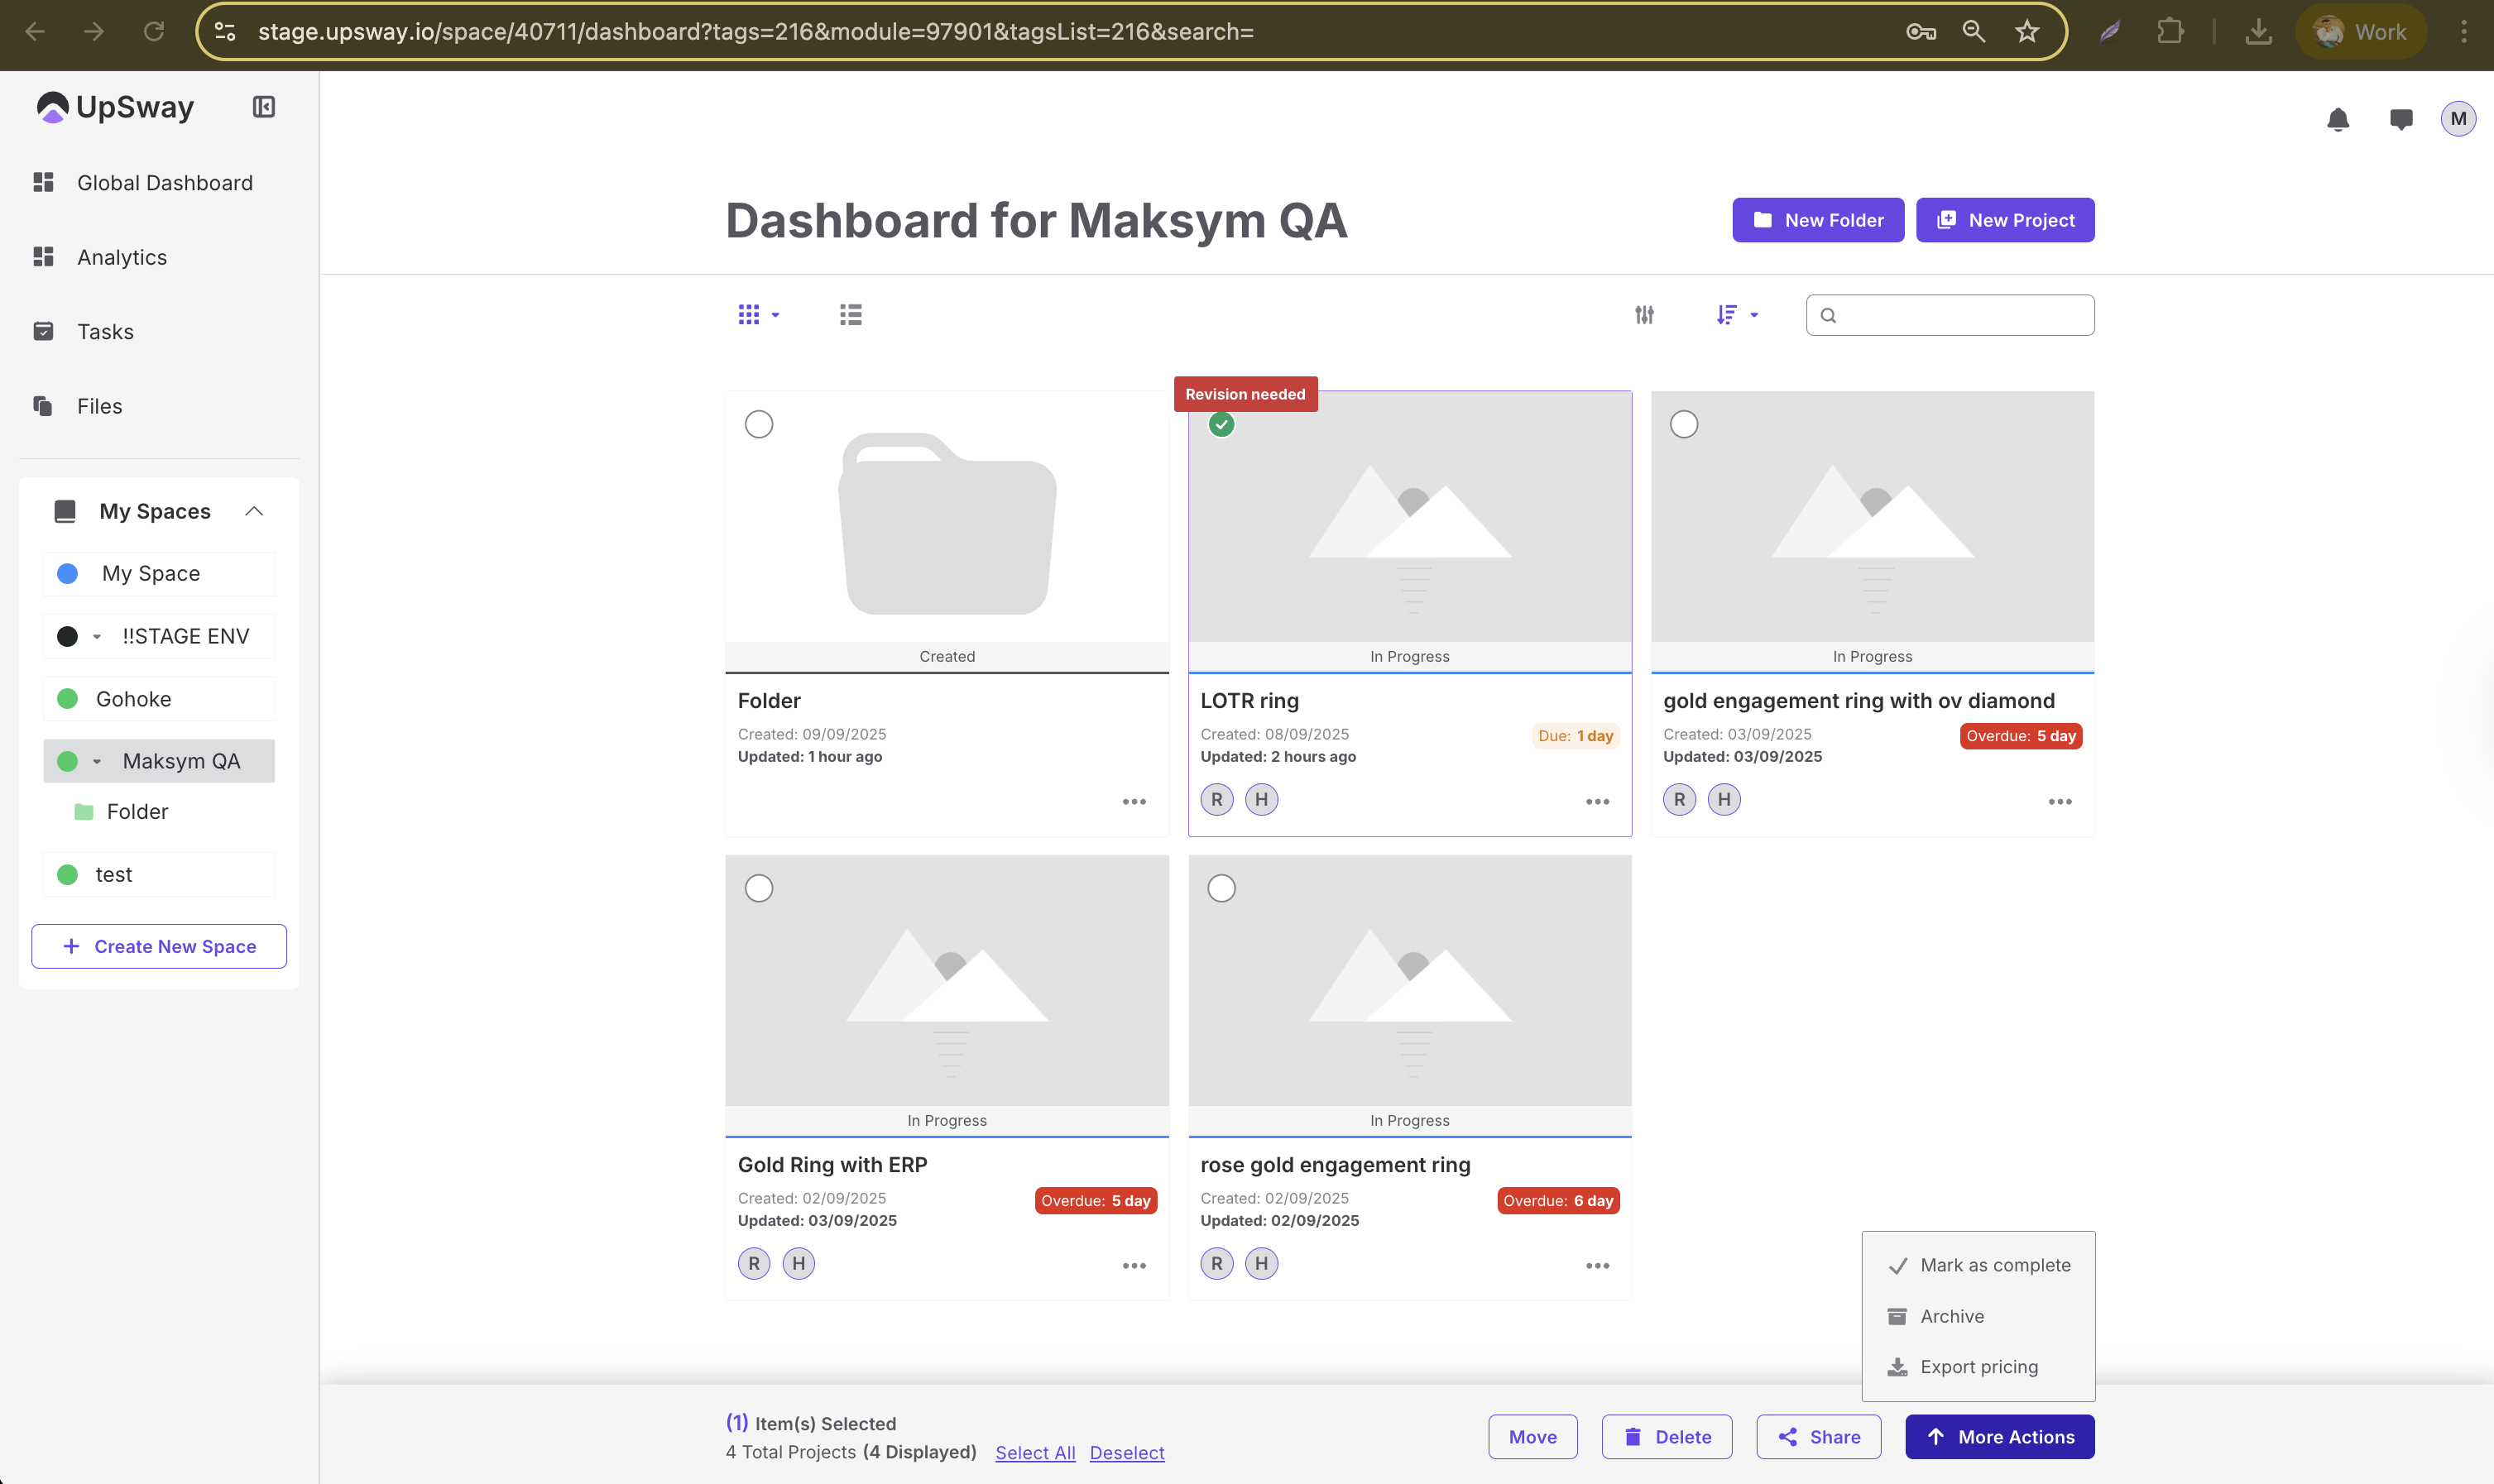
On the Dashboard page, each project has a circle selector next to it.
Click the circle to select a project.
Once selected, additional actions become available, such as:
Move project
Delete project
Share project
Mark as complete
Archive project
Export pricing
This allows you to manage projects without opening them individually.
Selecting Projects on the Files Page
The same functionality is available on the Files page.
Each project listed in Files includes a circle selector.
Selecting projects here enables the same set of actions: move, delete, archive, mark as complete, export pricing or share.
This is especially useful when you need to handle multiple projects across Spaces in one centralized view.
Notes
Be careful when deleting a project, as this action may be irreversible.
Use archiving instead of deleting if you may need the project again in the future.
Selected projects remain active until you deselect them, so double-check your selection before applying an action.
Client - Managing Project Display and Filters
Table of Contents
Table of Contents
Overview
Upsway provides flexible options for how projects are displayed and how they can be filtered. This helps users organize their workspace, quickly locate relevant projects, and adjust the view according to their preference.
You can:
Change the project display size or layout.
Switch between grid view and tabular view.
Use filters to sort and refine the list of projects by different criteria.
Adjusting Project Display
In the Dashboard or Files page, you can customize how projects appear:
Click on the dotted box icon to choose display size:
Large, Medium, or Small view of project cards.
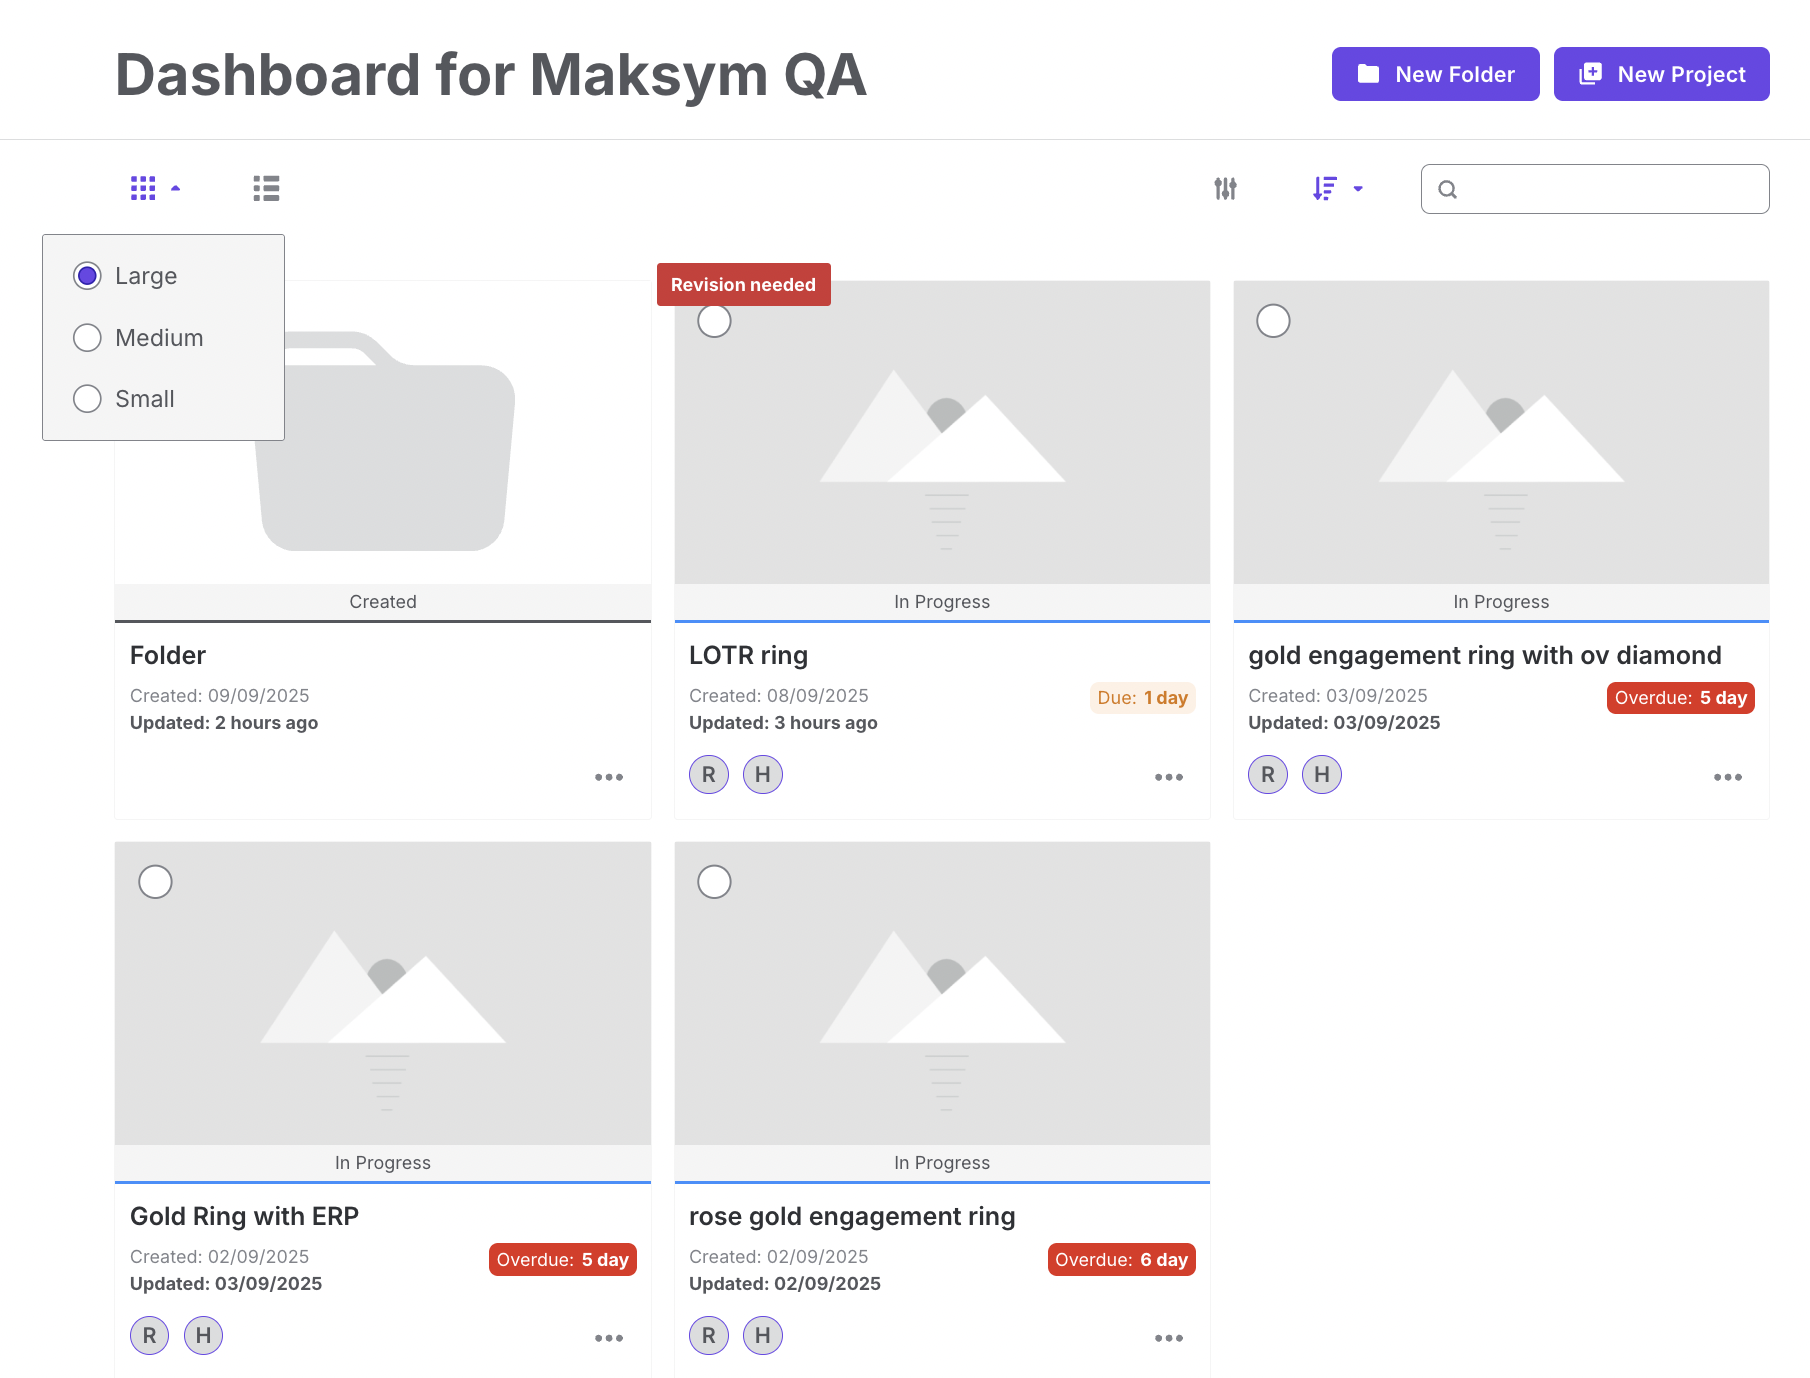
Next to the dotted box, you can switch to a tabular view for a more compact, spreadsheet-like display.
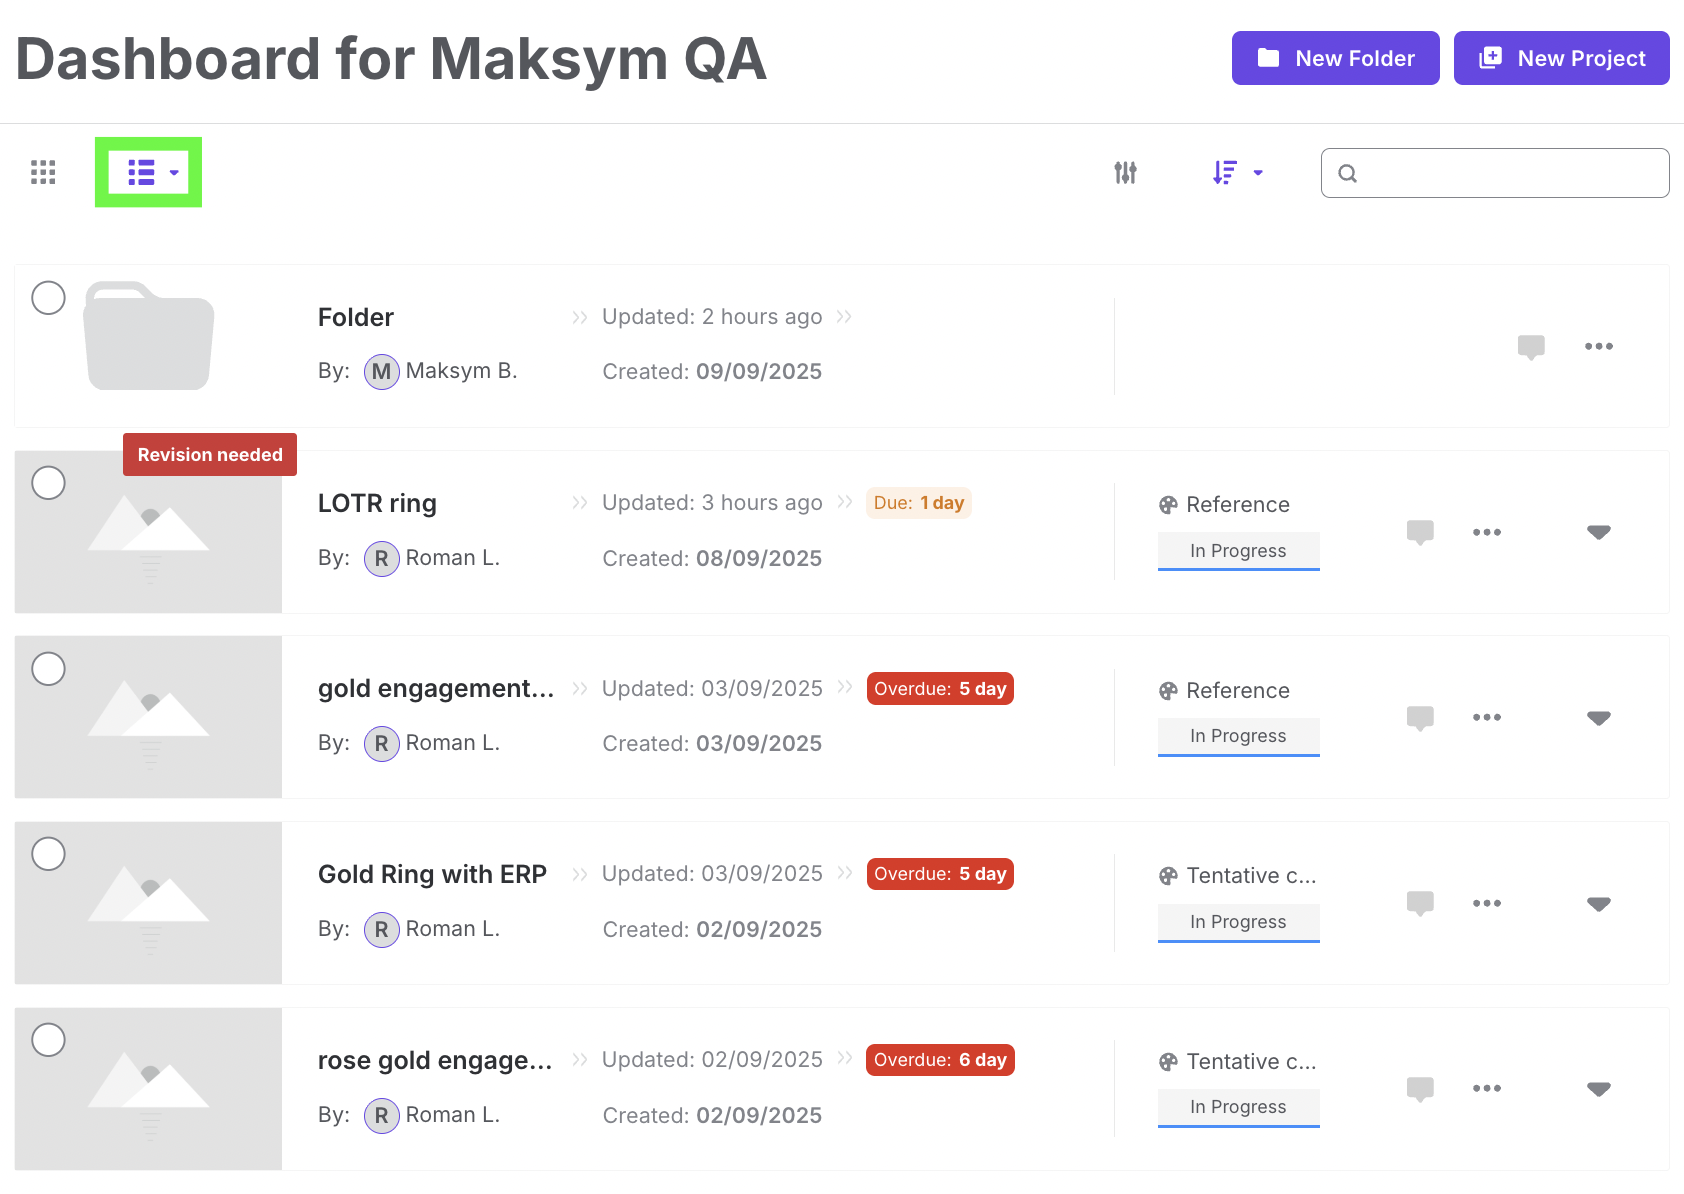
Use larger icons if you prefer a visual overview of projects, or table view for quick scanning and comparisons.
Using Search and Filters
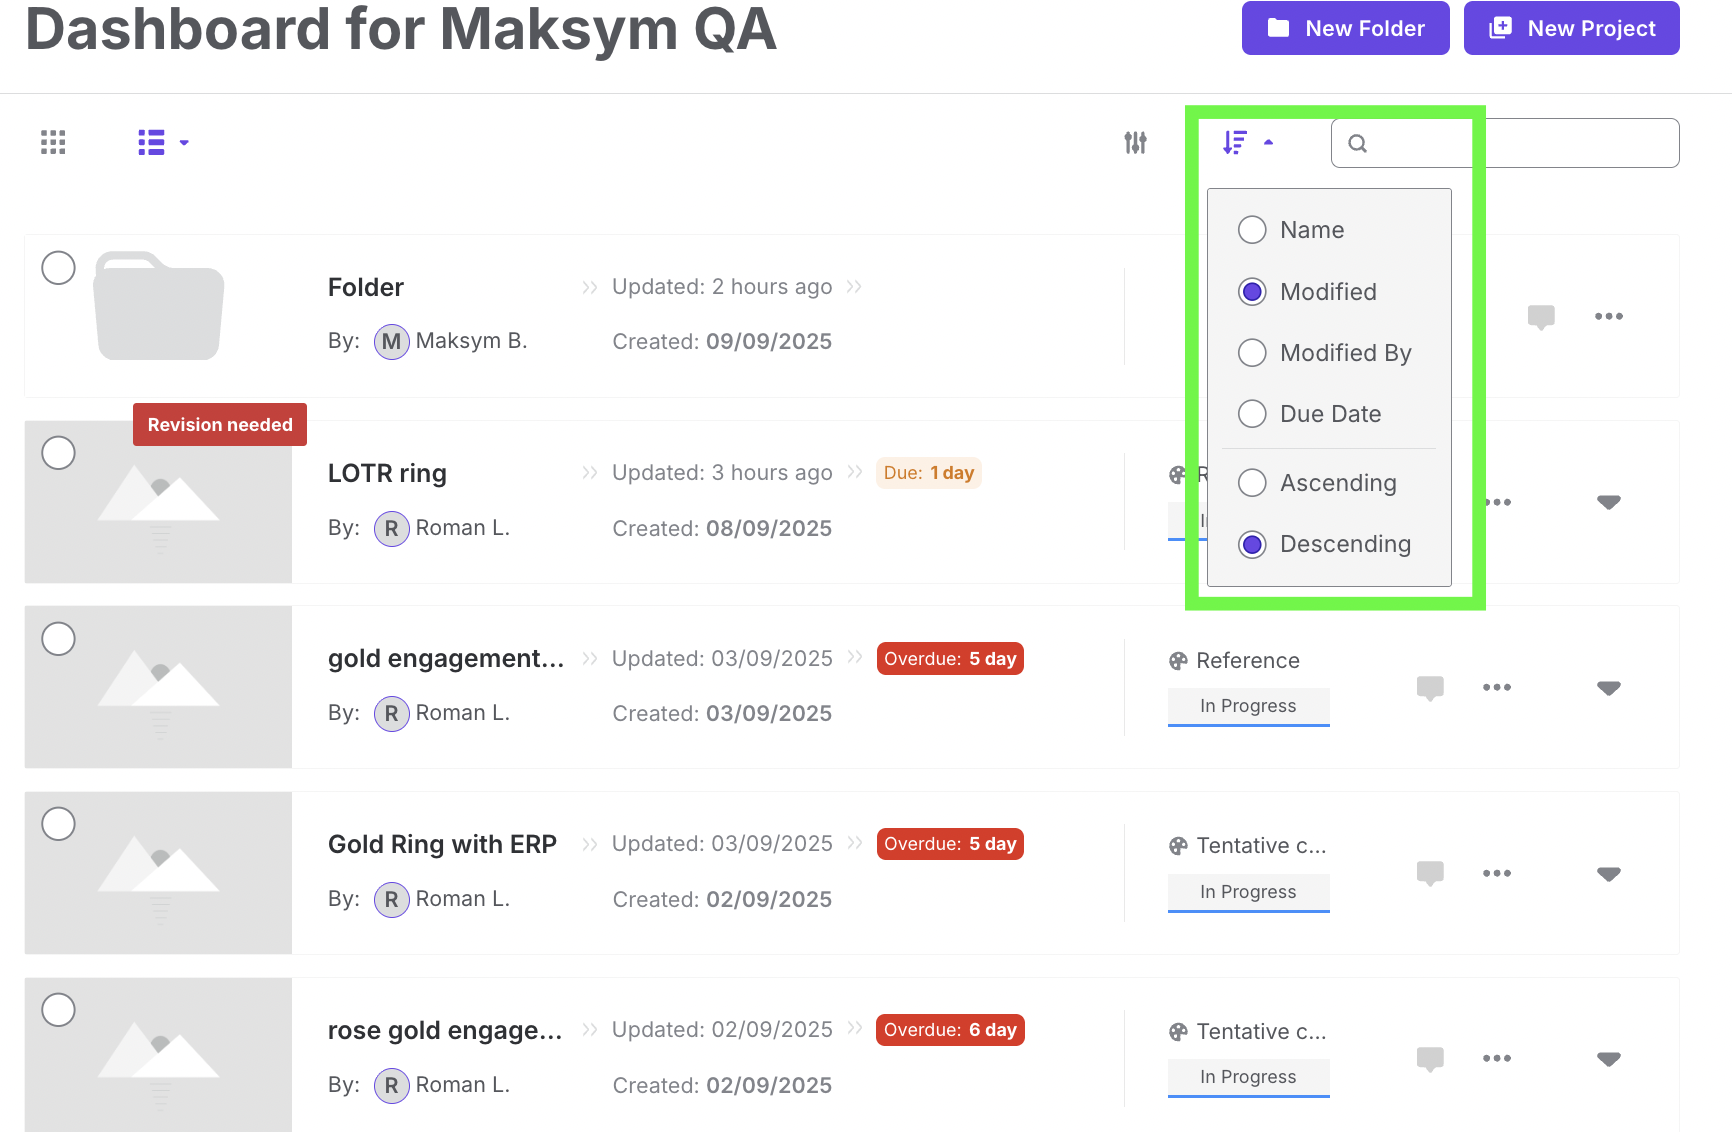
To refine the project list, click on the Search/Filter panel.
Sorting options include:
Name
Modified date
Modified by
Due date
Ascending / Descending order
Filter options allow you to narrow projects by:
Category
Status of the project
Workflow process
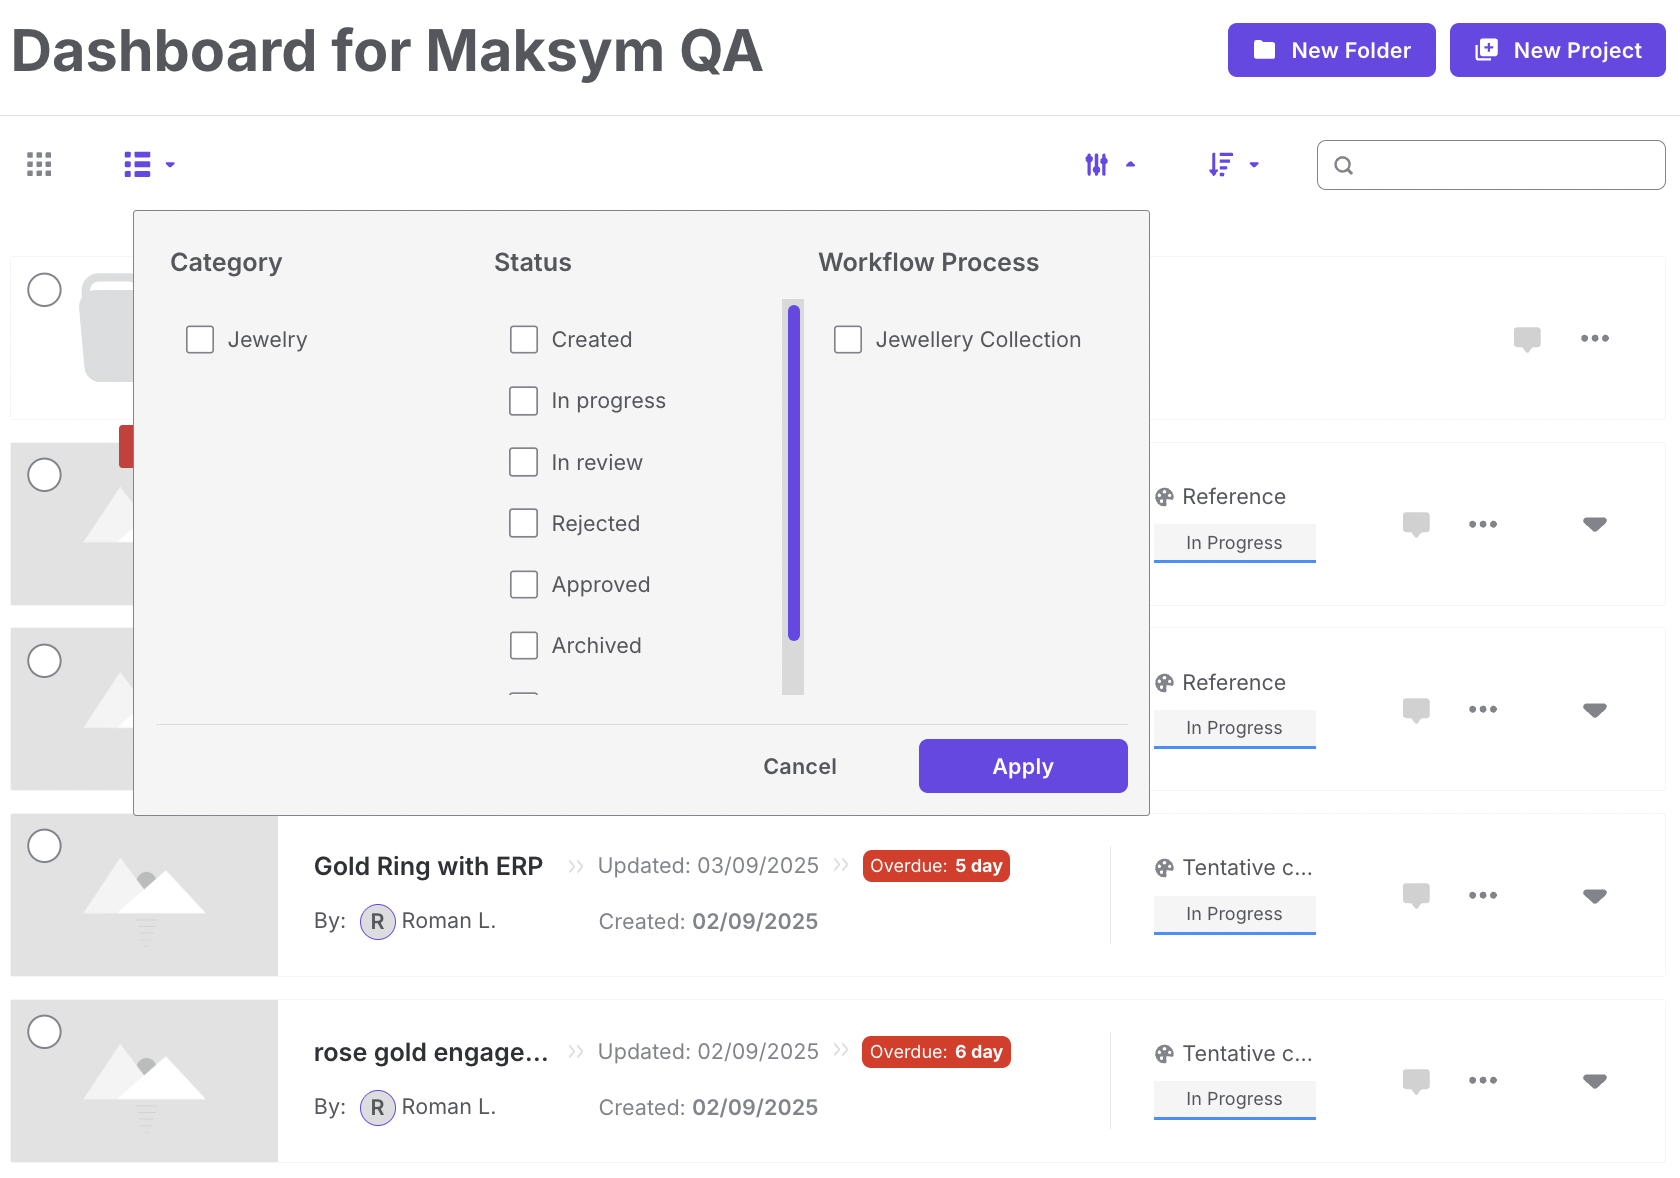
After selecting your desired filters, click Apply to update the display.
You can combine multiple filters to focus only on projects that meet specific conditions.
Notes
The same display and filtering options are available both on the Dashboard and on the Files page.
Switch between views depending on whether you need a visual gallery of projects or a detailed list for management.
Filters remain active until cleared — make sure to reset them if some projects seem to be missing.
Client - Project Styles on Files
Table of Contents
Table of Contents
Overview
The Files section in Upsway not only lists all projects you have access to but also allows you to explore the styles inside each project. Styles represent specific design variations, technical files, and related assets, giving you quick access to detailed project content from a centralized location.
Viewing Styles from the Files Page
Navigate to the Files page from the main menu.
A list of all projects is displayed.
Select a project to open it.
Once inside, the styles associated with that project will be listed.
Click on any style to open its details, designs, and attachments.
This structure allows you to move directly from the Files view into a specific style without going through the Dashboard or Spaces.
Notes
The Files page provides the same style information as when you open a project from the Dashboard, but in a more centralized way.
Use this option if you are managing multiple projects and need to quickly jump into a particular style.
Ensure you select the correct project first, as styles are always tied to their parent project.
Client - Project Versions on Files
Table of Contents
Table of Contents
Overview
In Upsway, each style within a project can have multiple versions. Versions allow teams to track design progress, compare iterations, and manage changes over time. From the Files page, you can navigate through projects, styles, and their versions to review or create updates as needed.
Viewing Versions from the Files Page
Open the Files page from the main menu to see all projects.
Select a project you want to explore.
Inside the project, the associated styles will be listed.
Click on a style to view its details.
Each style displays its versions in sequence.
You can:
Open any version to review its details and attached assets.
Use the Open Project option within a version to start working on it.
Creating or Updating Versions
From the version view, you can:
Update an existing version — make changes to design details or files.
Create a new version — duplicate the current version and apply modifications, preserving the history of previous iterations.
This workflow ensures teams can maintain a clear version history while continuing to refine designs.
Notes
Always create a new version when major changes are introduced, so earlier work remains accessible for comparison.
Use version numbers or descriptive labels (e.g., “v2 – client feedback applied”) to keep the history organized.
Editing an existing version may overwrite data. Consider creating a new version to avoid losing progress.
Client - Managing Workflow Processes
Table of Contents
Table of Contents
Overview
In Upsway, workflows define the sequence of steps for handling designs, approvals, and project tasks. Previously, workflows could be adjusted directly inside a project or style. Now, workflows can only be managed from the Space Settings. This ensures consistency across all projects within the same Space.
Accessing Workflow Settings
To configure or update a workflow:
Hover over the desired Space in the left sidebar menu.
Click the gear icon (⚙️) to open the Settings menu.
From the dropdown, select Settings.
Inside the Space Settings panel, navigate to the Workflow tab.
Here you will find all workflow configuration options.
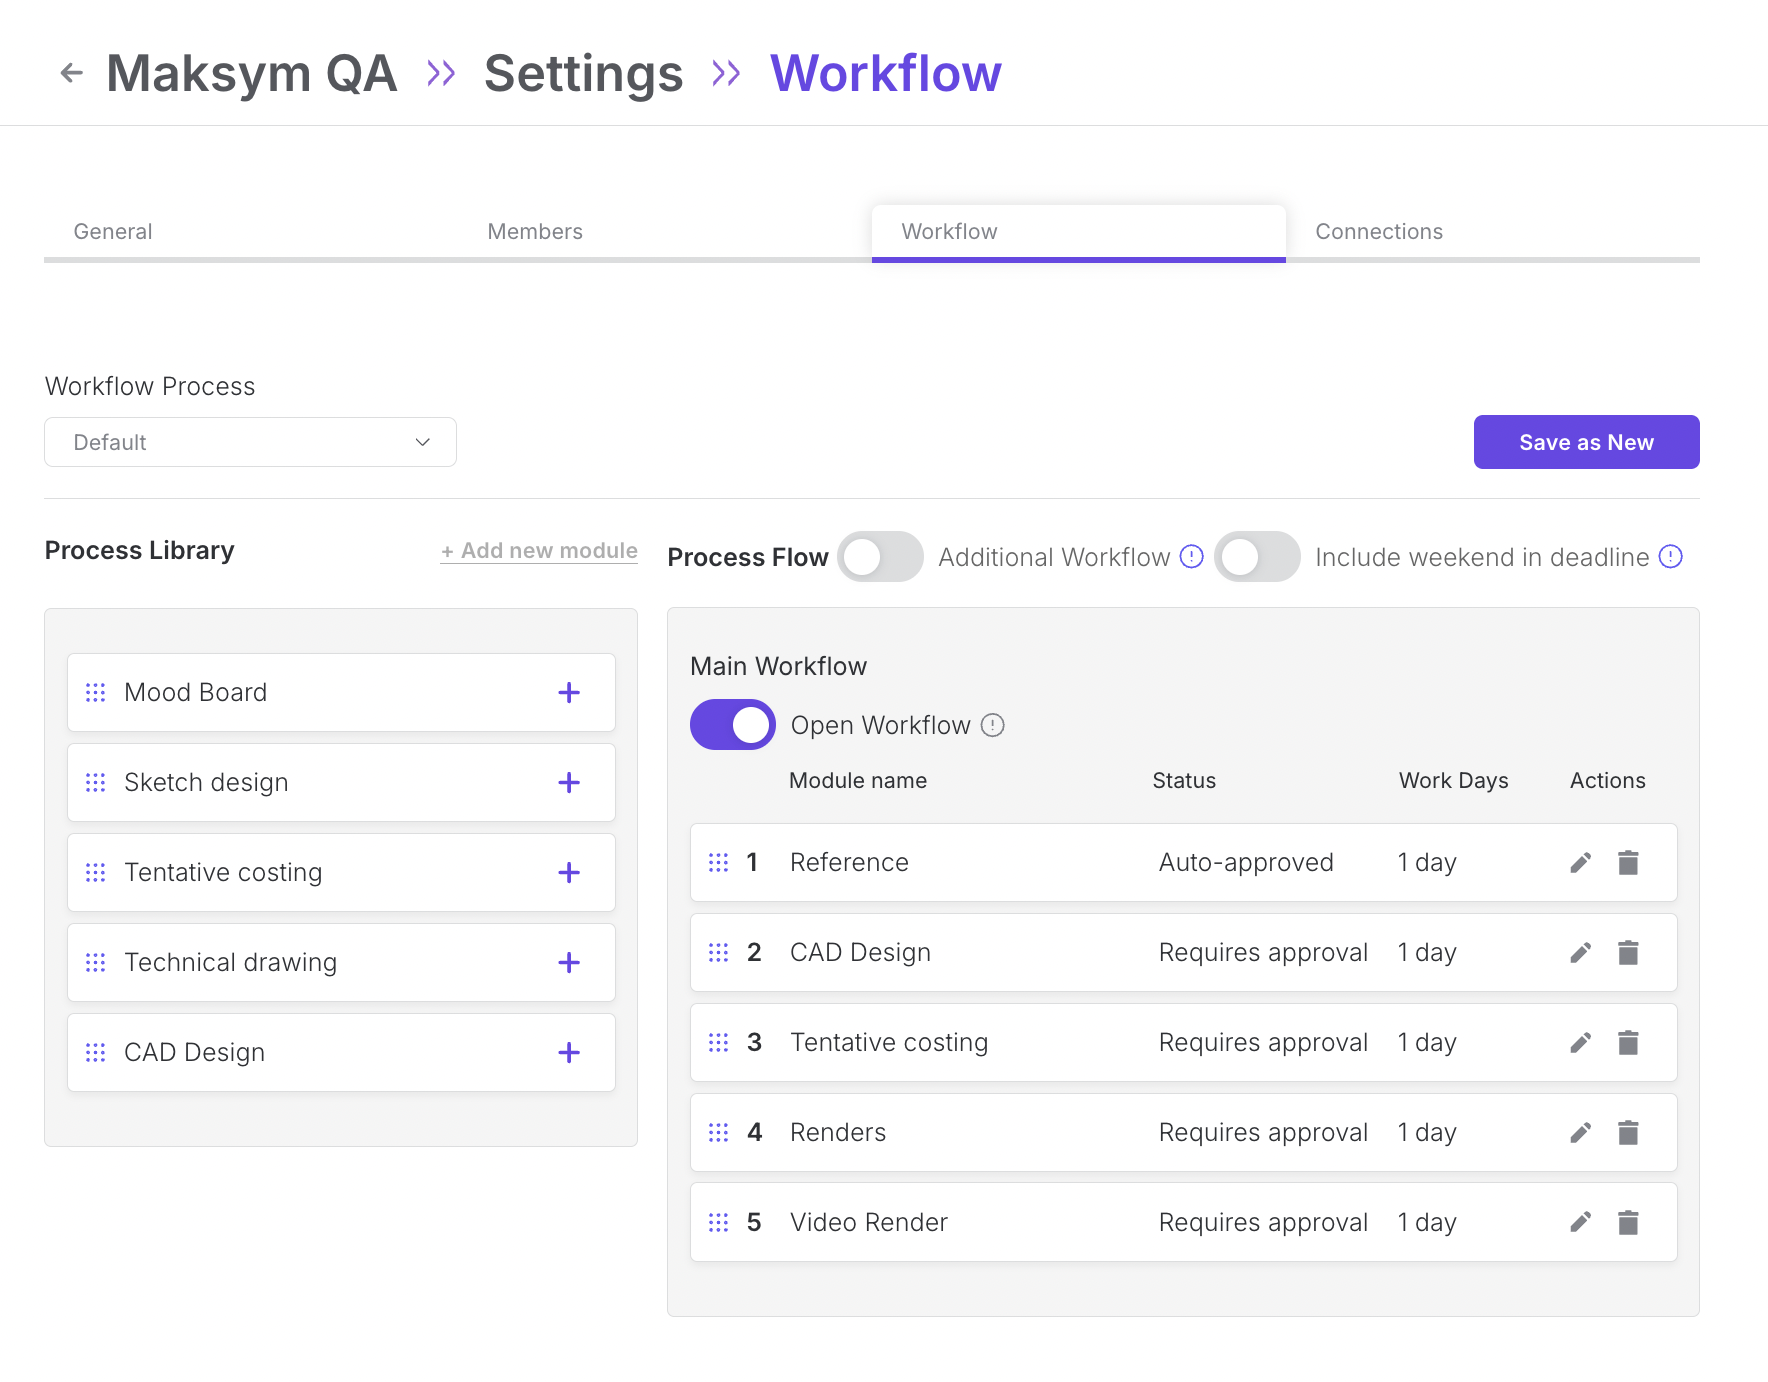
Configuring Workflows
Each Space in Upsway includes a default workflow to help you start quickly, while still offering flexibility for customization.
Default Workflow
The first module, Reference, is auto-approved.
All other modules require approval.
By default, the Open Workflow toggle is turned on. This means users can work on modules in any order. If the toggle is switched off, modules must be completed sequentially — you cannot move to the next step until the previous one is approved.
Tip: Keep the workflow open if you want flexibility, or close it to enforce strict step-by-step progression.
Managing Modules
You can customize modules in several ways:
Reorder modules by dragging and dropping them into the desired sequence.
Edit a module by clicking the ✏️ (pencil) icon.
Available options:
Change the module name.
Update the Duration:
Workdays (default).
Calendar days (if the Include weekend in deadline toggle is enabled, the duration is displayed in calendar days).
Enable/disable All assets auto-approved:
This toggle is on by default, meaning the module does not require manual review/approval in order to move to the next step.
Delete a module by clicking the 🗑️ (trash bin) icon.
You can also expand your workflow with modules from the Process Library.
Additional Workflow
In addition to the Main Workflow, you can enable a separate workflow track:
Activate the Additional Workflow toggle to create an extra workflow section below the Main Workflow.
Just like in the main section, you can:
Toggle Open Workflow on/off.
Drag and drop modules to define their order.
Add modules from the Process Library.
Use Additional Workflow for independent steps that should run in parallel with the main process and not depend on its completion.
Saving Your Workflow
After configuring your workflow:
Click Save as New to store it.
The workflow becomes available for projects created in this Space.
Tip: Use descriptive names and realistic durations so your team clearly understands each stage and project deadlines remain accurate.
Notes
Workflows are now Space-level settings. Once updated, they apply to all projects created inside that Space.
Use the Process Library to maintain consistent steps across multiple projects.
Remember to save your workflow before leaving the settings page — otherwise, changes will be lost.
Client - Project sidebar
Table of Contents
Table of Contents
Overview
The Project Sidebar in Upsway provides quick access to essential project tools and information without leaving the project view. By opening the sidebar, you can review activity logs, chat with customers, manage tasks, explore design files, and check project history — all in one place.
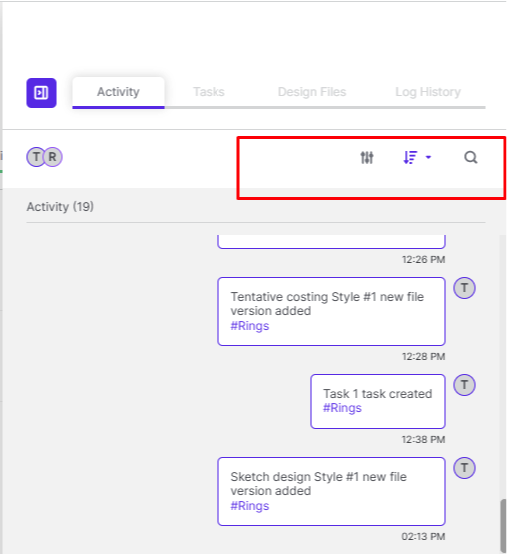
Activity Section
The Activity tab provides a chronological overview of project updates:
Filters allow you to search by tag, style, or design module, and sort results in ascending or descending order.
Updates include events such as new style created, new version added, along with time and date stamps.
A built-in chat box lets you communicate directly with team members, sending text messages or files.
Use the Activity section to track progress and maintain transparent communication with your team.
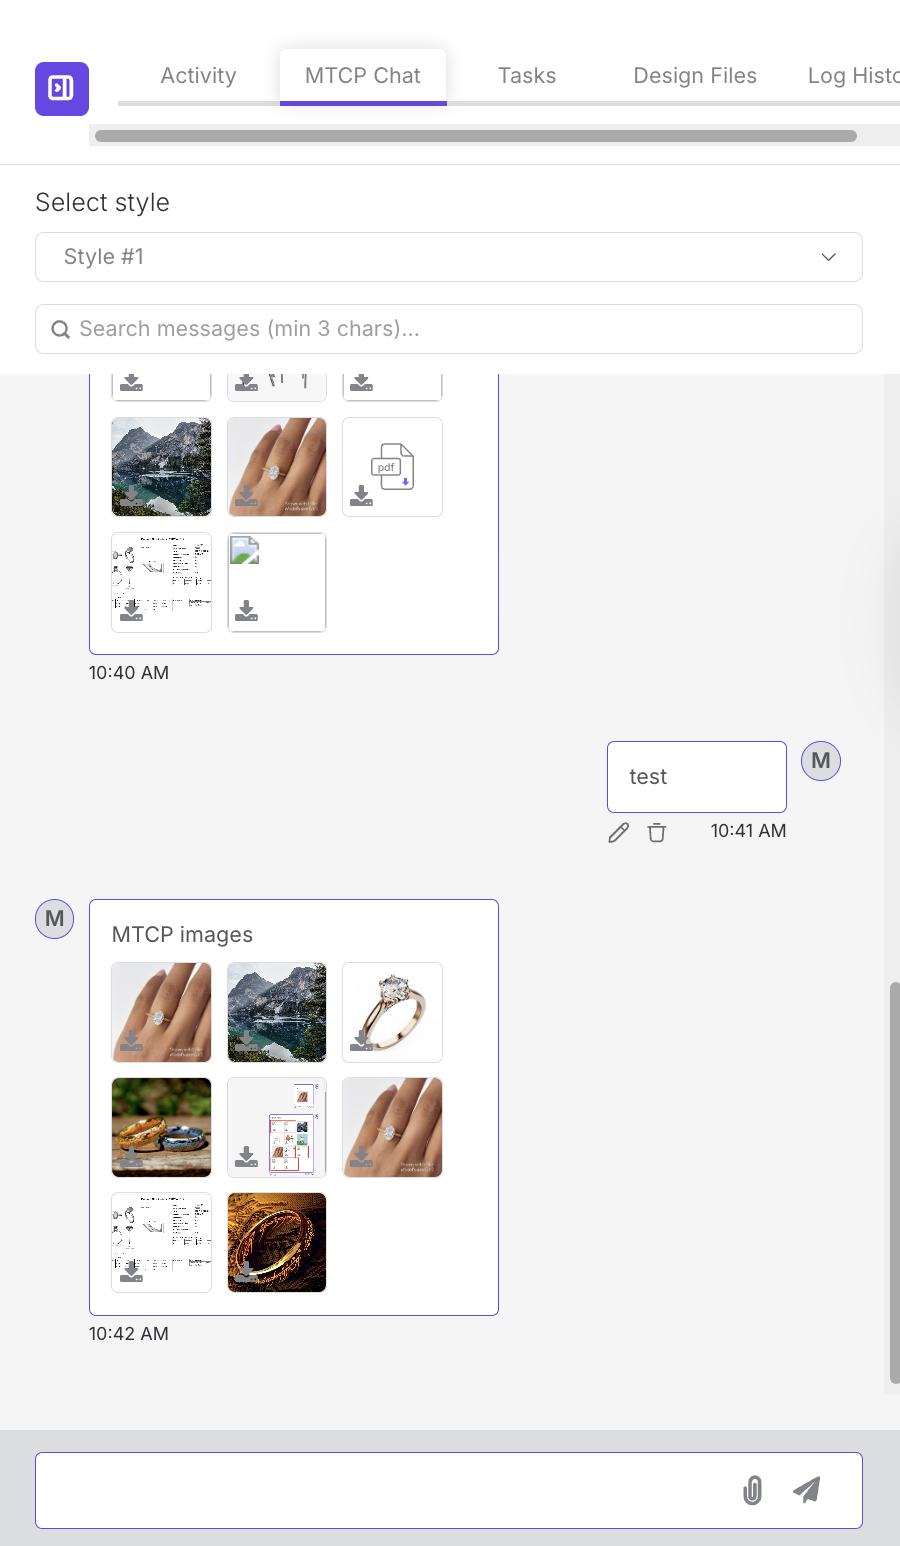
MTCP Chat
The MTCP Chat tab enables direct communication with MadeTruly — specifically with the original client who initiated the order.
Features include:
Text messaging – exchange messages with clients.
File attachments – supported formats include:
.png, .jpeg, .jpg, .gif, .pdf, .obj, .stl, .xlsx, .xld, .3dm, .3d, .jcd, .mp4.
Message editing – update previously sent messages.
Message deletion – remove your own messages if needed.
Search functionality – search chat history (minimum of 3 characters).
Style-based communication – conversations are organized within the scope of a specific Style module, keeping discussions focused and relevant.
MTCP Chat works similarly to the Activity section but is dedicated to external communication with clients.
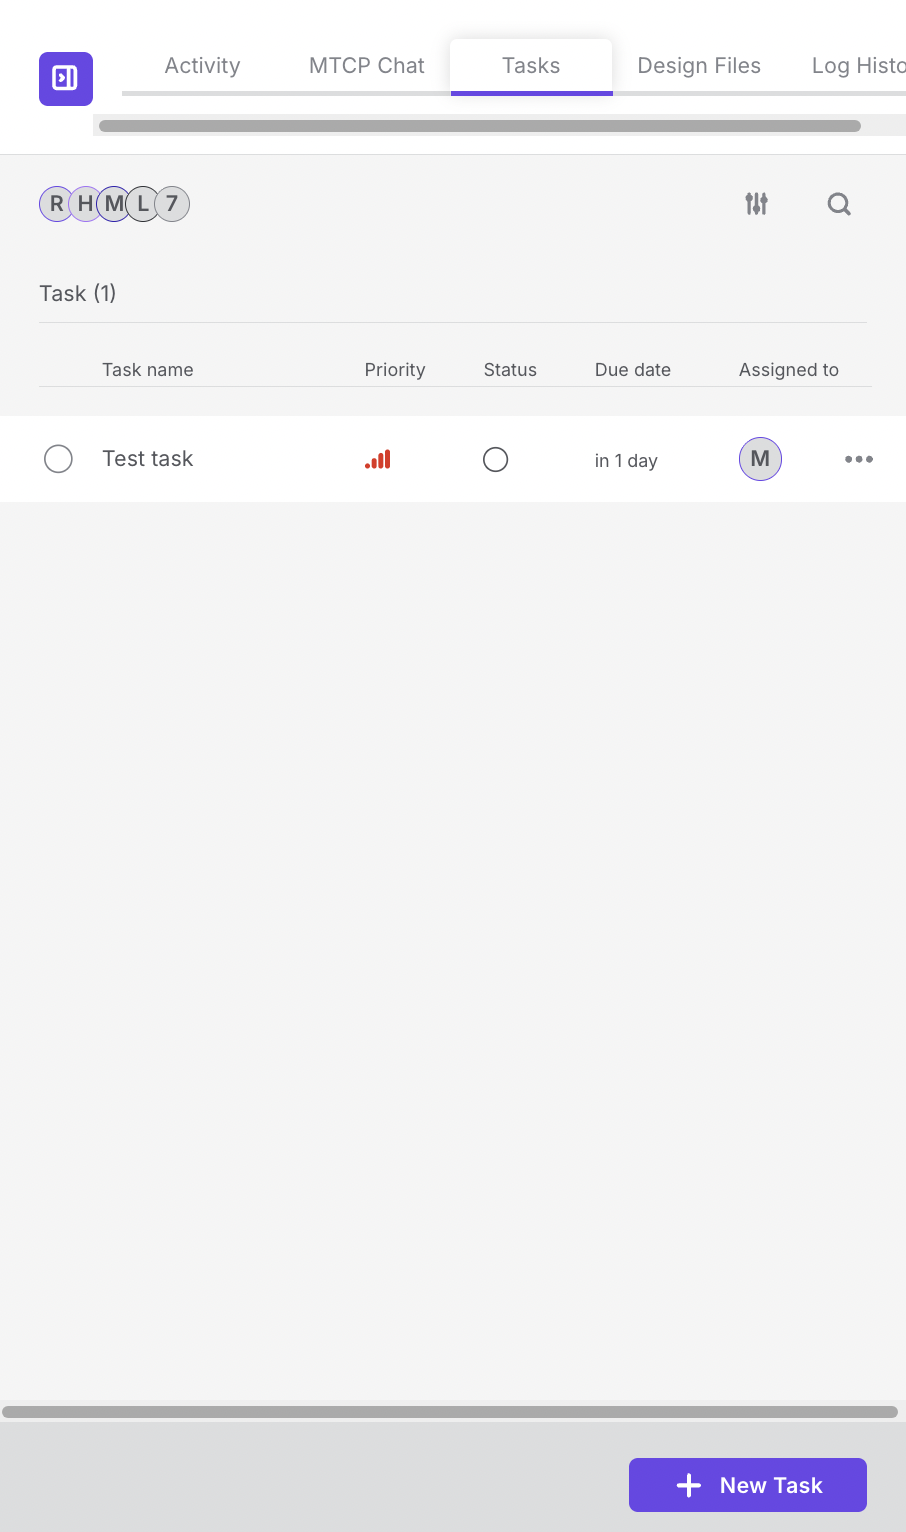
Task Section
The Task tab centralizes all project-related tasks.
A filter lets you refine tasks by tag, style, or design module.
Each task entry includes:
Task name
Priority
Assignee
Due date
Status
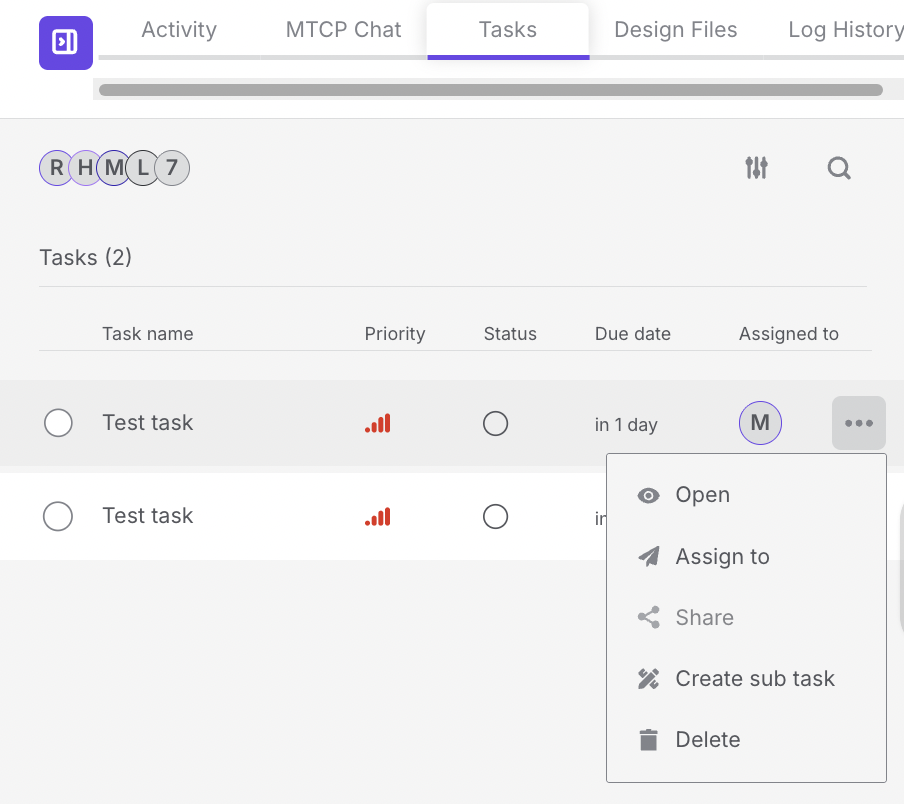
Task Actions
Click the three dots (⋮) next to a task to:
Open the task
Assign or reassign it
Create a sub-task
Share or delete it
Creating a Task
Click New Task to open the task creation form, which includes:
Project and style selection
Task name and description
Sub-task option
File attachments
Owner and assignee fields
Dates (created, due date)
Priority and status
Task reminders

Fill in the details and click Create Task to save, or Cancel to discard.
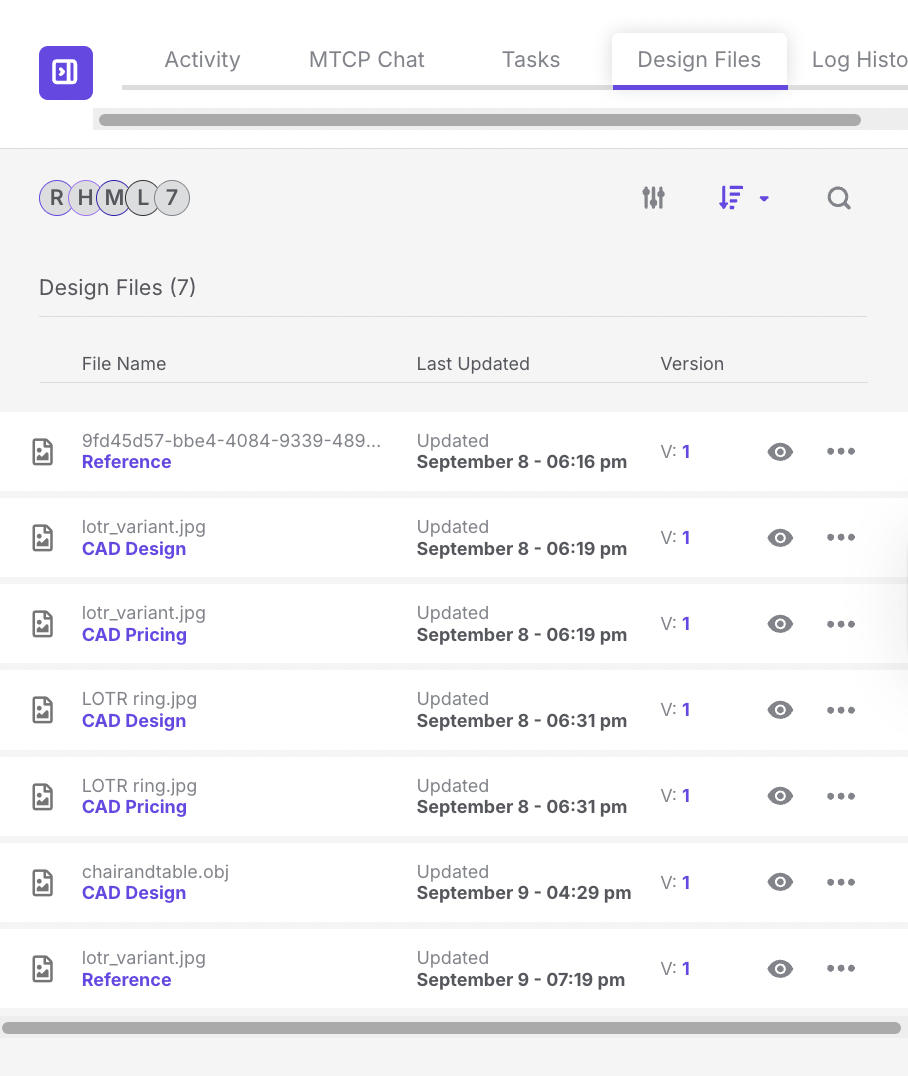
Design Files Section
The Design Files tab organizes all design-related documents.
Filters allow searching by tag, style, or design module.
Each file shows:
File name
Last updated (hover to see exact date and time)
Version number (e.g., v1, v2)
Actions:
Eye icon – preview the design
Three dots (⋮) – download or delete the file
This section ensures the team always works with the most up-to-date design files.
Log History
The Log History tab displays the chronological record of project actions. It functions similarly to the Design Files view but focuses on broader project events and changes.
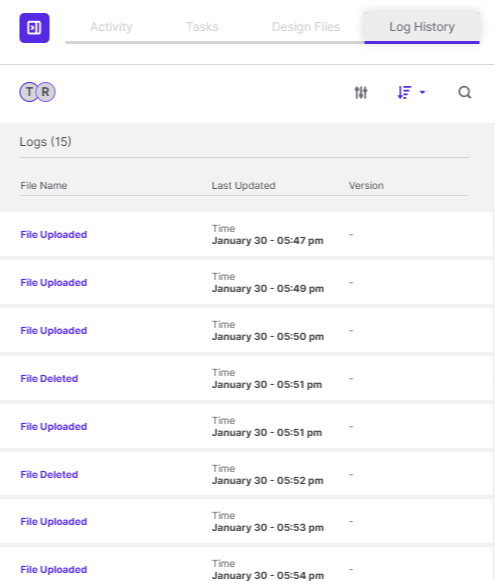
Notes
The Project Sidebar is accessible by clicking the sidebar button on the right side of the project view.
Use the sidebar instead of navigating between multiple sections to save time and keep all essential project data in one place.
Deleting tasks or files from the sidebar is permanent — double-check before confirming.
Client - Whiteboard Management
Table of Contents
Table of Contents
Overview
The Whiteboard in Upsway is a collaborative space inside a project where users can upload files, organize content, and add external references such as links or videos. It supports a variety of file operations: uploading, duplicating, resizing, and deleting, and allows you to manage multiple boards for different purposes.
Opening the Whiteboard
Inside a project, click on the Whiteboard button to open it. From here, you can add files, create new boards, and manage existing ones.
Adding and Managing Files
Use the + button to upload files directly to the Whiteboard.
Supported actions include:
Upload File – add a new file to the board.
Delete File – remove a file.
Duplicate File – create a copy of a file on the board.
Once added, files can be:
Resized to fit your layout.
Accessed through the three dots (⋮) menu to duplicate or delete them.
Adding URL Links
You can enrich the Whiteboard with external links, such as YouTube videos:
Select Add URL Link and paste the link.
Once added, the video or link appears on the board.
The item can be resized and managed via the three dots (⋮) menu (duplicate, edit URL, delete).
Board Actions
The Whiteboard Default menu provides options to manage the entire board:
Rename Board – give the board a custom name.
Lock Board – prevent further edits. Unlock to enable actions again.
Add a URL Link – paste a video or external reference.
Remove Board – delete the current board.
Formatting and Navigation
Use the Undo/Redo arrows to step back or forward through recent actions.
A formatting view (dotted box) is available to quickly organize files on the board.
Notes
Locking a board prevents all actions until it is unlocked.
Use multiple boards to separate different phases or themes of your project.
Deleting a board or file is permanent — ensure you duplicate items first if you may need them again.
Client - Analytics calculations
Table of Contents
Projects in space
Show how many projects are there in selected spaces
Percentage change should show the change in the selected timeframe.
Example: I selected “Last 30 days”. 60-30 days ago there were 14 projects. 30-0 days ago there are 20 projects. This will show 43% increase - round to whole number.
Completion ratio
Percentage of how many projects are completed
There are 10 completed projects and 10 incomplete projects. Ratio should be 50%
Percentage change. I selected “Last 30 days”. 60-30 days ago the completion ratio was 50%. 30-0 days ago it was 50%. We should show 0% change.
Review/approval success rate
Formula for success rate:
(Number of Approved Assets / Total Number of Assets) * 100 - Assets and all their versions should be taken from selected spaces.
Applying your numbers:
Total Assets (taken from all projects, styles, versions: 5 (number of times an asset was rejected) + 8 (number of times an asset was approved) = 13
Success Rate: (8 / 13) * 100 ≈ 61.54%
We are taking the number of events (from in review > approvals or rejections) and calculating the success rate from that. We are not taking only the end result.
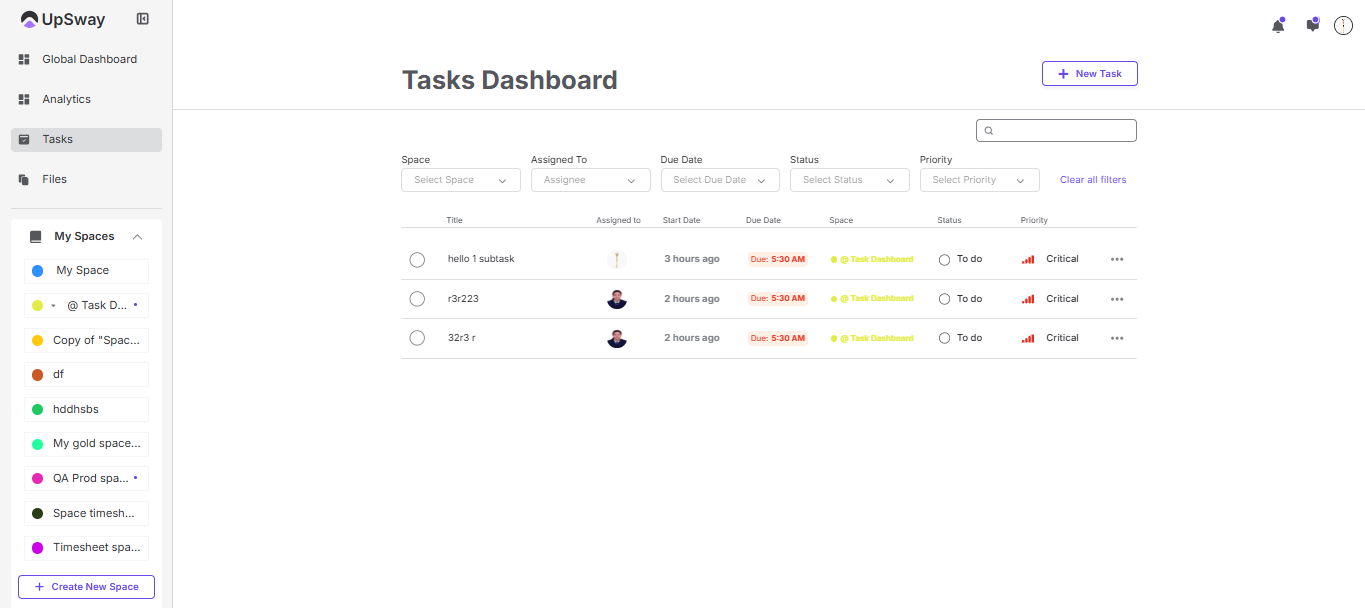
Client - Task Dashboard
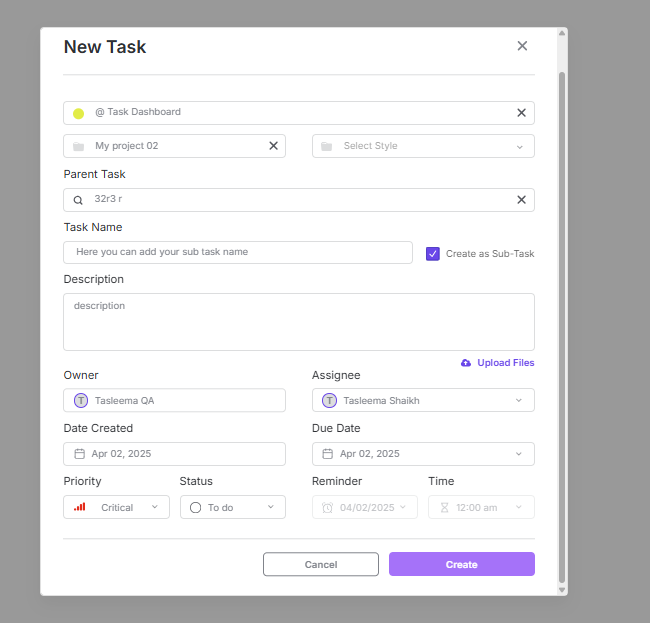
Client - Create New Task
1- Go to the Upsway website https://upsway.io/login
2- Enter your credentials to log in to the system, or you can log in through your Google or Facebook account
3- Log in to the system, and you will land on the global dashboard page
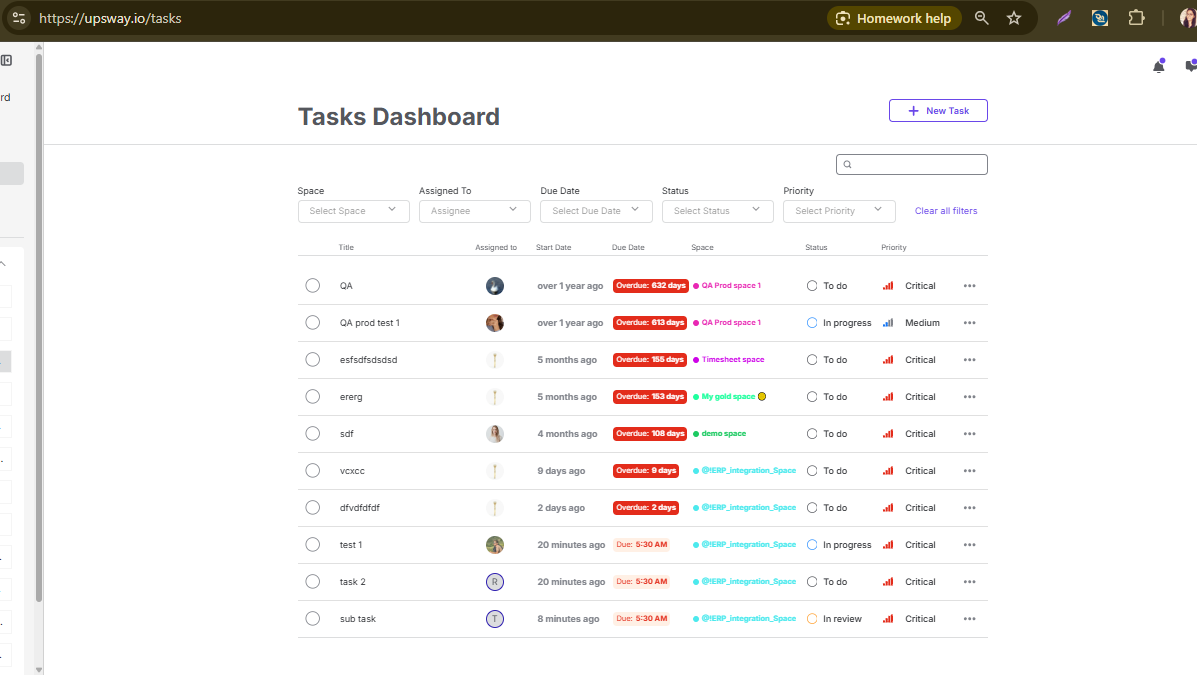
4- Click on Tasks menu- You will land on task dashboard page
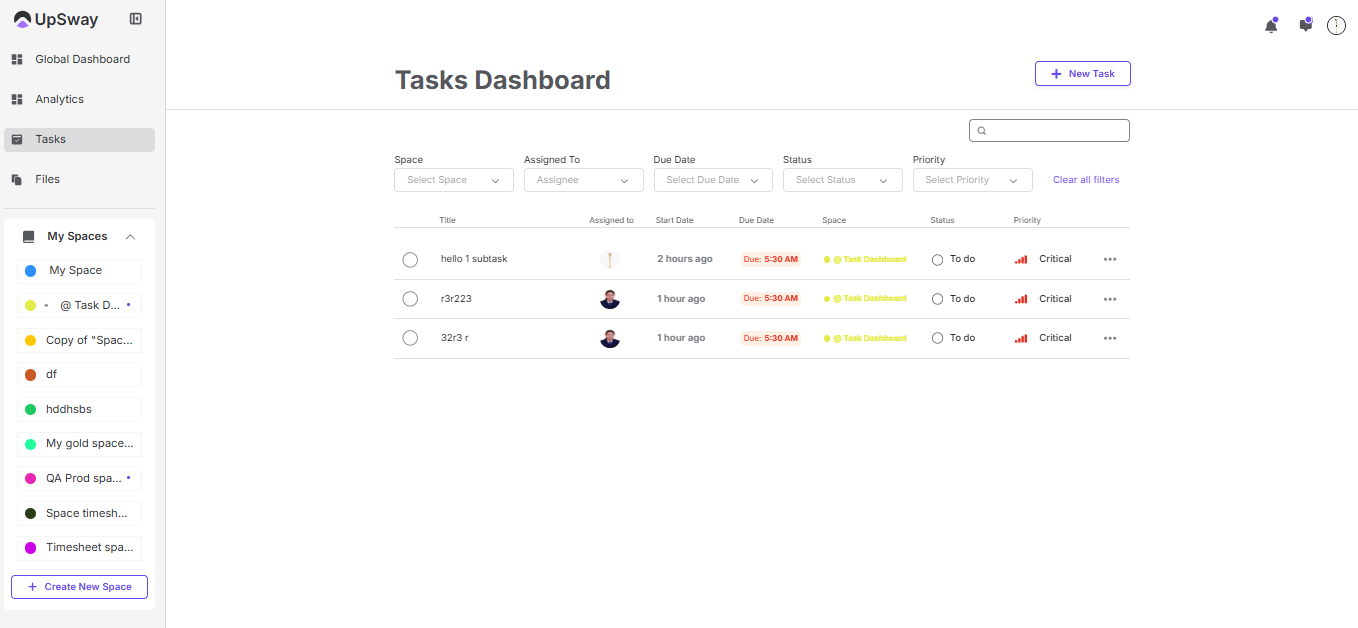
5- Here you will see all tasks assigned to you across different projects.
6- Click on New task CTA- You will redirect on new task popup. Here you have to add all fields like select space, select project, select style, add task name, when you will tick create sub-task you can create subtask under this main task, description, assignee, due date, priority, status, etc.
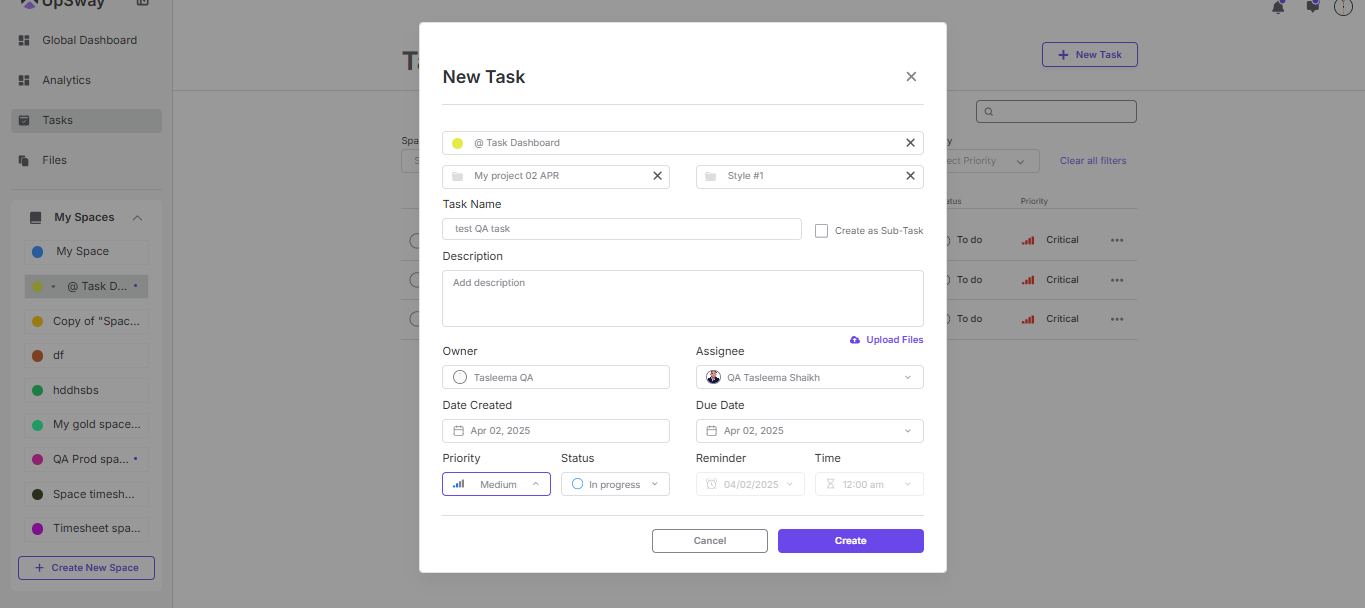
7- Click on Create button- Task will get create successfully. Create task will display on dashboard page also you can see this task in project.
8- Click on Cancel button- Popup will get close and task will not get create.
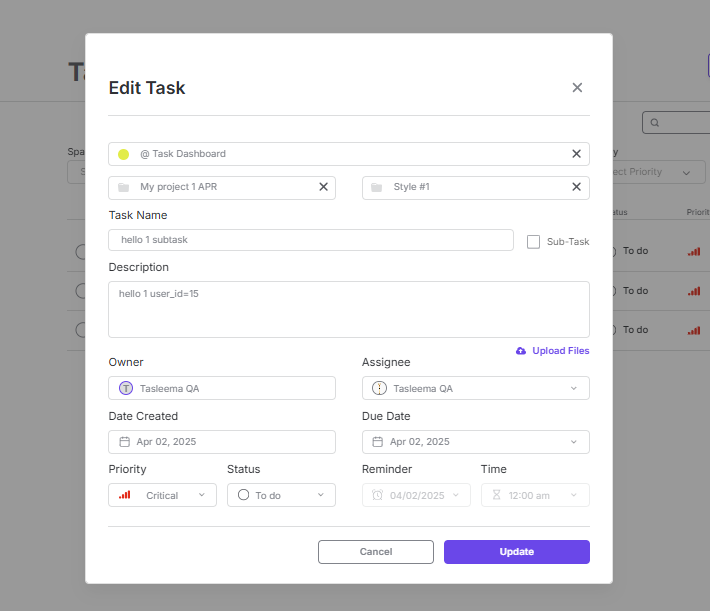
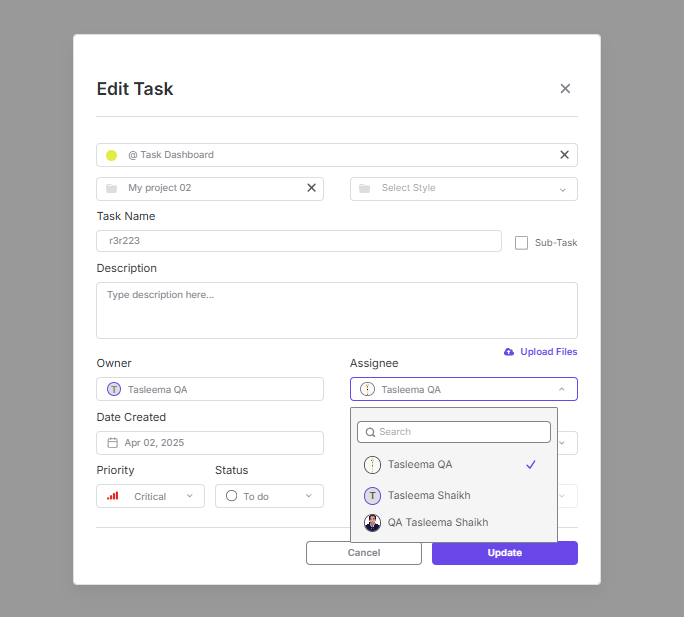
Client - Edit Task
1- Go to the Upsway website https://upsway.io/login
2- Enter your credentials to log in to the system or log in through your Google or Facebook account
3- Log in to the system, and you will land on the global dashboard page

4- Click on Tasks menu- You will land on task dashboard page
5- Click on any task you want to edit/update. After clicking on task you will redirect on edit task popup. Here you can change any field. Click on update will save changes and cancel button will not allow to save changes.
Client - Task Burger Menu
1- Go to the Upsway website https://upsway.io/login
2- Enter your credentials to login to the system or log in through your Google or Facebook account
3- Log in to the system, and you will land on the global dashboard page
4- Click on Tasks menu- You will land on task dashboard page
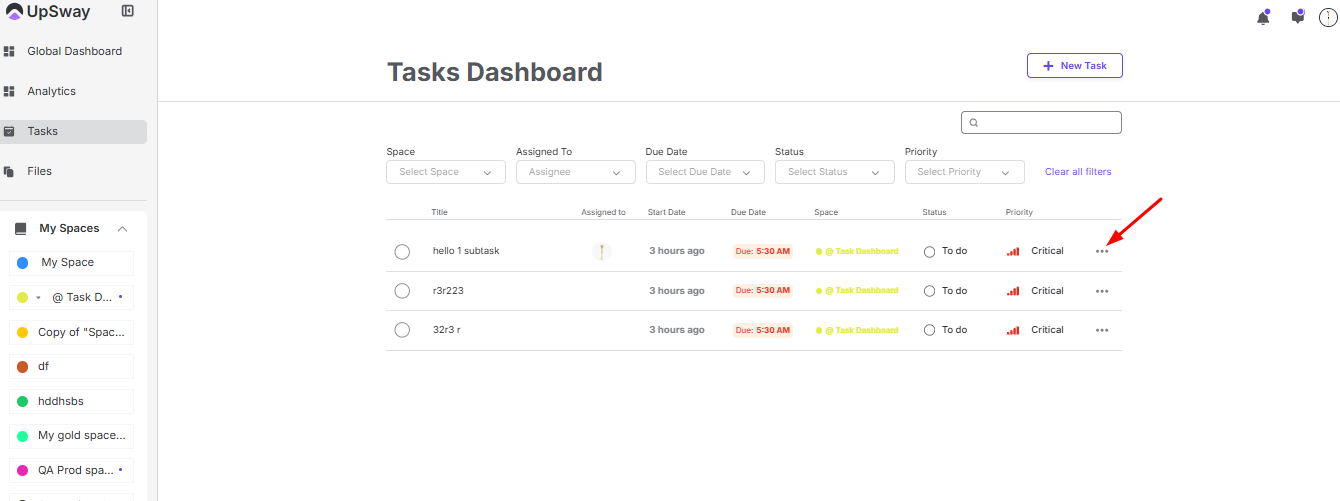
5- Click on 3-dots of Task- you will see options like Open project, Assign to, Create sub-task, Delete
6- Open Project- If task is created through tasks tab then you will redirect on project view page where that task is created. But if task is created through comment then you will redirect on asset view page with folded comment when you click on comment icon you will see task.
7- Assign to- You will redirect on edit task popup with unfolded Assignee list(these assignees will from space members). You can select any assignee here. Update button will save changes. Cancel will not save changes.
8- Create Sub-task- You will redirect on new task popup. Here you can select parent task in which you want to add sub-task. Add task name, add any field as per your requirements. Create button will create sub-task. Subtask will not display on task dashboard page you should have to go project there you can see.
9- Delete- You can delete any task by clicking on delete option.
6- Complete/Done Task- When you will click on radio button then the task will get mark as complete/done. And that task will get remove from the task dashboard without refresh page.
Client - Task Dashboard Filters
Client - Bulk project creation
Table of Contents
Table of Contents
Overview
The Bulk Project Creation feature allows users to create multiple projects at once by uploading a pre-configured Excel template.
This feature simplifies large-scale project setup and automatically uploads related files from Google Drive if folder names match project or style names.
Creating a Bulk Upload Template
You can download the official Excel template using the link below:
https://docs.google.com/spreadsheets/d/1yn-86hZQEGNCIygO1IyBeTM2IJvCCbSPyvrAcvhb3tY/edit?usp=sharing
https://drive.google.com/drive/folders/1IFJhvb4cK0xq81jItJxP07BpUx4SU33D
The template contains all required fields for project and style configuration.
Important Formatting Rules
Separation Symbol: use ; to create multiple entries in a single field.
Example: entering Style#1;Style#2;etc will create 3 separate styles.
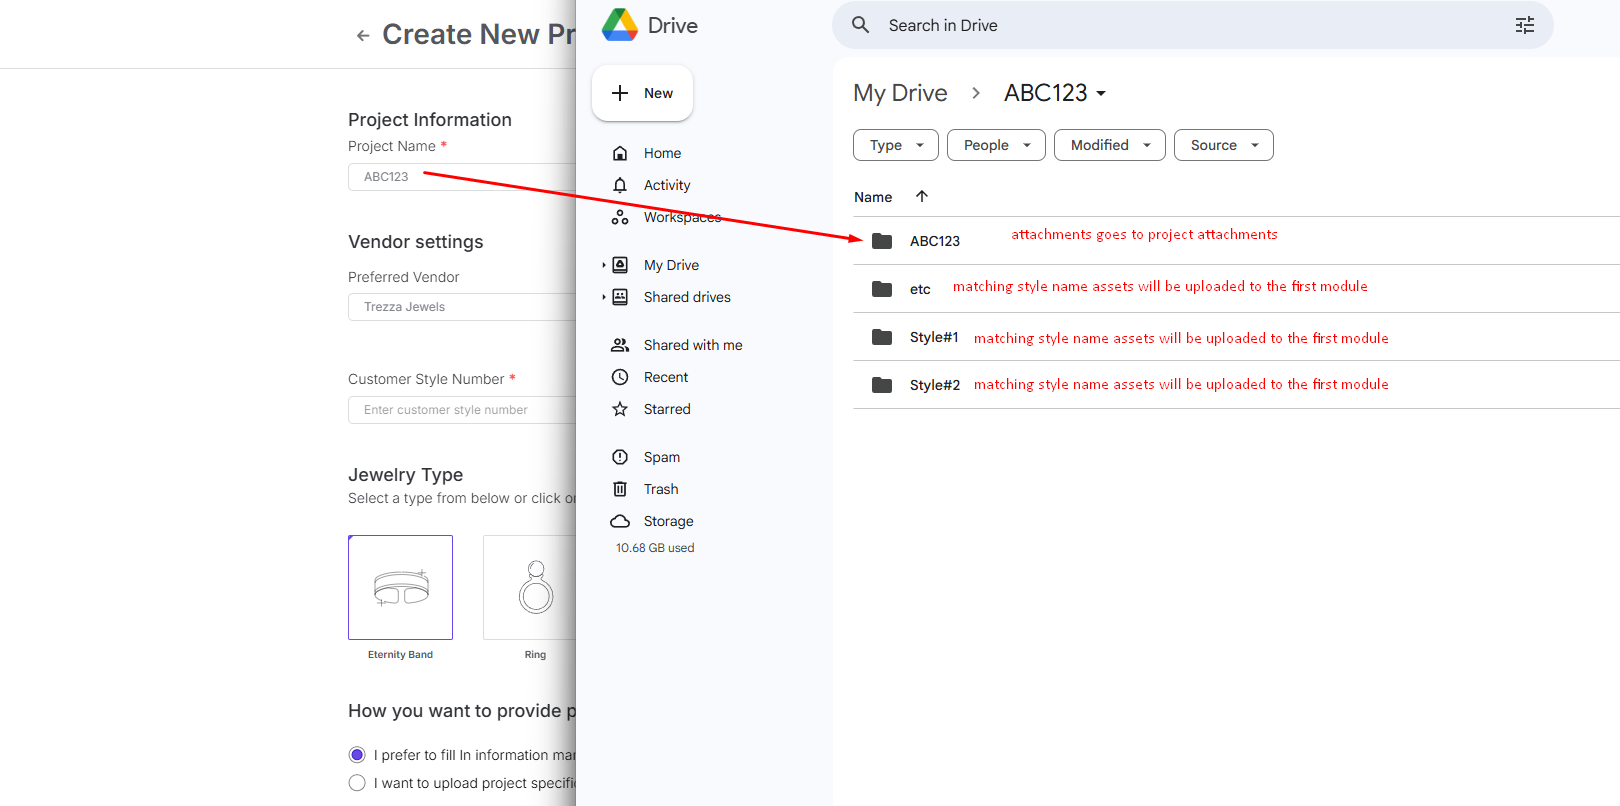
Google Drive Folder Structure:
If a folder matches the Project Name, its contents are uploaded as project attachments.
If a folder matches a Style Name, all files inside are uploaded to the first module of that style.
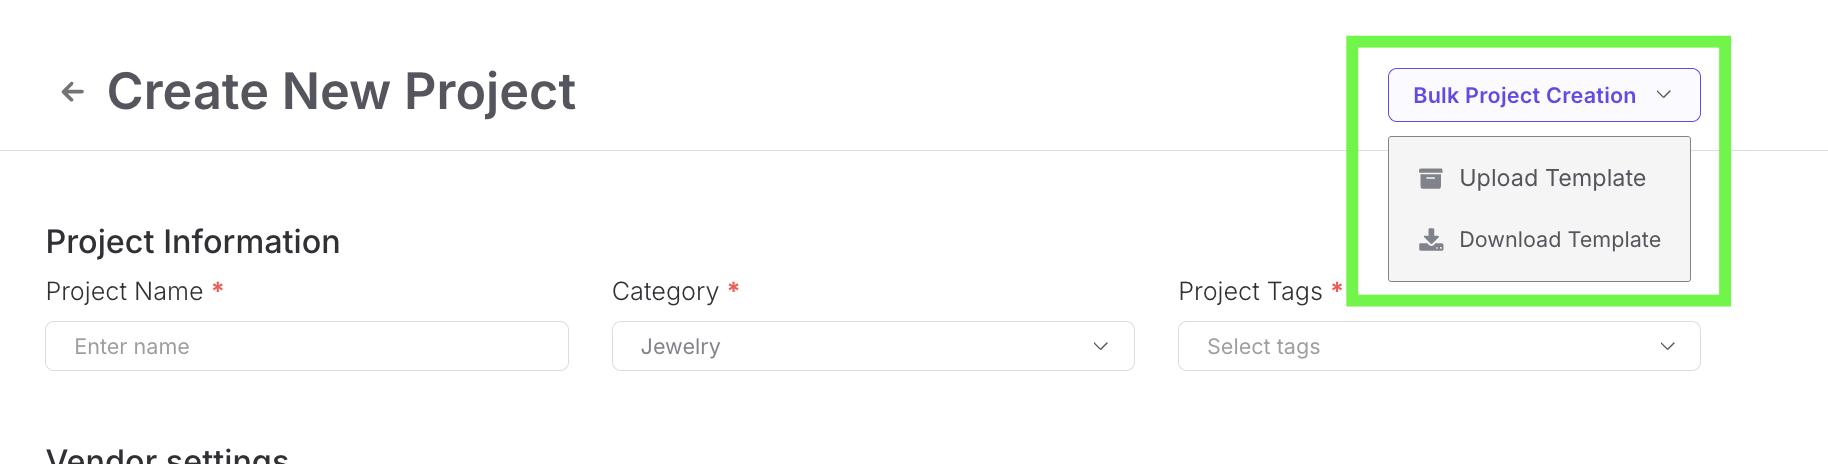
Uploading and Managing Templates
During project creation, a new dropdown menu appears — Bulk Project Creation.
Available Options
Upload Template – upload your completed Excel file to automatically create multiple projects.
Download Template – opens the official template in a new tab.
Error Handling and Validation
When uploading, the system checks the file for errors and displays notifications if issues are found.
ERP Connection Errors
If an ERP connection is enabled but tags from the template are not recognized:
Error Message:
“You have ERP connected but the product type is not matching any of the existing types.”
If the same product style already exists on ERP:
Error Message:
“Product style name already exists on ERP.”
Common Upload Errors
“Cannot access Google Drive link – make sure the folder is shared.”
“File format not supported – only .xlsx and .csv are allowed.”
Notes
Always verify that your Google Drive folders are shared publicly or with the integration account before uploading.
Use consistent naming for projects and styles to ensure file matching works correctly.
Incorrect tags or mismatched product types from ERP will stop the bulk upload process until resolved.
Client - Manual total costs
Table of Contents
Table of Contents
Overview
Since the MTCP India team will not be ready for the initial launch of the MadeTruly Customer Portal, Upsway provides a temporary solution that allows users to manually input total costs.
These manually entered values will be displayed on the MadeTruly Customer Portal (MTCP) without any automated calculations or ERP product creation.
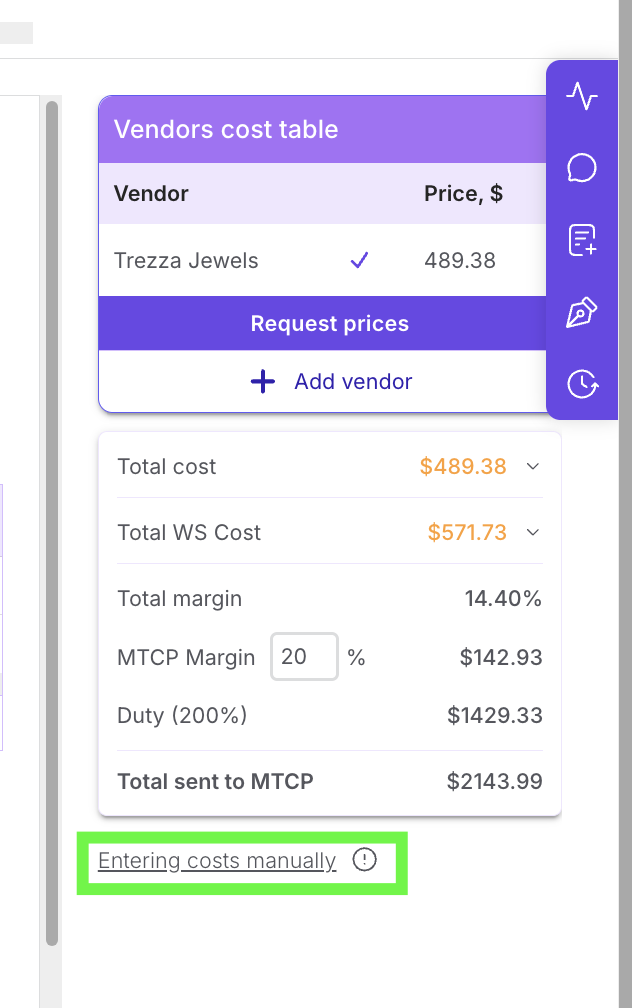
Entering Costs Manually
Click Enter costs manually in the Vendors cost table.
A pop-up window titled Enter Costs Manually appears.
Input the following values:
Total Cost (USD)
Total WS Cost (USD)
Click Done to confirm.
Once confirmed:
The entered totals will appear in the Totals Table.
Cost breakdowns (bifurcations) for components will show as 0.
Manually entered values are displayed in black, indicating they were entered directly by the user.

Sending Costs to MTCP
When pricing is approved, manually entered costs are automatically sent to MadeTruly (MTCP) to be displayed in the customer portal.
No ERP product is created for these cases, since there are no component-level calculations available.
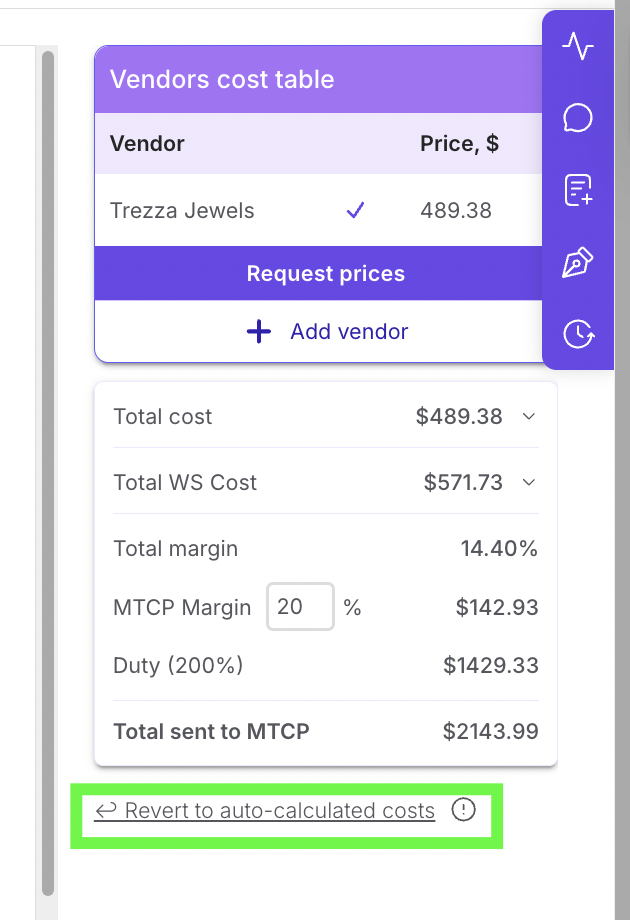
Reverting to Auto-Calculated Costs
If manual costs have been entered previously, a “↩ Revert to auto-calculated costs” option appears below the totals table.
Behavior:
Clicking this option recalculates all costs based on the existing component data.
The process works exactly the same as when using the “Request prices” CTA.
Once recalculated, the “Enter costs manually” link reappears.
Tooltip Information
When hovering over the MTCP label in the totals table, the following tooltip appears:
MTCP:
Manually entered total costs will show up on MadeTruly Customer Portal without any calculation.
Notes
Use this feature only when the MTCP auto-calculation process is unavailable.
Ensure that the totals entered manually match verified vendor quotations.
Do not create a product on ERP for manually entered costs, as component details are not provided.
Client - Duties per Country
Table of Contents
Table of Contents
Overview
Upsway acts as a bridge between ERP and the MTCP platform, managing and sending final costs from ERP vendors to MTCP.
Since each vendor (factory) operates from a specific country, duties (tariffs) must be applied based on the country of origin.
This module allows administrators to define and manage duty percentages by country and effective date to ensure accurate cost calculation and synchronization with MTCP.
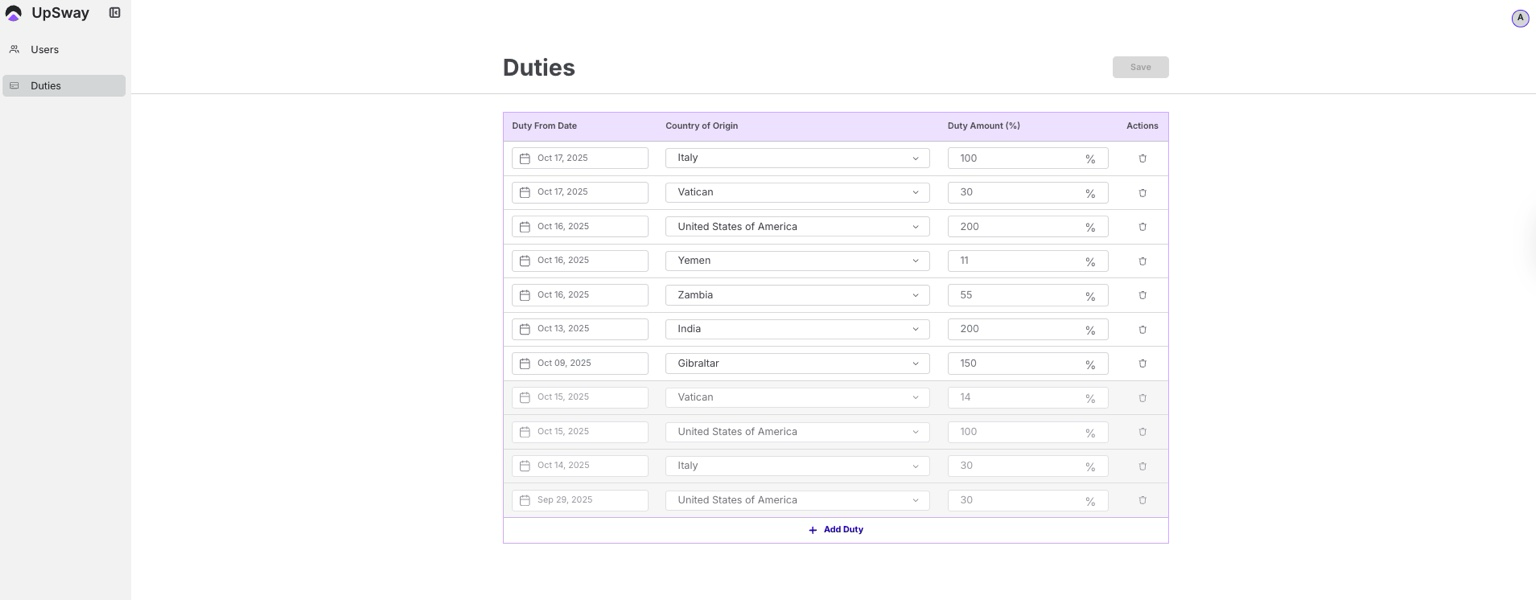
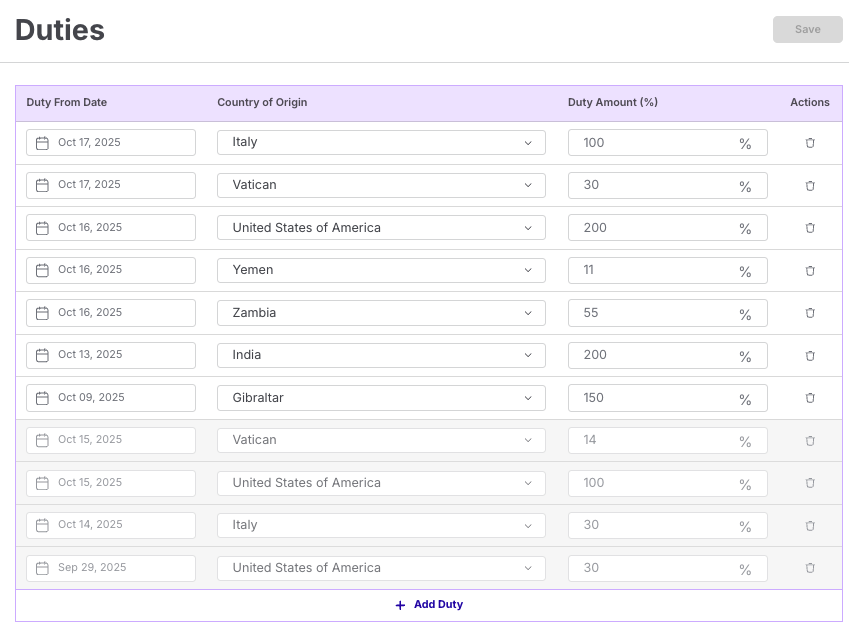
Admin Panel Table
A new Duties table is available under the Admin panel:
Columns Description
Duty From Date - Select the date from which the duty rate will take effect. Example: selecting September 3rd means this duty applies from that date until a newer duty is set for that country.
Country of Origin - Dropdown list of all available countries (same list as in ERP).
Duty Amount (%) - Percentage value representing the duty. Only numeric and decimal inputs are allowed.
Actions - Delete icon to remove a specific row.
Additional controls:
+ Add Duty — Adds a new row to the table.
Save — Saves all valid duty entries.
Duty Management Logic
Effective Dates
Each duty record applies from its start date until a newer entry is defined for the same country.
If no newer date exists, the duty remains active indefinitely.
Example:
USA law updates tariffs for India effective December 1st.
You create a new entry — India, 20%, Dec 1, 2025.
The previous entry (India, 50%, before Dec 1) becomes inactive automatically.
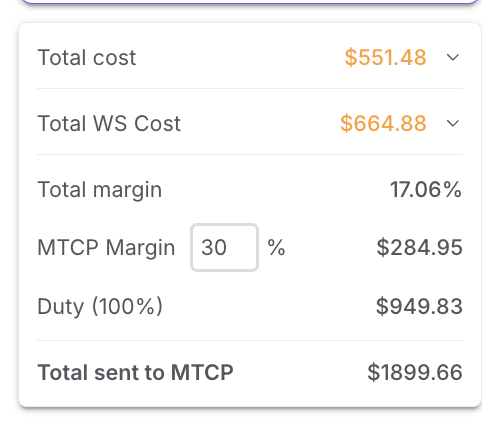
Duty Calculation
When sending data to MTCP, the total cost is calculated using the following logic:
WS cost + MTCP margin + tariffs = Final cost sent to MTCP
Margin Calculation Formula
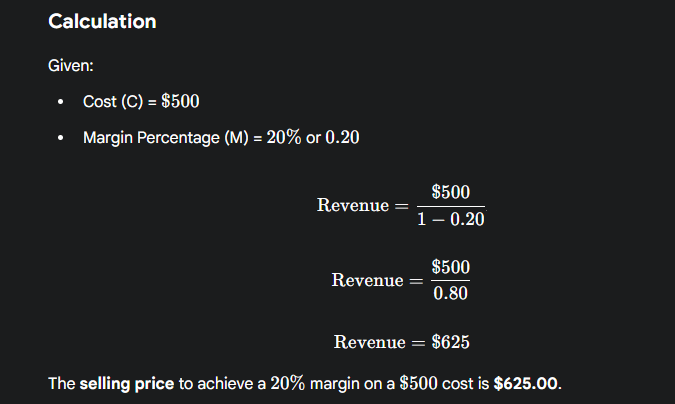
Revenue = Cost / (1 - M)
Example:
Cost (C): $500
Margin (M): 20%
Revenue = 500 / (1 - 0.2) = 625
Duty Calculation Formula
(WS cost + MTCP margin) * Tariff
Example:
WS cost = 500
MTCP margin = 20%
Tariff = 50%
→ Margin = 500 / (1 - 0.2) = 625
→ Tariff = 625 × 1.5 = 937.5
Validation Rules
1. Prevent Duplicate Entries

Condition: Do not allow saving two entries with the same Country and same Date.
Behavior:
Show error message.
Highlight the conflicting rows in red.
Disable the Save button until corrected.
2. Display Order & Expiration
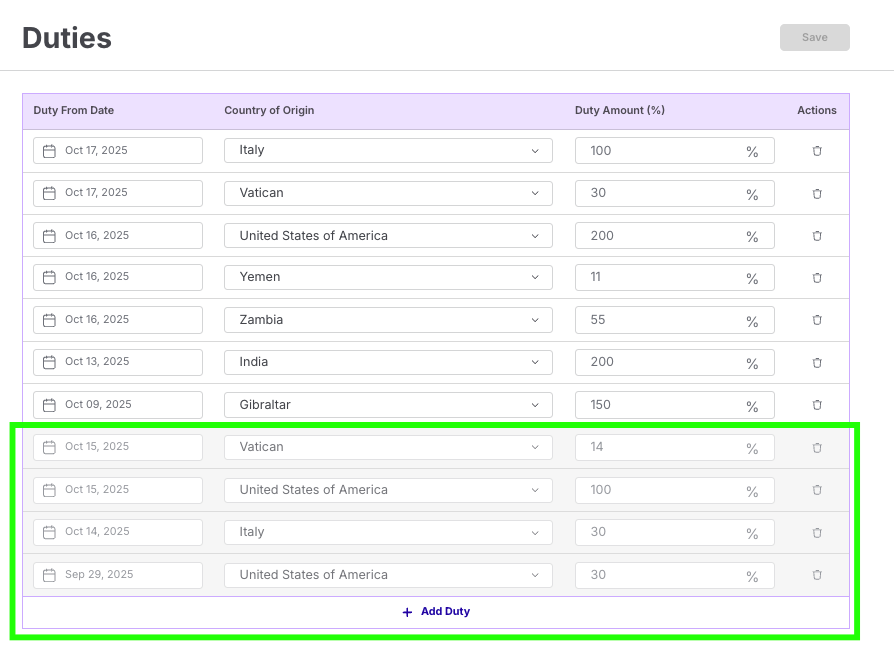
Newest entries must appear on top of the table.
Expired entries (with older “From Date”) are shown at the bottom, highlighted grey.
Additional Rules
If Country is not selected, the system automatically sets Duty = 0% — no calculation is performed.
All duties are automatically sent to MTCP during cost synchronization.
Only admins have permission to edit or add duties.
Notes
Duties ensure compliance with regional tariffs before sending costs to MTCP.
Incorrect or duplicate entries may cause MTCP pricing mismatches.
Keep at least one active duty per country to ensure seamless calculation flow.
Client - ClickUp integration
Table of Contents
Table of Contents
Overview
The ClickUp Integration allows automatic task creation and synchronization between Upsway and ClickUp whenever a new style is created within a connected Space.
This integration helps teams centralize communication, automatically attach assets, and ensure that relevant data (such as project links, deadlines, and custom field information) flows directly into ClickUp tasks.
Setting Up ClickUp Integration
To configure the ClickUp integration:
Go to your Space Settings.
Open the Connections tab (next to Workflow).
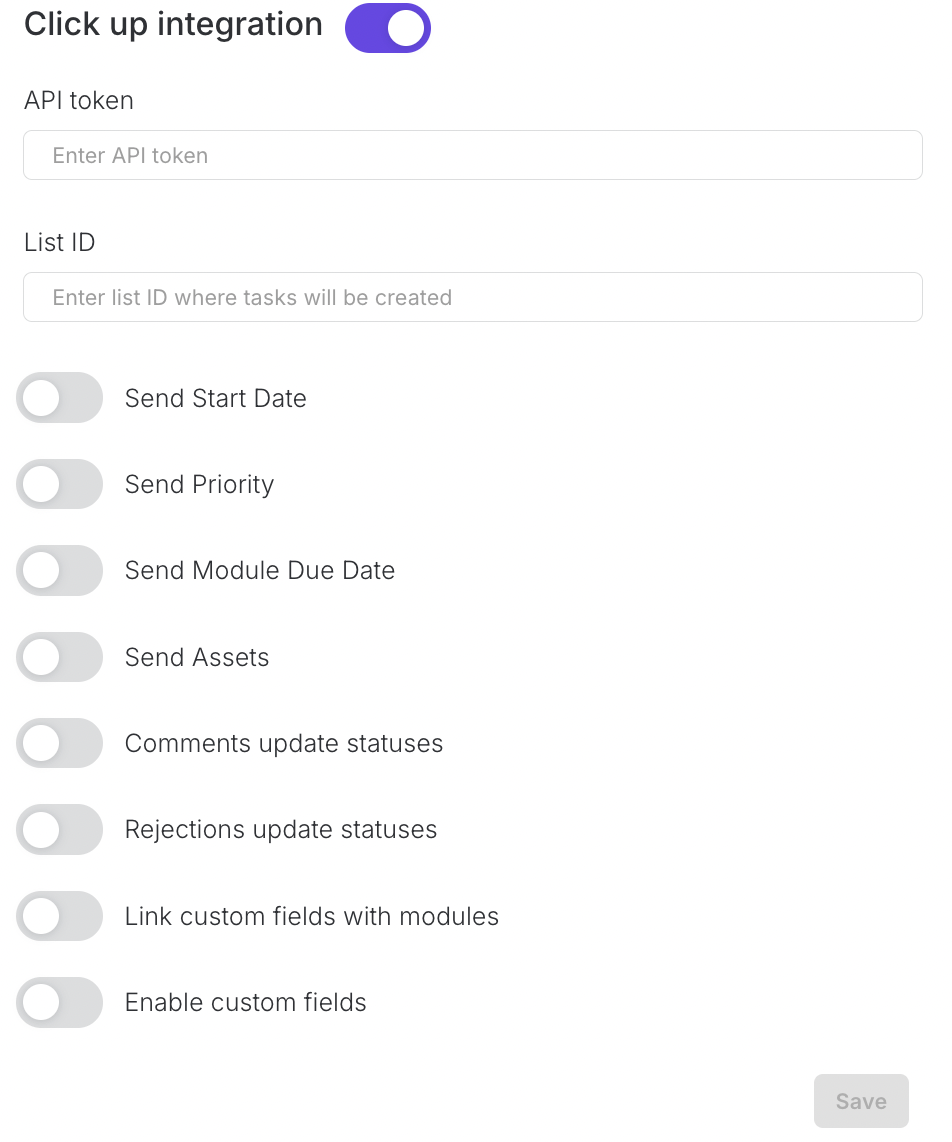
Enable the ClickUp Integration toggle.
📌 Make sure you have entered both your API Token and List ID before proceeding.
Required Fields
API Token — Found in your ClickUp profile under:
Settings → Apps → API Token
List ID — Found in your ClickUp list URL, for example:
https://app.clickup.com/9016854688/v/b/li/901607992322?pr=90163211654
Optional Configuration
Send Start Date
If enabled, the style creation date in Upsway will be sent as the Start Date in ClickUp.
Send Module Due Date
Allows you to select one specific module — the ClickUp task Due Date will automatically match that module’s Upsway Due Date.
Send Assets
You can select one or multiple modules.
All assets uploaded within those modules will automatically appear in the ClickUp task activity chat.
Custom Fields Mapping
The integration supports advanced mapping between Upsway and ClickUp custom fields.
Enable the “Enable custom fields” toggle to access the field mapping options:
Project URL Field ID — Select a ClickUp custom field to receive the Upsway Style URL.
Space Name Field ID — Select a field to display the Space name (and Folder name, if applicable).
Custom Field ID — Select a ClickUp custom field to which text entered in the second field will be sent.
Updated Behavior
The dropdown list now includes all available custom fields from ClickUp, including Description.
You can now use the Description field in a ClickUp task to store any of the following values:
Project URL
Space name
Custom field text
Any manually entered value
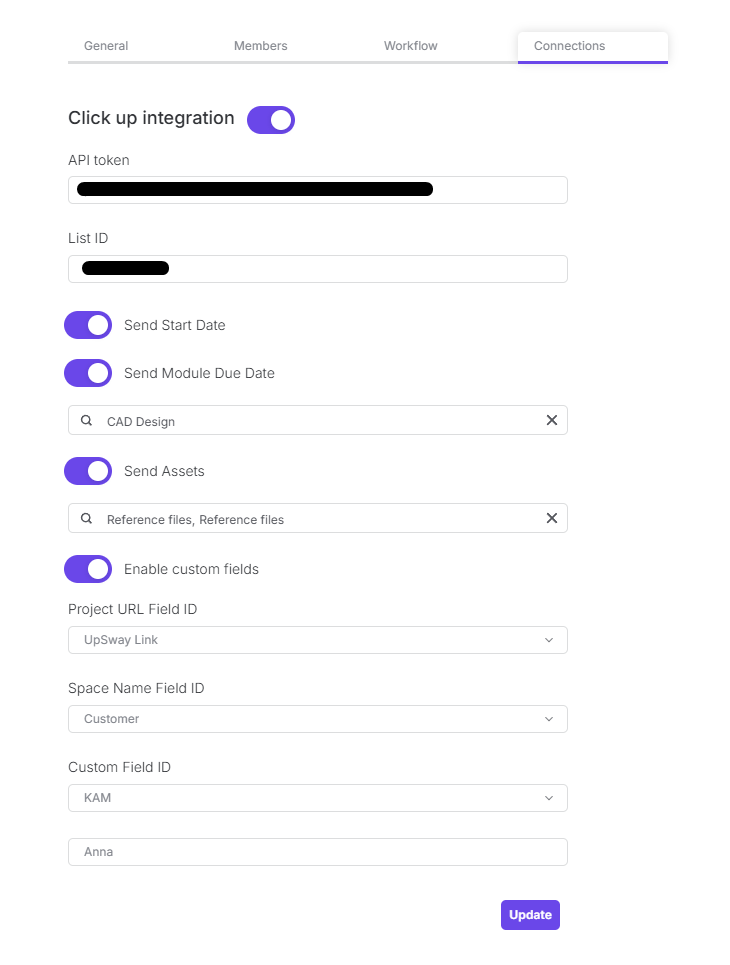
Task Creation and Sync
When a new style is created in Upsway:
A new task is automatically generated in ClickUp.
The task title follows the format:
{Project Name} – {SKU Number}
Any selected assets, custom fields, or deadlines are automatically synced.
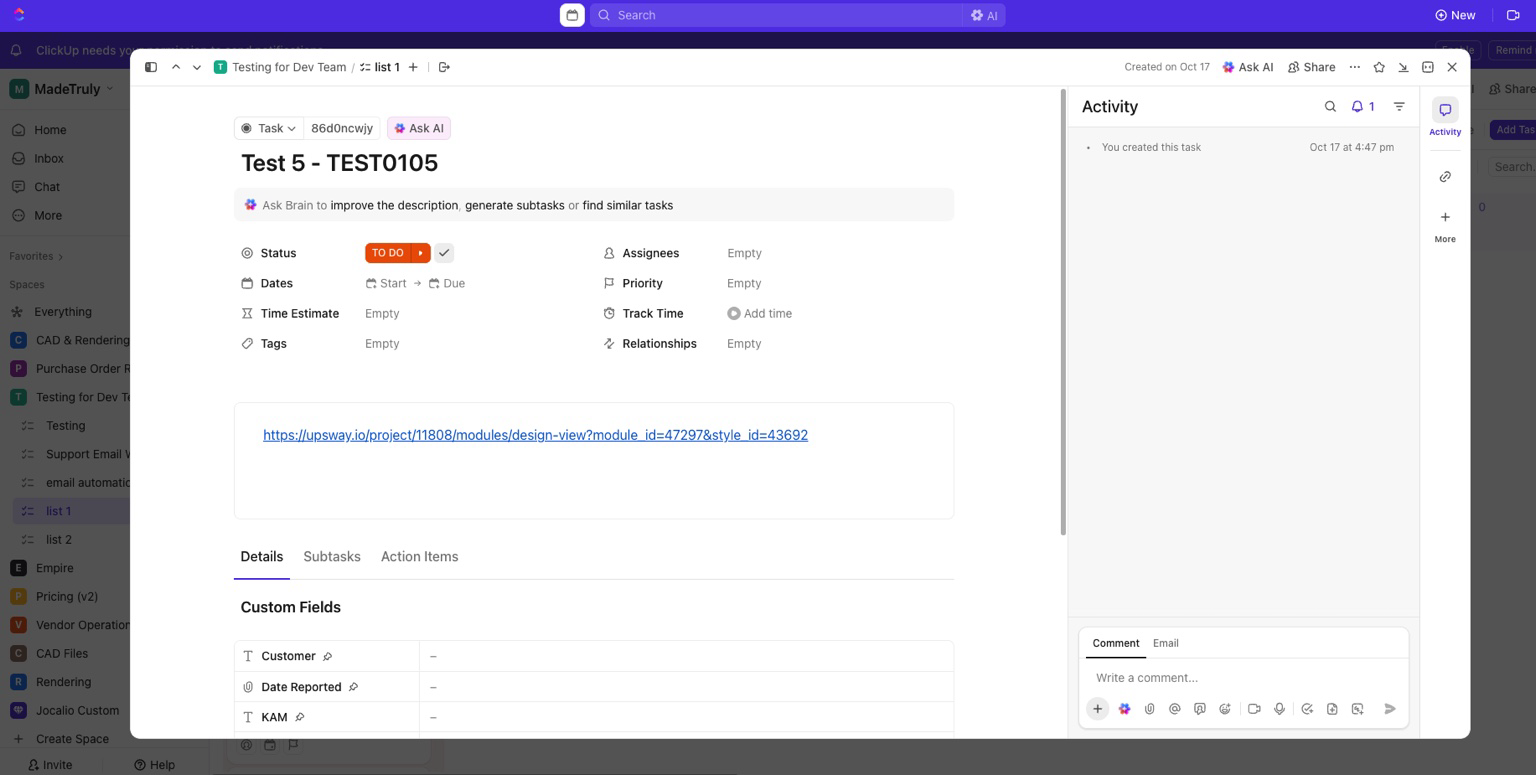
Notes
Ensure your ClickUp API Token has sufficient permissions to create and update tasks within the selected List.
You can update or disable the integration anytime from the Connections tab.
If a field mapping or List ID is incorrect, tasks will not sync properly.
Client - (May 2025) ClickUp integration
Table of Contents
Summary
The ClickUp Integration module in Upsway allows automatic creation and synchronization of tasks in ClickUp based on project styles and workflow events in Upsway. It supports full metadata mapping, custom field linking, asset transmission, and bidirectional status updates.
Once properly configured, the system ensures seamless mirroring of styles, deadlines, priorities, and asset uploads between Upsway and ClickUp.
Prerequisites
Before enabling the integration, make sure the following elements are in place:
ClickUp Account
You must have a registered account on ClickUp.
API Token
Navigate to
<https://app.clickup.com/{your_user_id}/settings/apps>
to generate an API Token.
List Setup in ClickUp
Create a Space and under it, a List that will receive synchronized tasks.
You can extract the
List IDmanually from the URL in this format:<https://app.clickup.com/{your_user_id}/v/l/li/901808228592?pr=90184704796>
→901808228592is your List ID.
How to Configure Integration
Go to your Upsway Project > Settings > Connections tab
Under ClickUp Integration, toggle the integration ON
Fill in the following:
API TokenList ID
Click Update to save the configuration.
Once set, your Upsway project will be linked with the specified ClickUp list.
Sync Configuration Options
Asset Sync
Send Assets
Choose multiple modules from which uploaded assets (e.g. CAD Design, Renders, Tentative Costing) will be sent as attachments to the ClickUp task activity log.
Status Updates
Comments Update Statuses
Defines what status should be set in ClickUp when a comment is added in Upsway.Rejections Update Statuses
Defines what status should be set when an asset is rejected in Upsway.
Linking Custom Fields with Modules
Enable linking between Upsway modules and ClickUp custom fields. For each mapping:
Select a ClickUp custom field
Select an Upsway module
Click Add
This maps custom field values dynamically per module (e.g., design phase, renders, video review).
Enabling Custom Fields
Toggle Enable custom fields to map additional metadata fields from Upsway:
Project URL Field ID
Maps the Upsway style/project URL into a custom ClickUp field.Space Name Field ID
Maps the Upsway space name (and optionally folder) into a custom field in ClickUp.Custom Field ID
Maps a static or descriptive field from Upsway (e.g., text notes or metadata) into ClickUp.
These must correspond to fields that already exist on the ClickUp side.
Validation
After successful setup:
Create a new Style under the connected Upsway project
Observe:
A corresponding task is created in ClickUp
Title, due dates, priorities, and custom fields are transferred
Assets appear as attachments in the ClickUp task
Status changes or rejections reflect accordingly in ClickUp
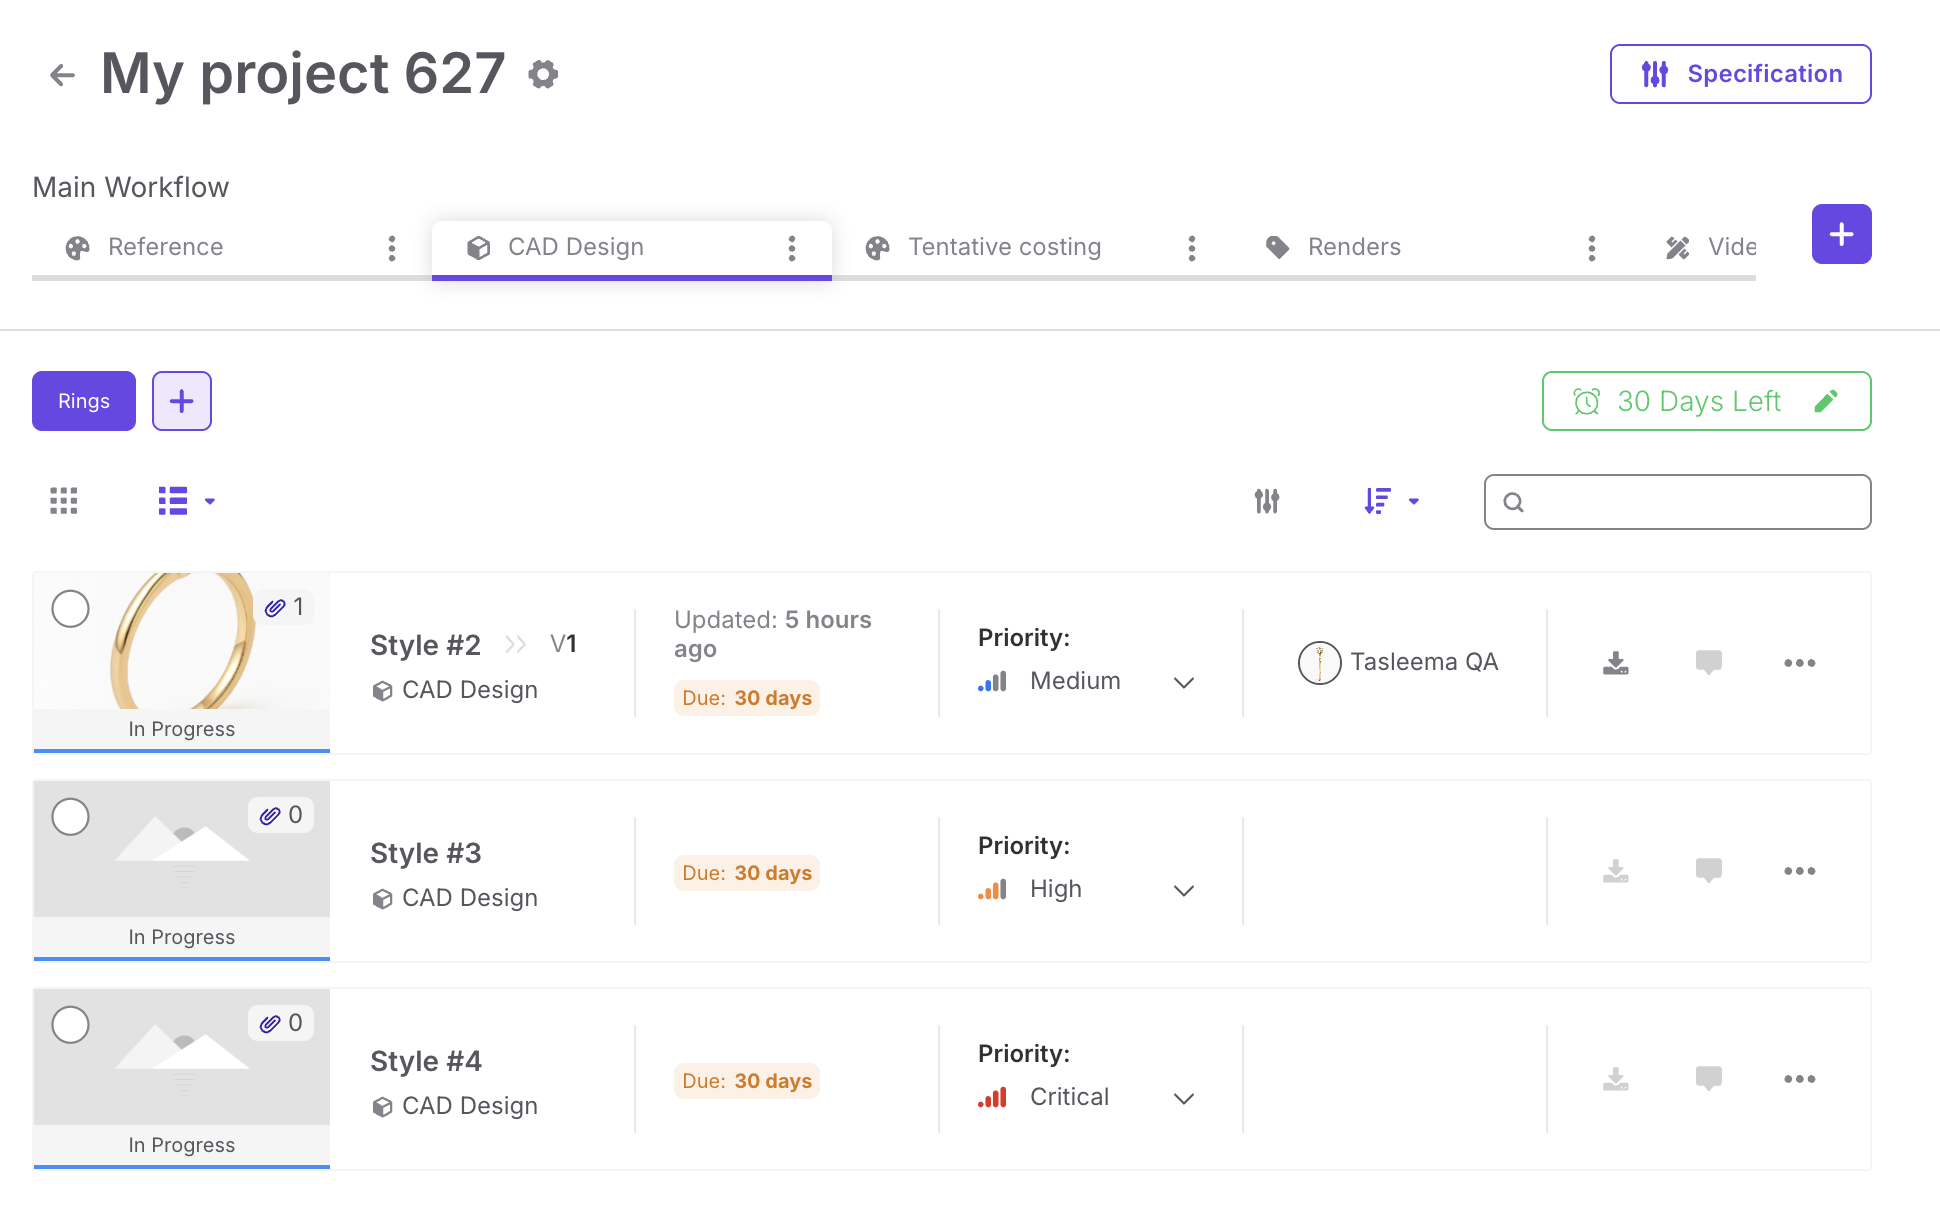

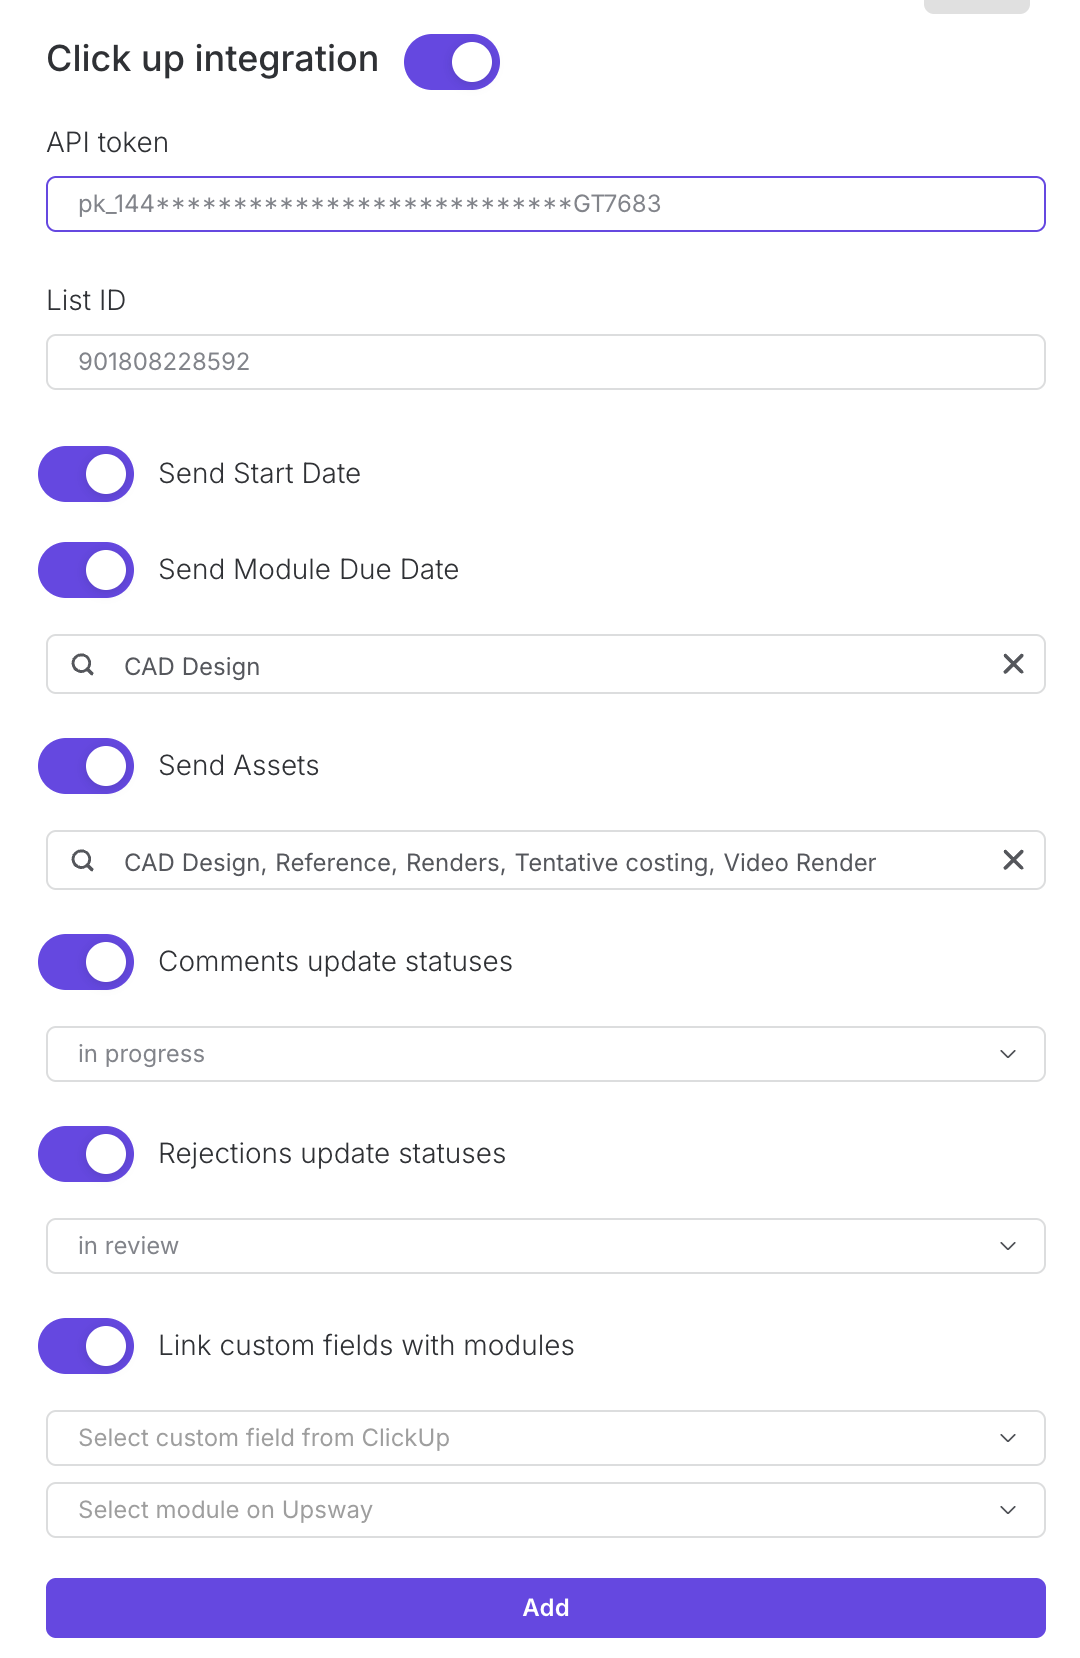
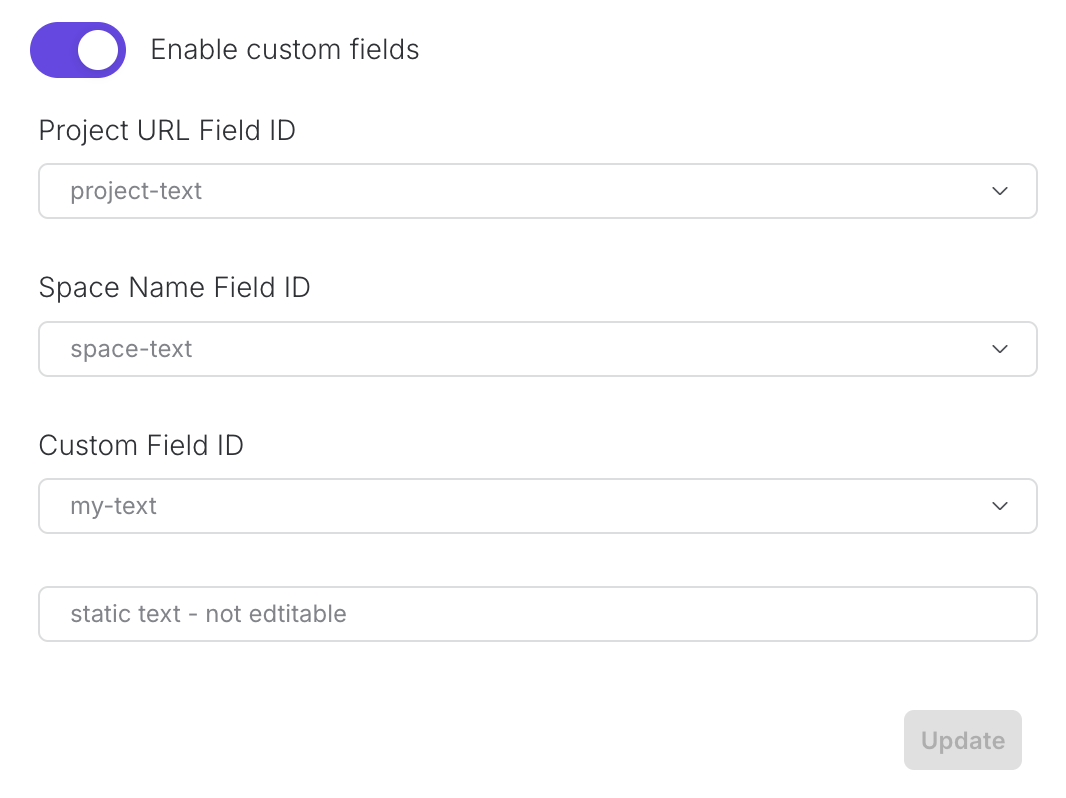
Client - JIT Flow
Product Development & Pricing Workflows:
3D file development for existing product flow
New product development flow
Pricing flow
Client - New product development flow
Table of Contents
Table of Content
New products can be created on ERP from Upsway in order to speed up new product development without the need of constructing difficult BOM files.
Setting up ERP connection
Service API URL - https://services.syqor.com
Customer code and Sales channel codes should be gotten from ERP.
Logins - use your account logins
Select a CAD Design module name to create a link with the pricing tool.
Duty (%) - Used for pricing exports to include duty
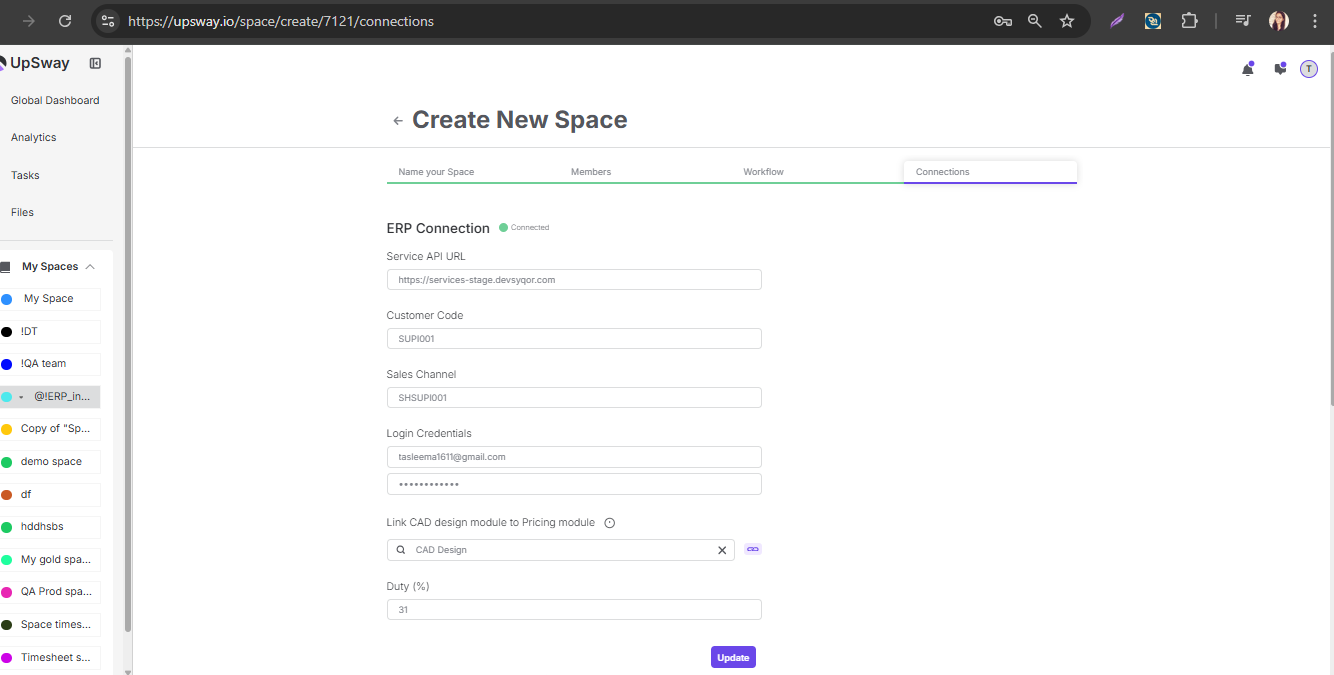
Project Creation
Create a new project
Project name - Can be anything
Project tags - Product type (list synced from ERP)
Customer style number - input before approving your technical drawings, 3D files and pricing.
Preferred vendor - a list of vendors which will be added to the pricing tool.
Default margin - Can be ignored for JIT flow
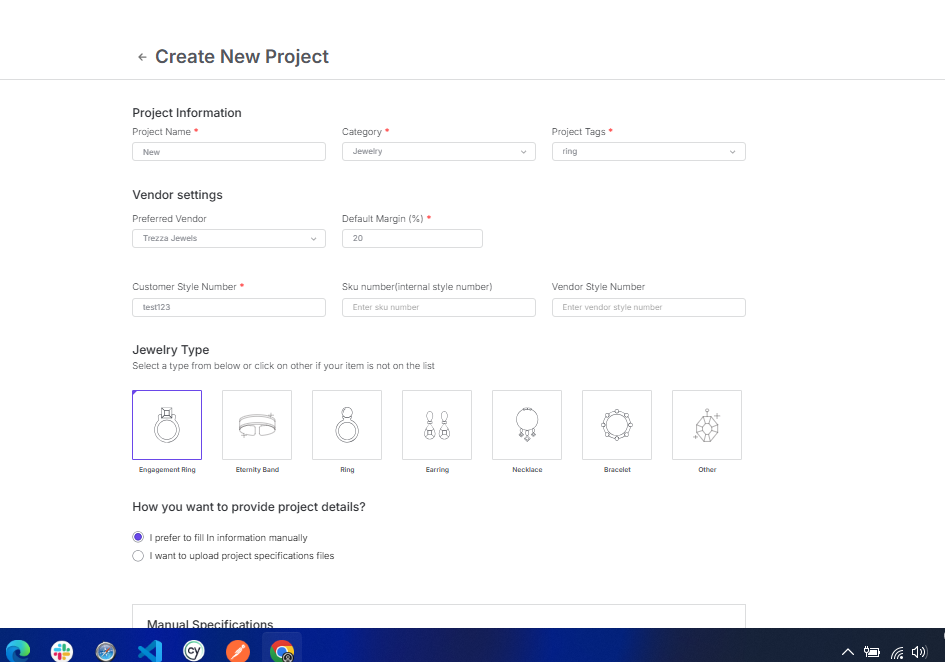
Creating a new product on ERP
To create a new product, it will require to approve 3 files: Technical drawing, 3D file and Pricing.
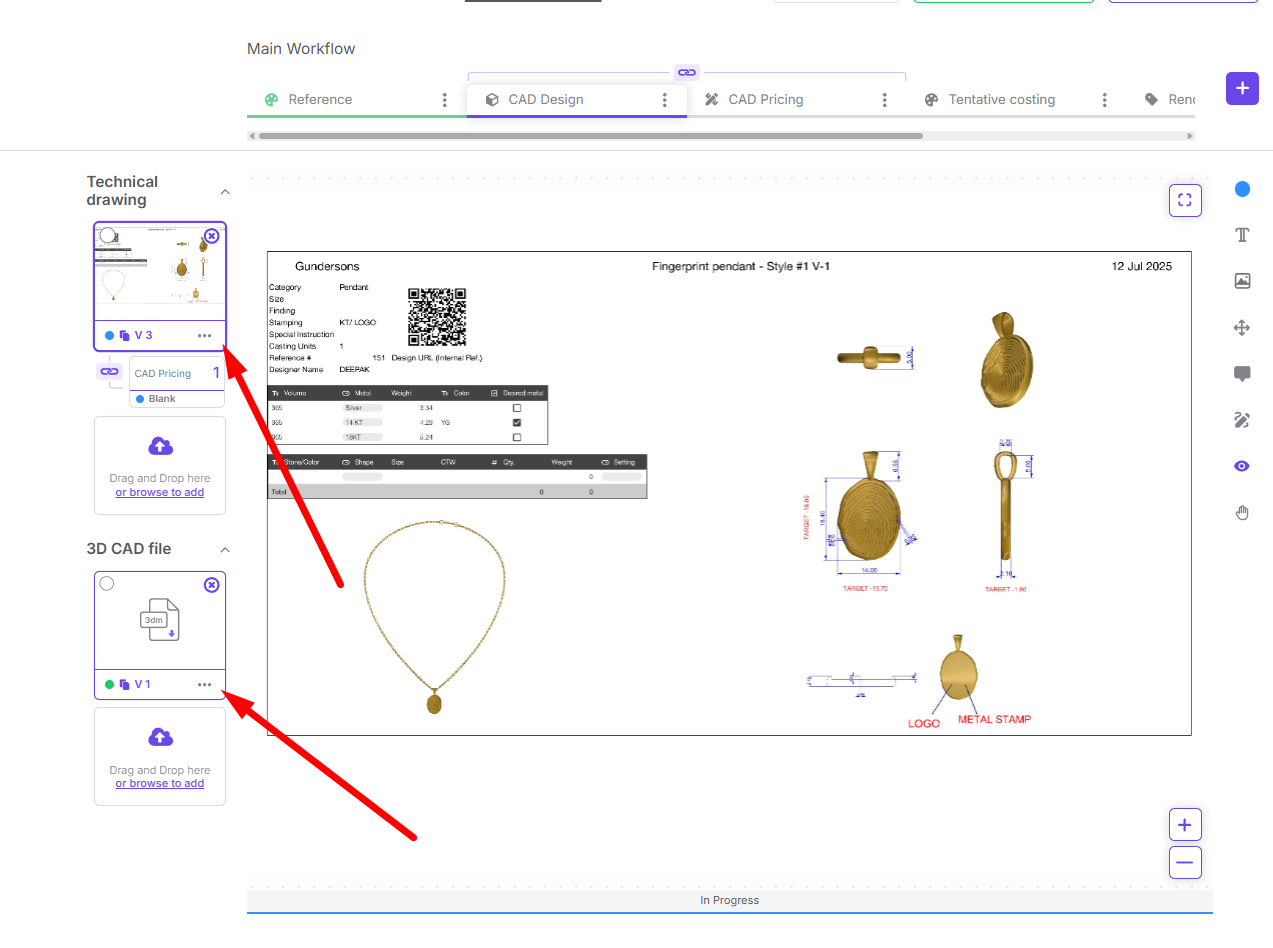
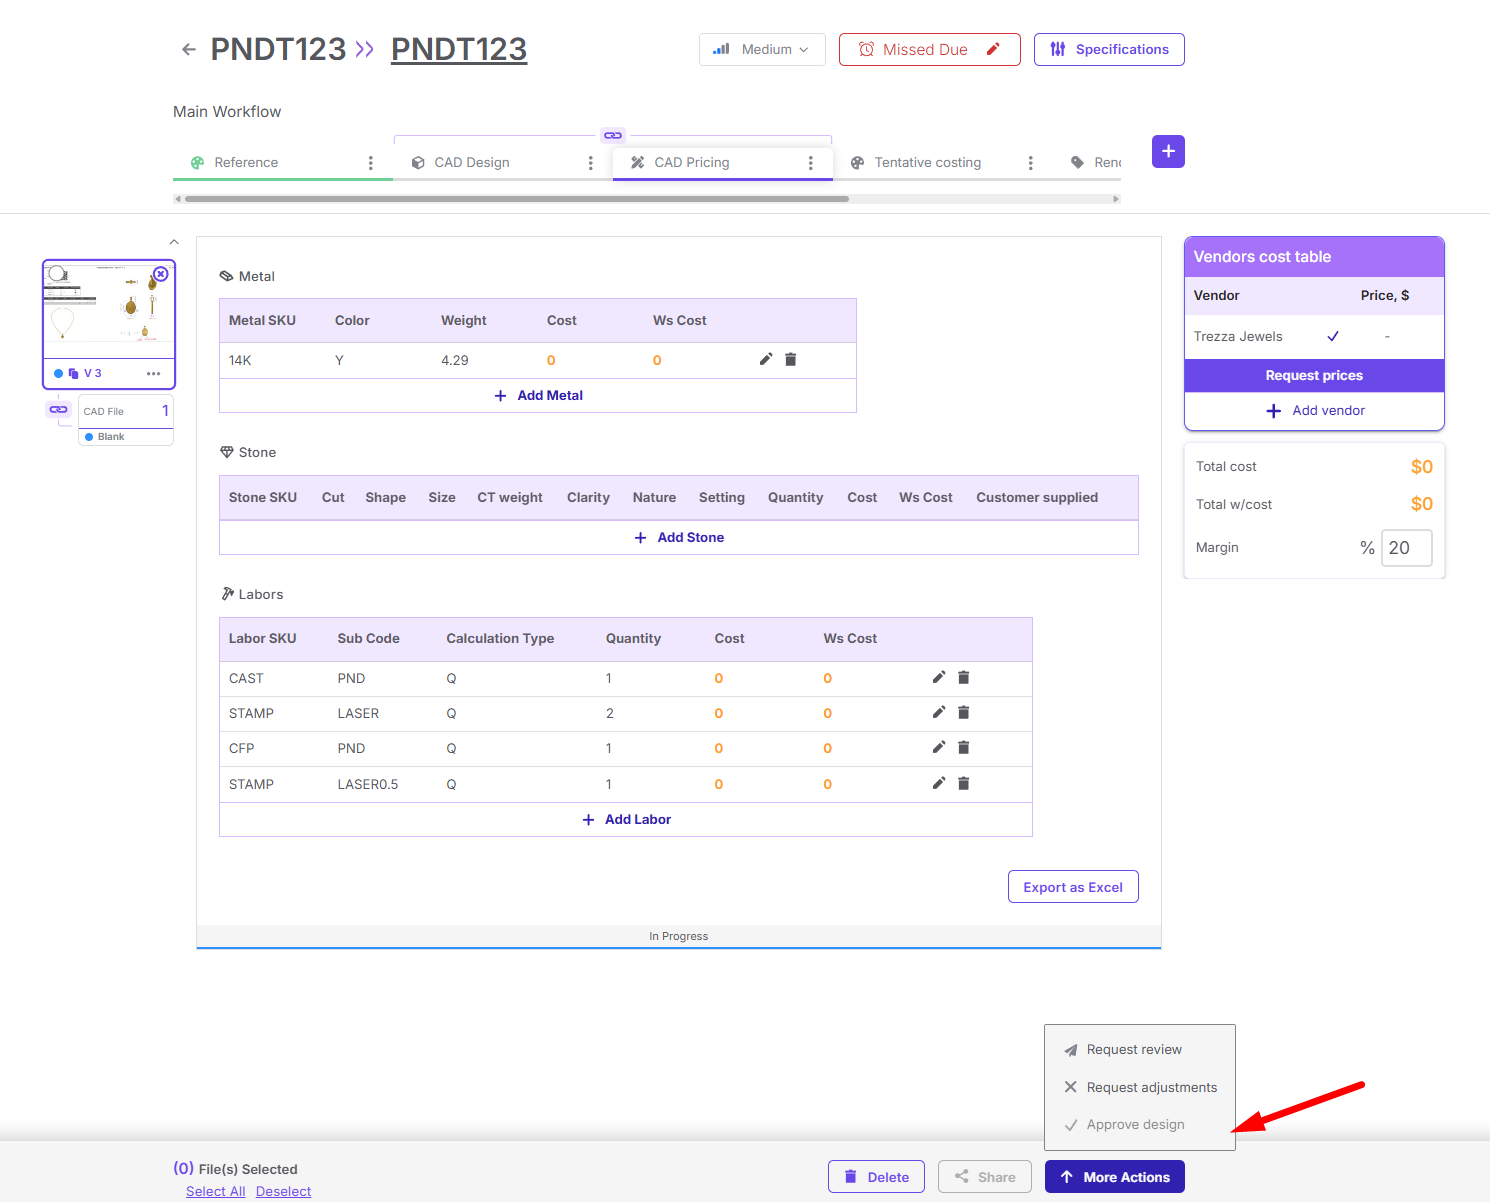
Pricing can be approve only when all the components are finalized and found/created on ERP.
Once you approve CAD pdf, 3D file and CAD pricing then new product will get create on ERP with 1 default configuration.
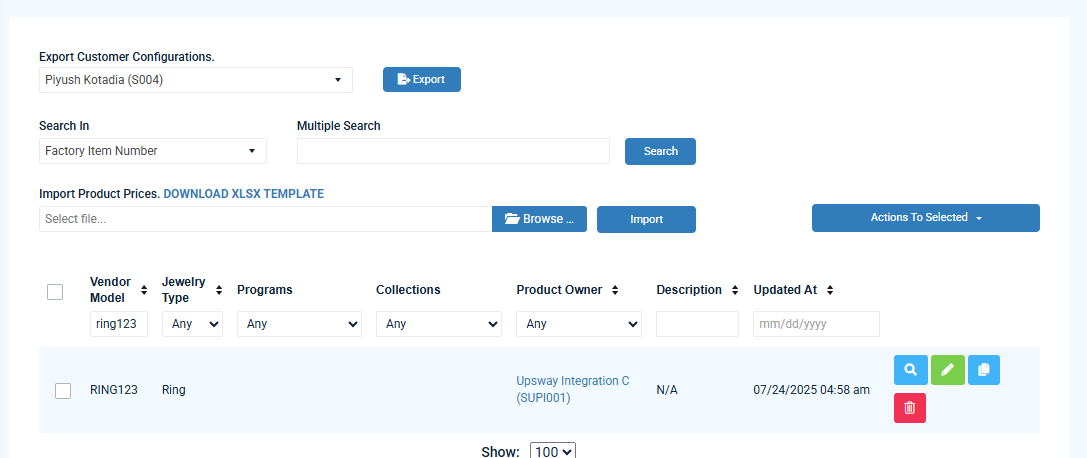
Client - Pricing flow
Table of Contents
Table of Content
Pricing tool allows a user to pull costs from ERP on a component level according to the selected customer and vendor.
Enabling CAD Pricing tool
Pricing module will be enabled only for projects which will be created when ERP is connected.
Service API URL - https://services.syqor.com
Customer code and Sales channel codes should be gotten from ERP.
Logins - use your account logins
Select a CAD Design module name to create a link with the pricing tool.
Duty (%) - Used for pricing exports to include duty
Once the ERP connection is established, it will link CAD Design and CAD Pricing modules.
CAD AI Parsing
Uploaded CAD pdf/jpg/png will be parsed by AI. Indicated by a message at the bottom “Pricing is being generated for your uploaded CAD design. Please wait….”

AI will recognize component parameters and populate a table in “CAD Pricing” module in separate tables for metal, stone, labor and findings.
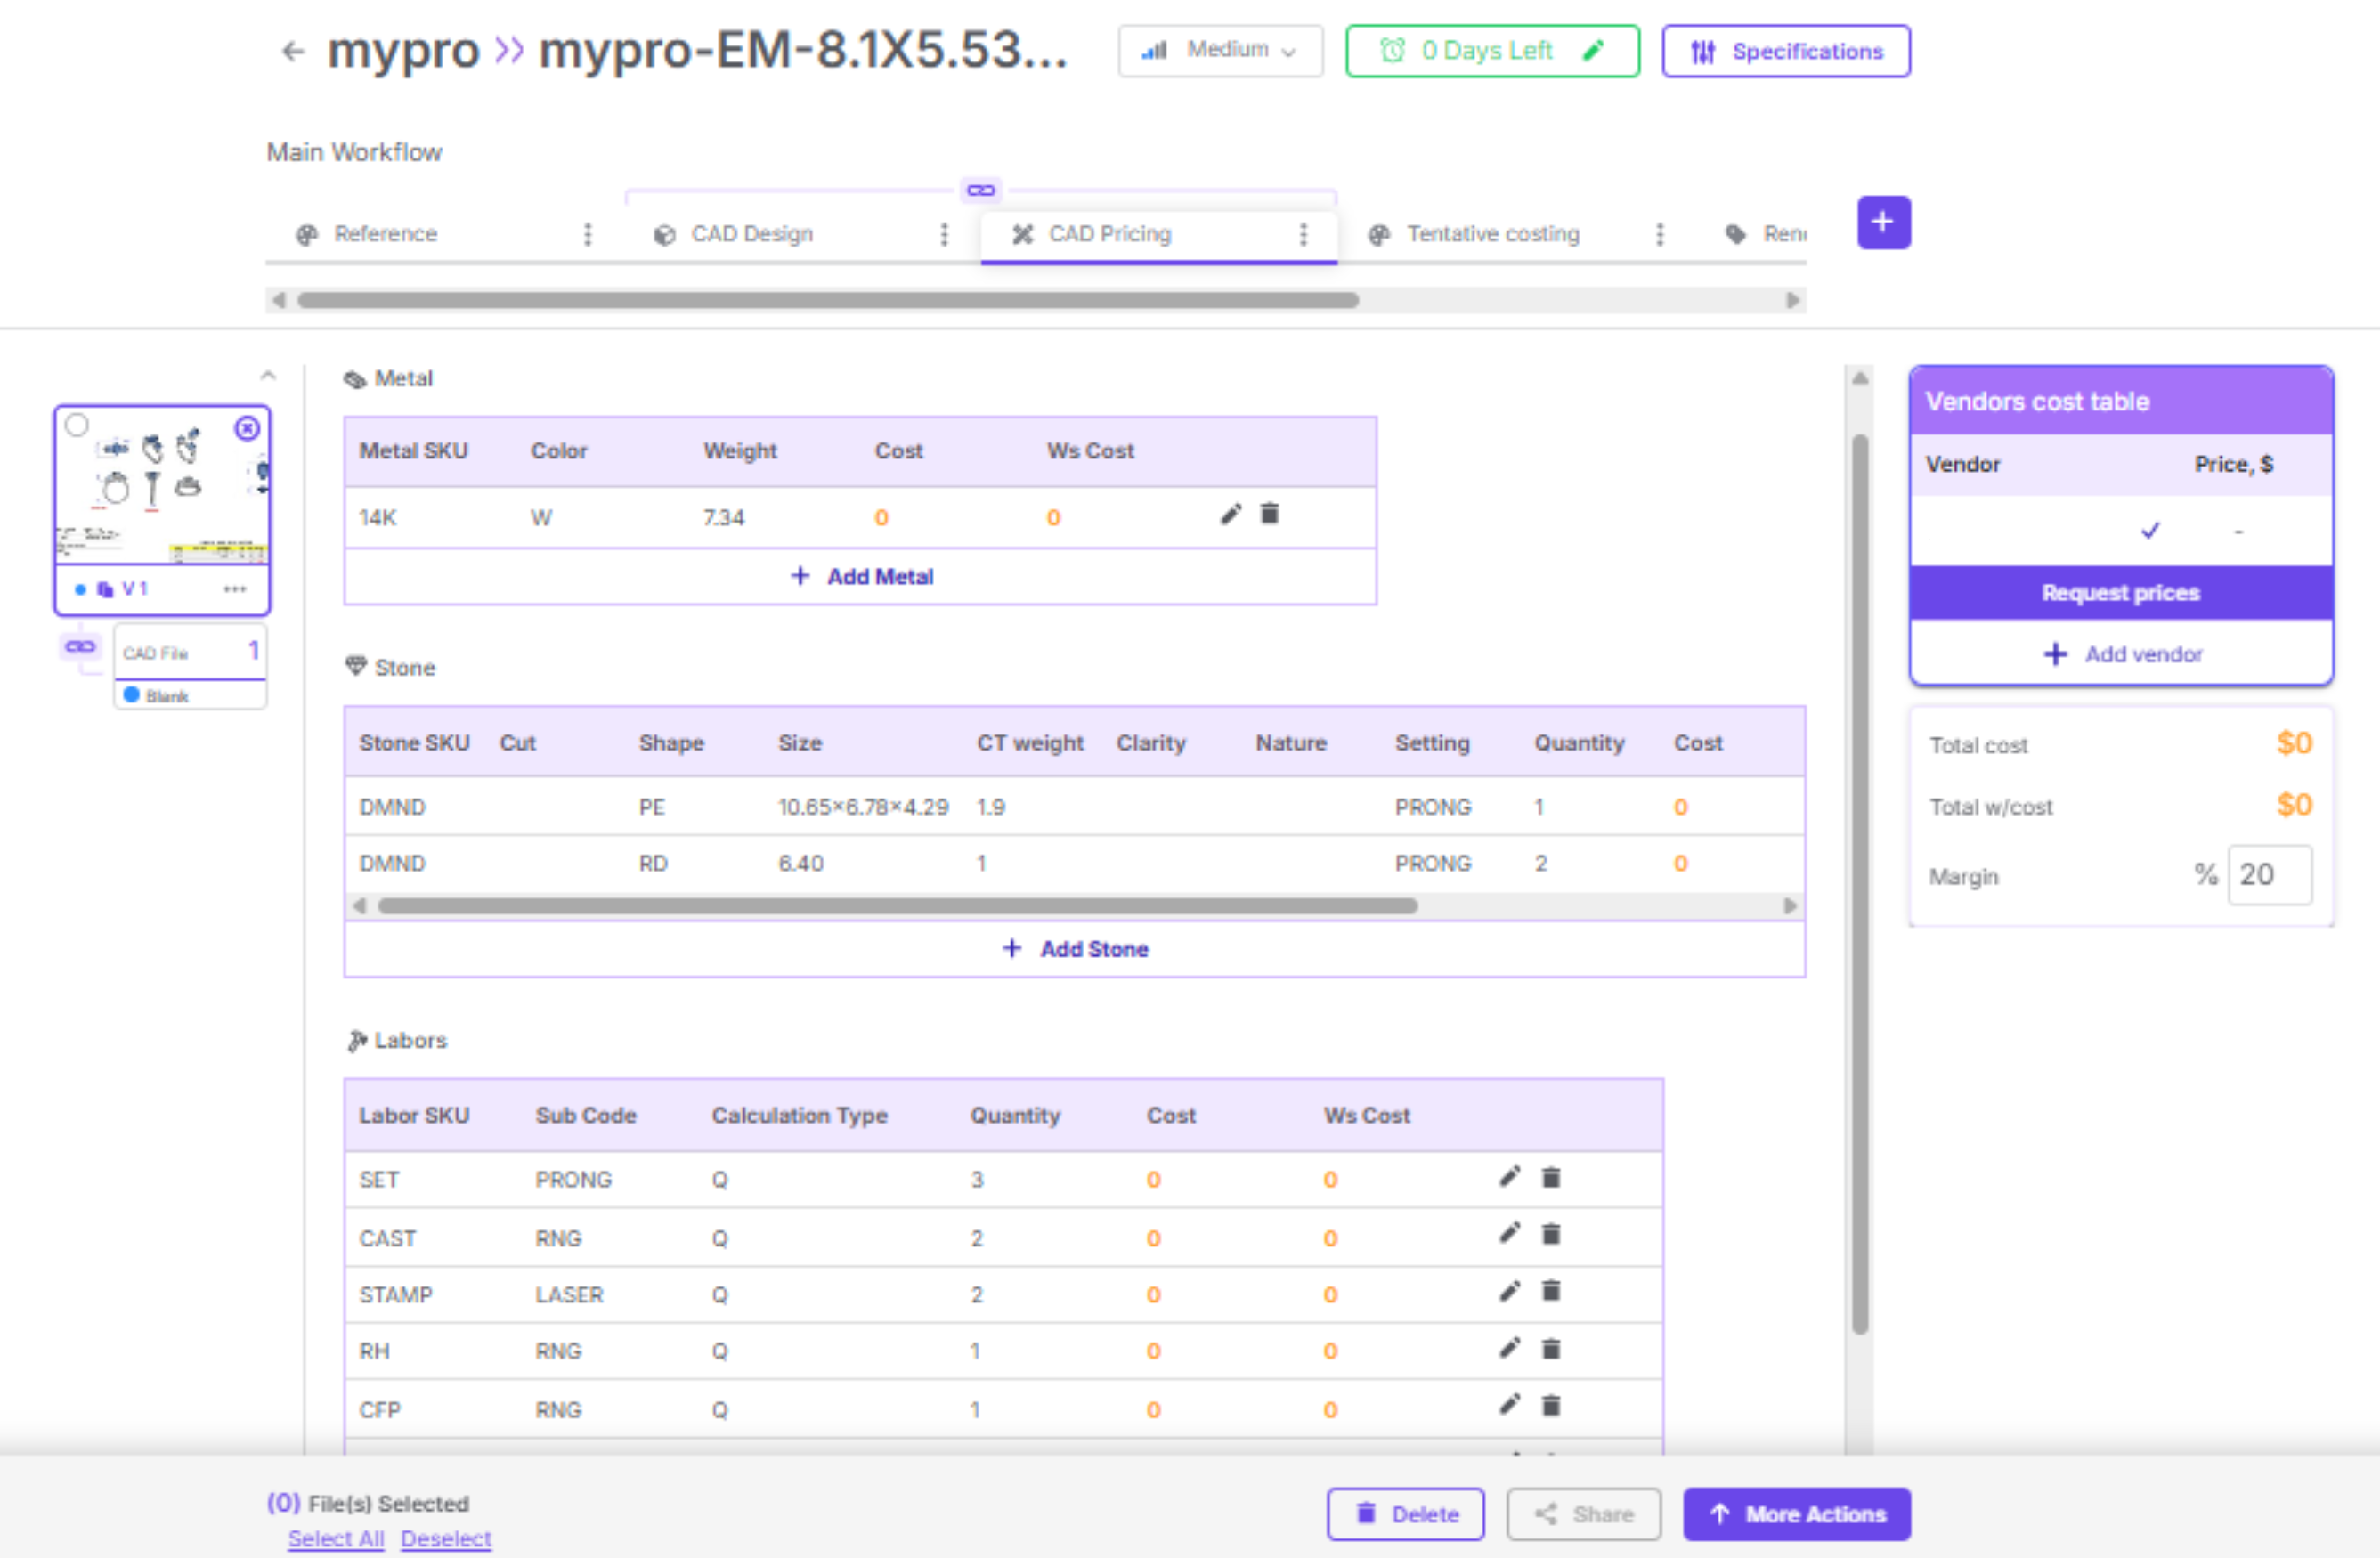
Managing components
You can edit components by clicking on a pencil icon on the right.

All the inputs like SKU, Shape, Cut, Size, etc. will work as a filter to search for an existing component on ERP.
Example: If I will input SKU = Diamond, in the table below you will see all the stones matching that SKU. Same applies to all other fields.
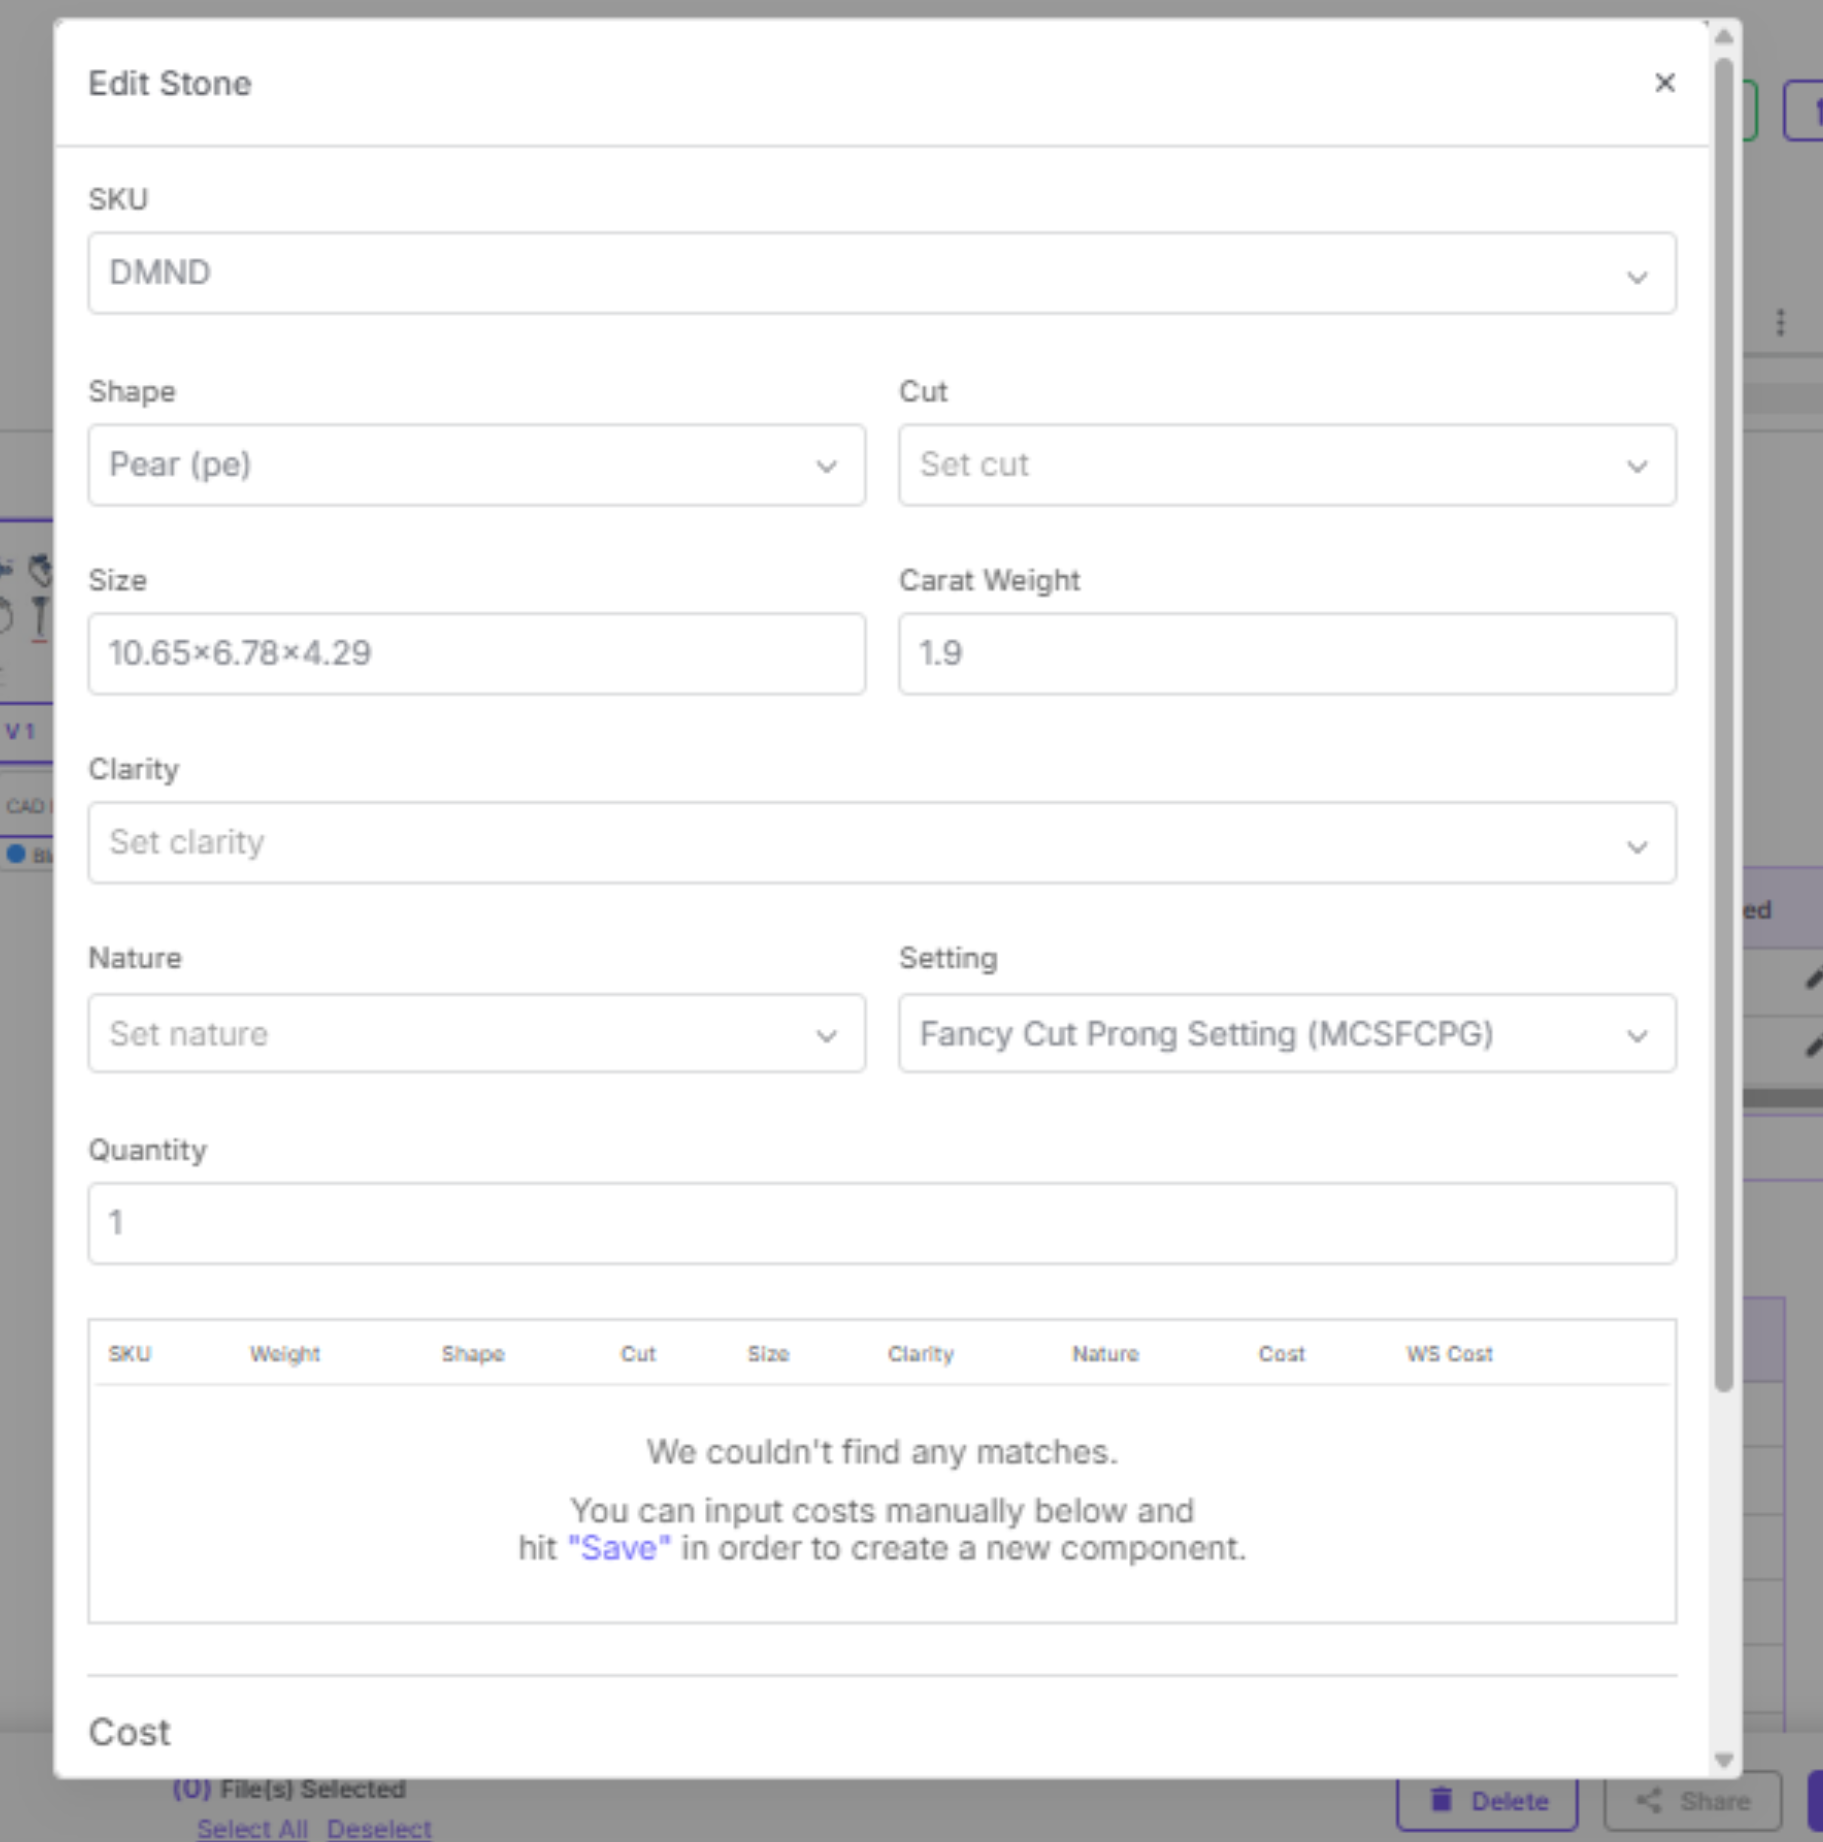
All Metals, Stones and Labor are searched from these menus on ERP.
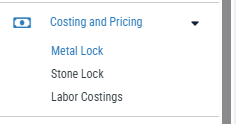
Create component - You can create a new component (stone or labor) directly from Upsway by inputting the costs when there are no matches found.
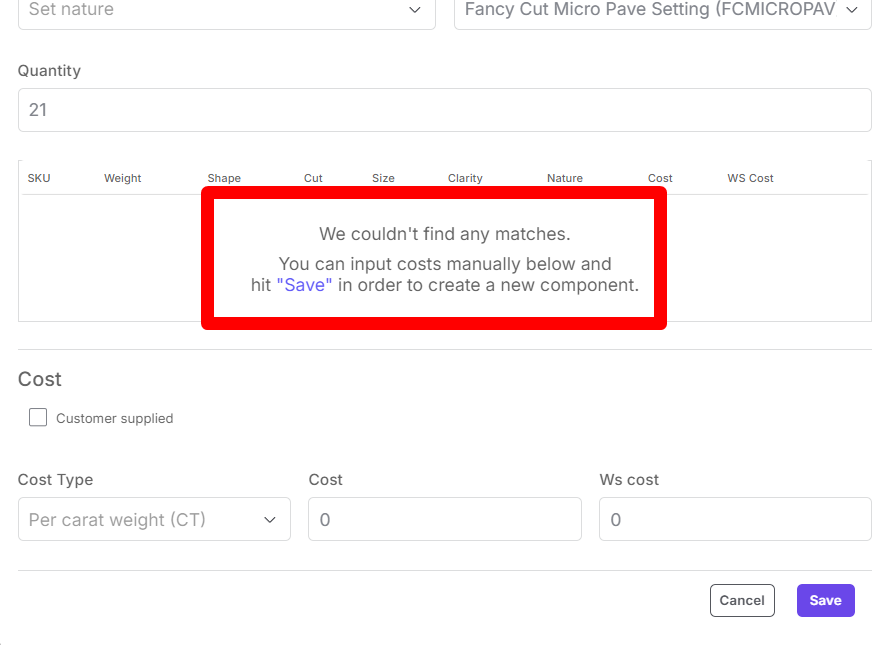
To create a new attribute, input the name of the attribute and Click the marked area.
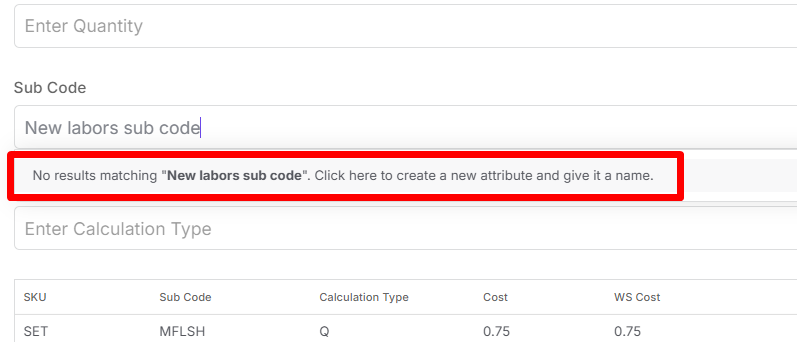
Input your SKU to create a new attribute.
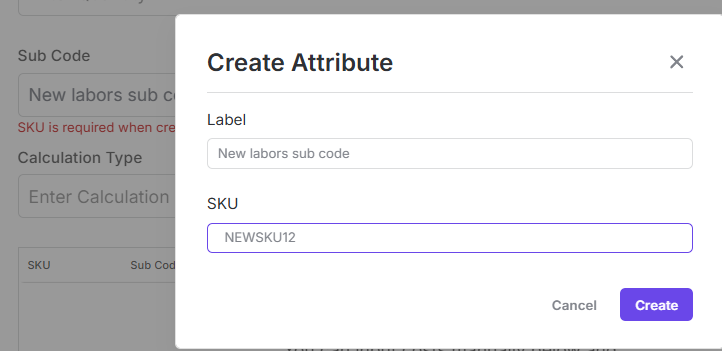
Attribute creation applies to all fields.
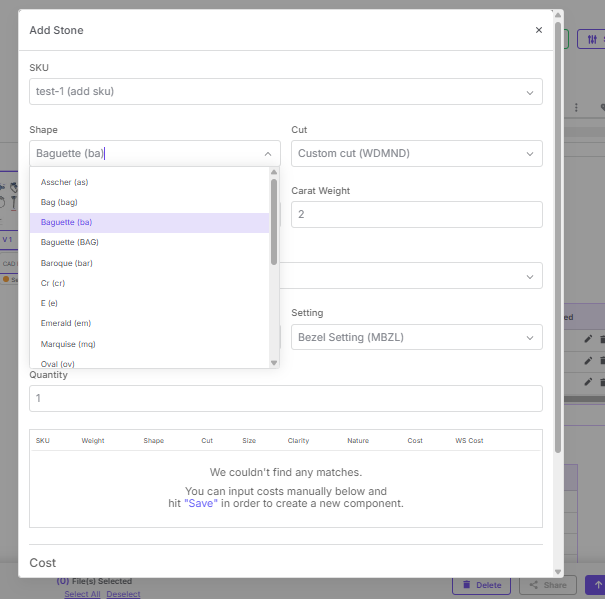
Once you fill in required fields, including costs, it will create a new stone or labor.
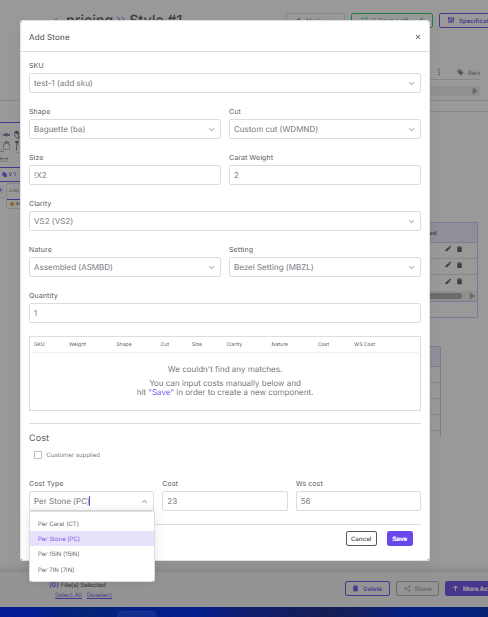
Verify that your component is created on ERP by searching for it on ERP.
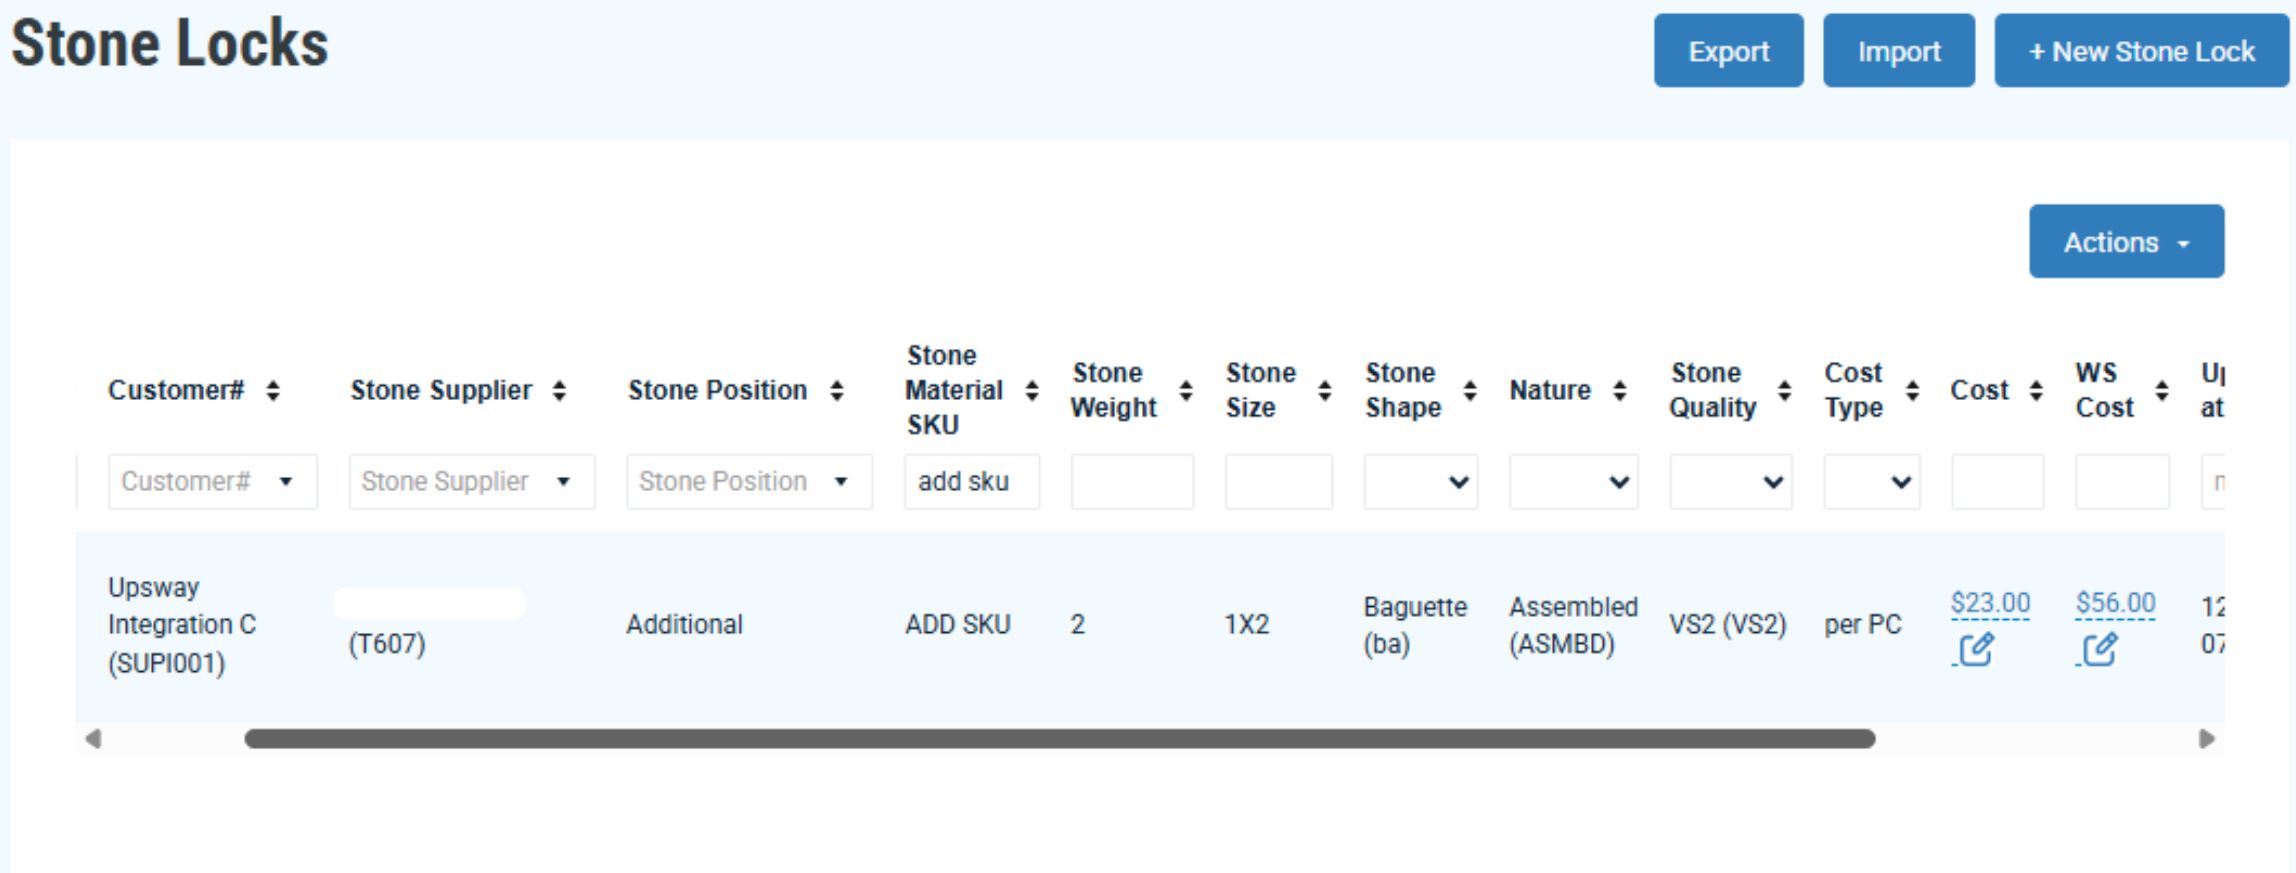
Calculating total costs
“Request pricing” button will calculate the final costs, including quantities for labors and stones and sum it all up.
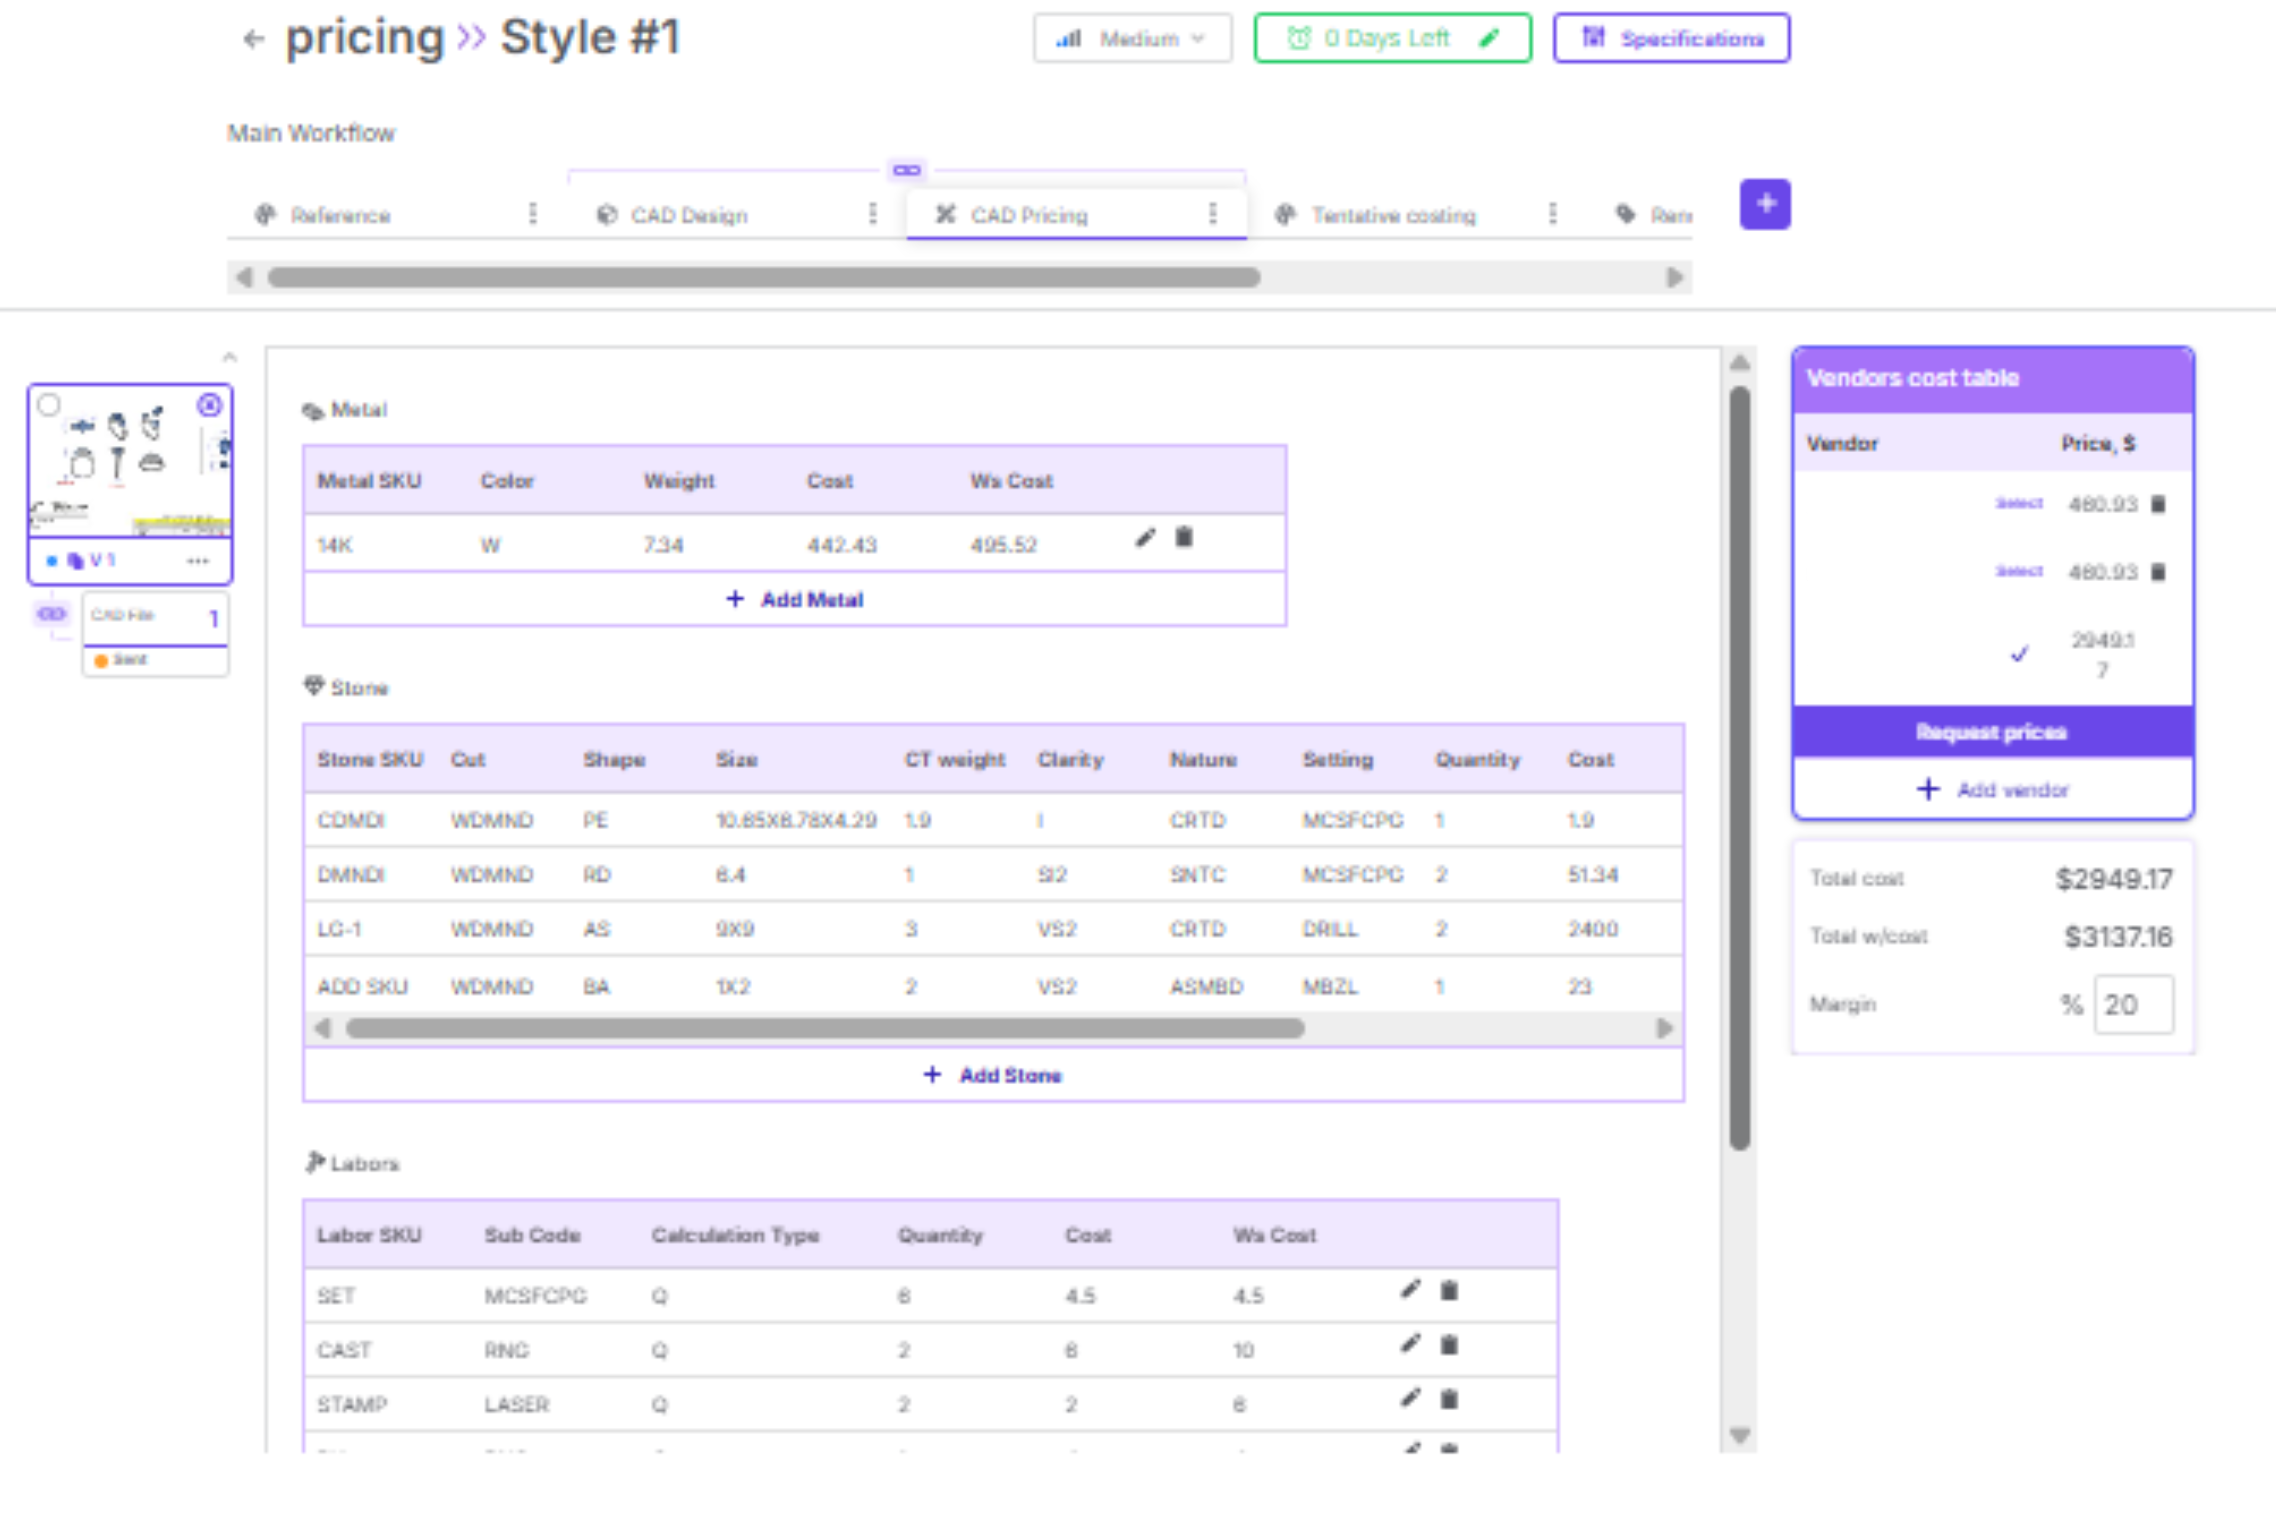
Notes and warnings
• If cost could not be retrieved for any of the component, it will be highlighted in orange on component level and total costs.
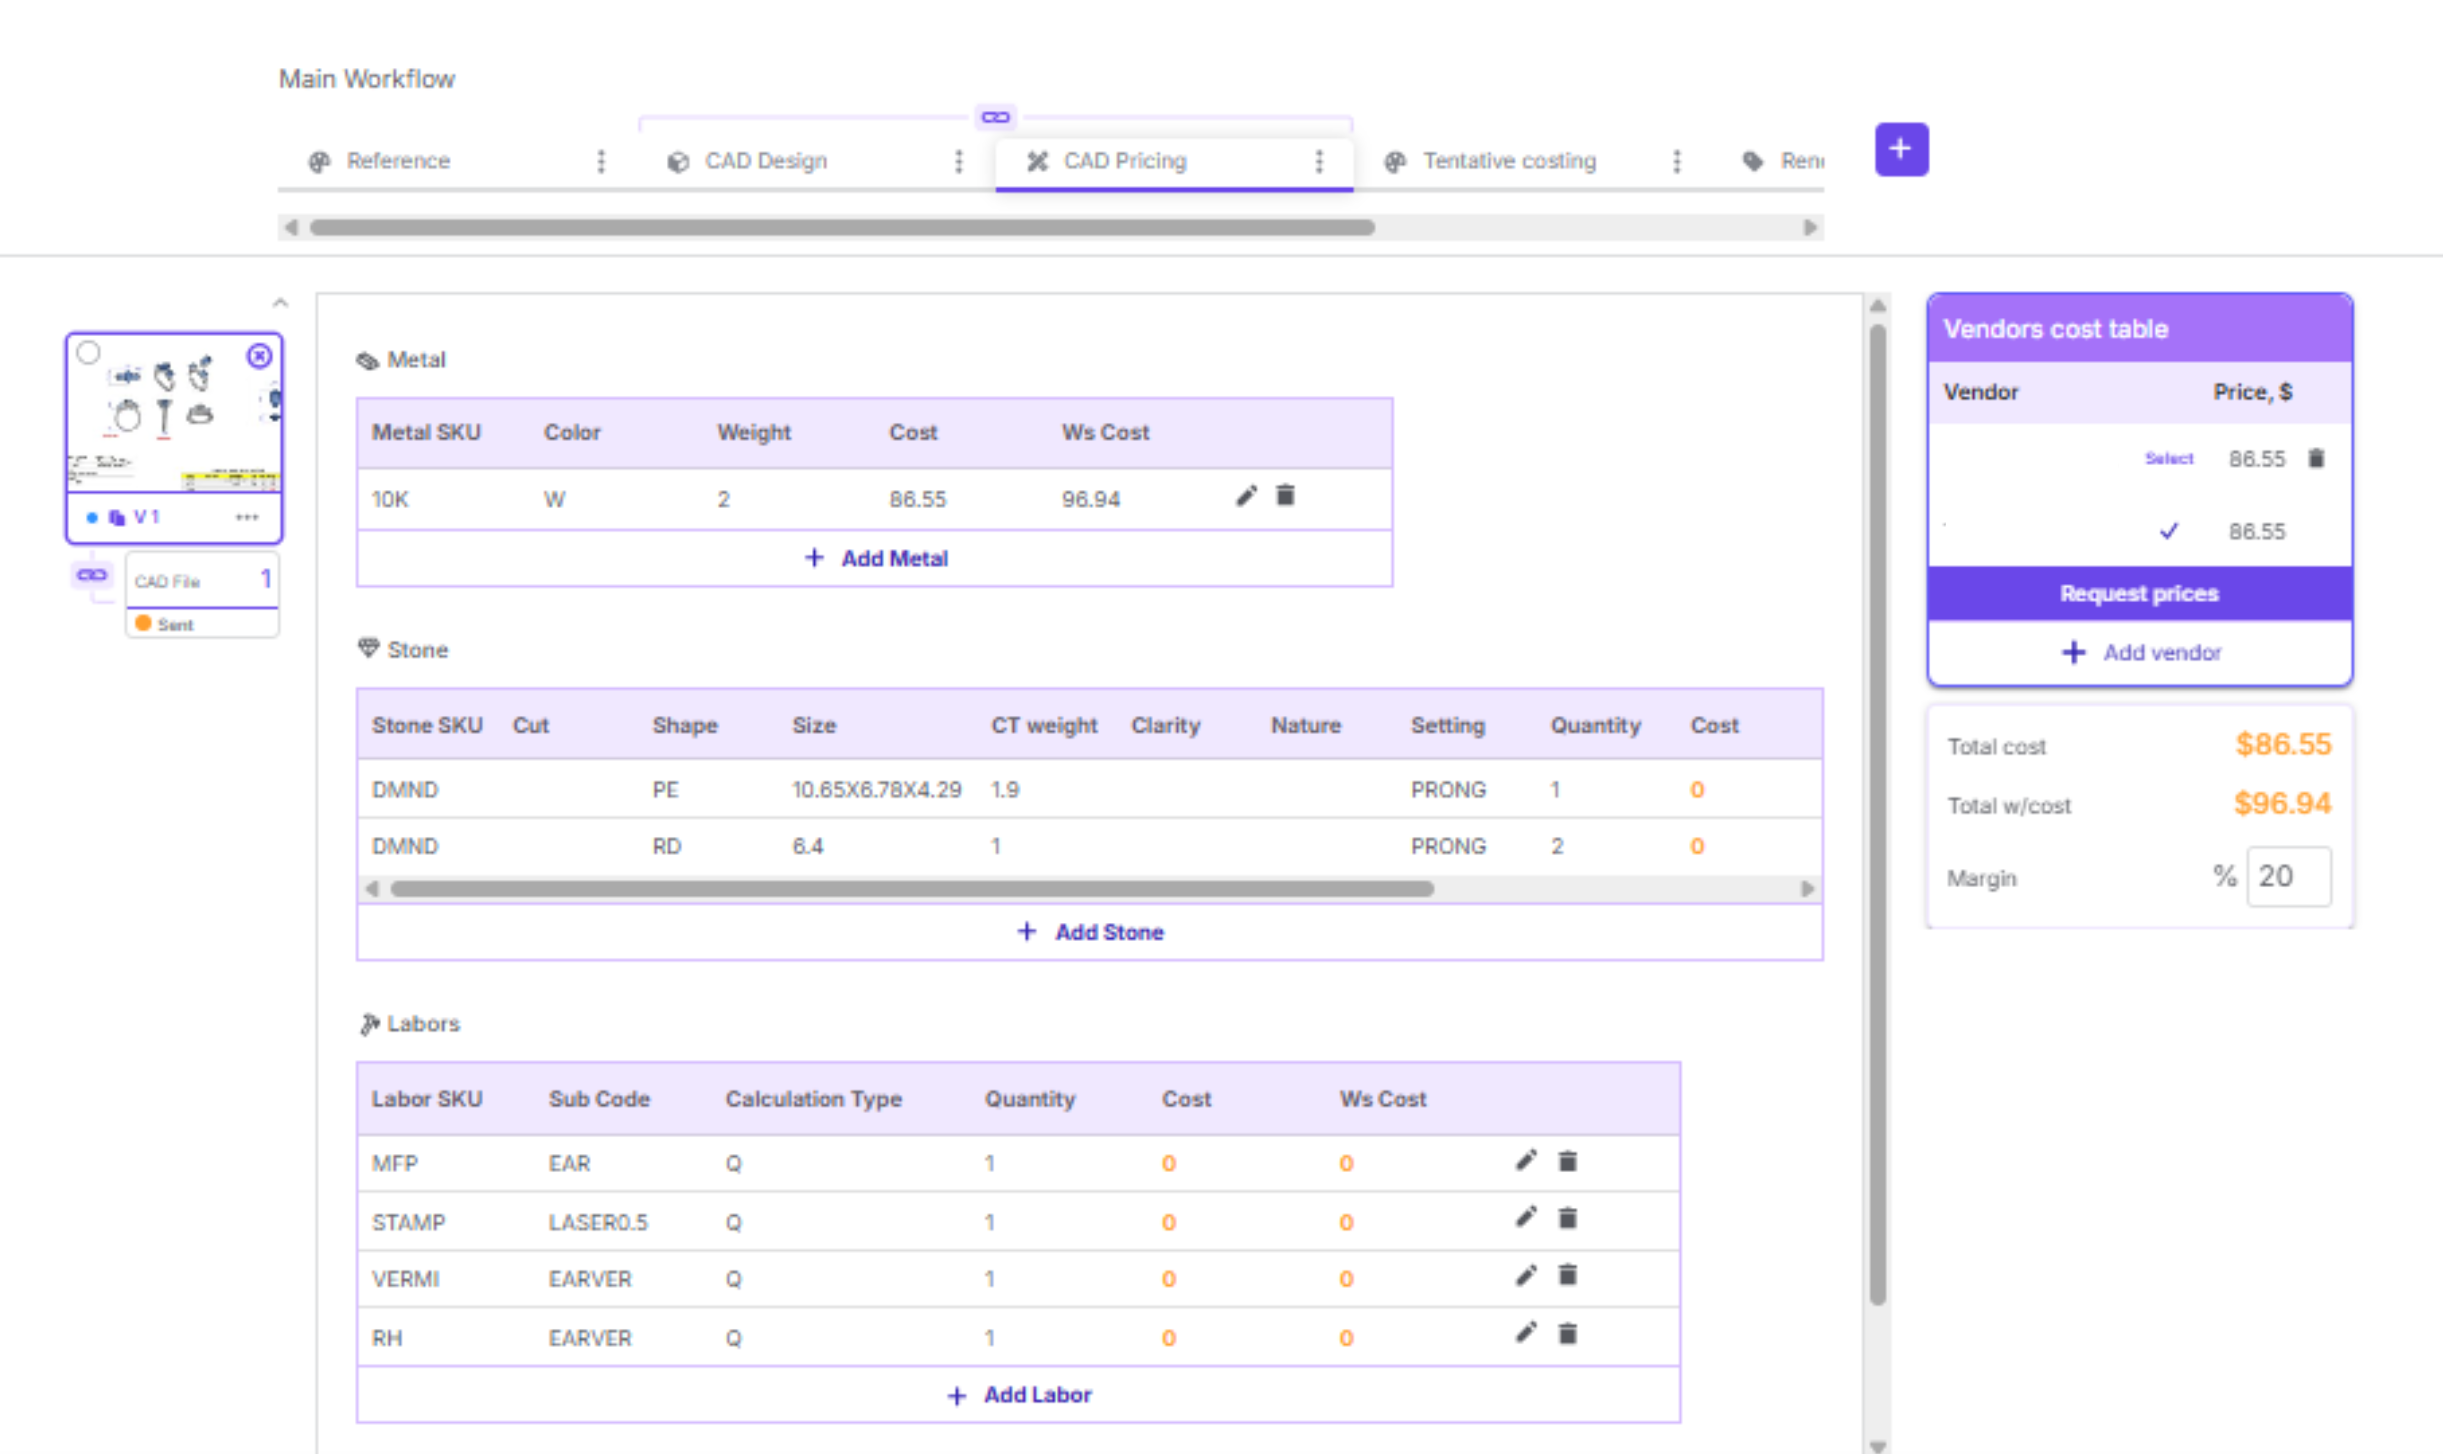
How pricing is exported
You can export pricing with the data that was calculated by the system.
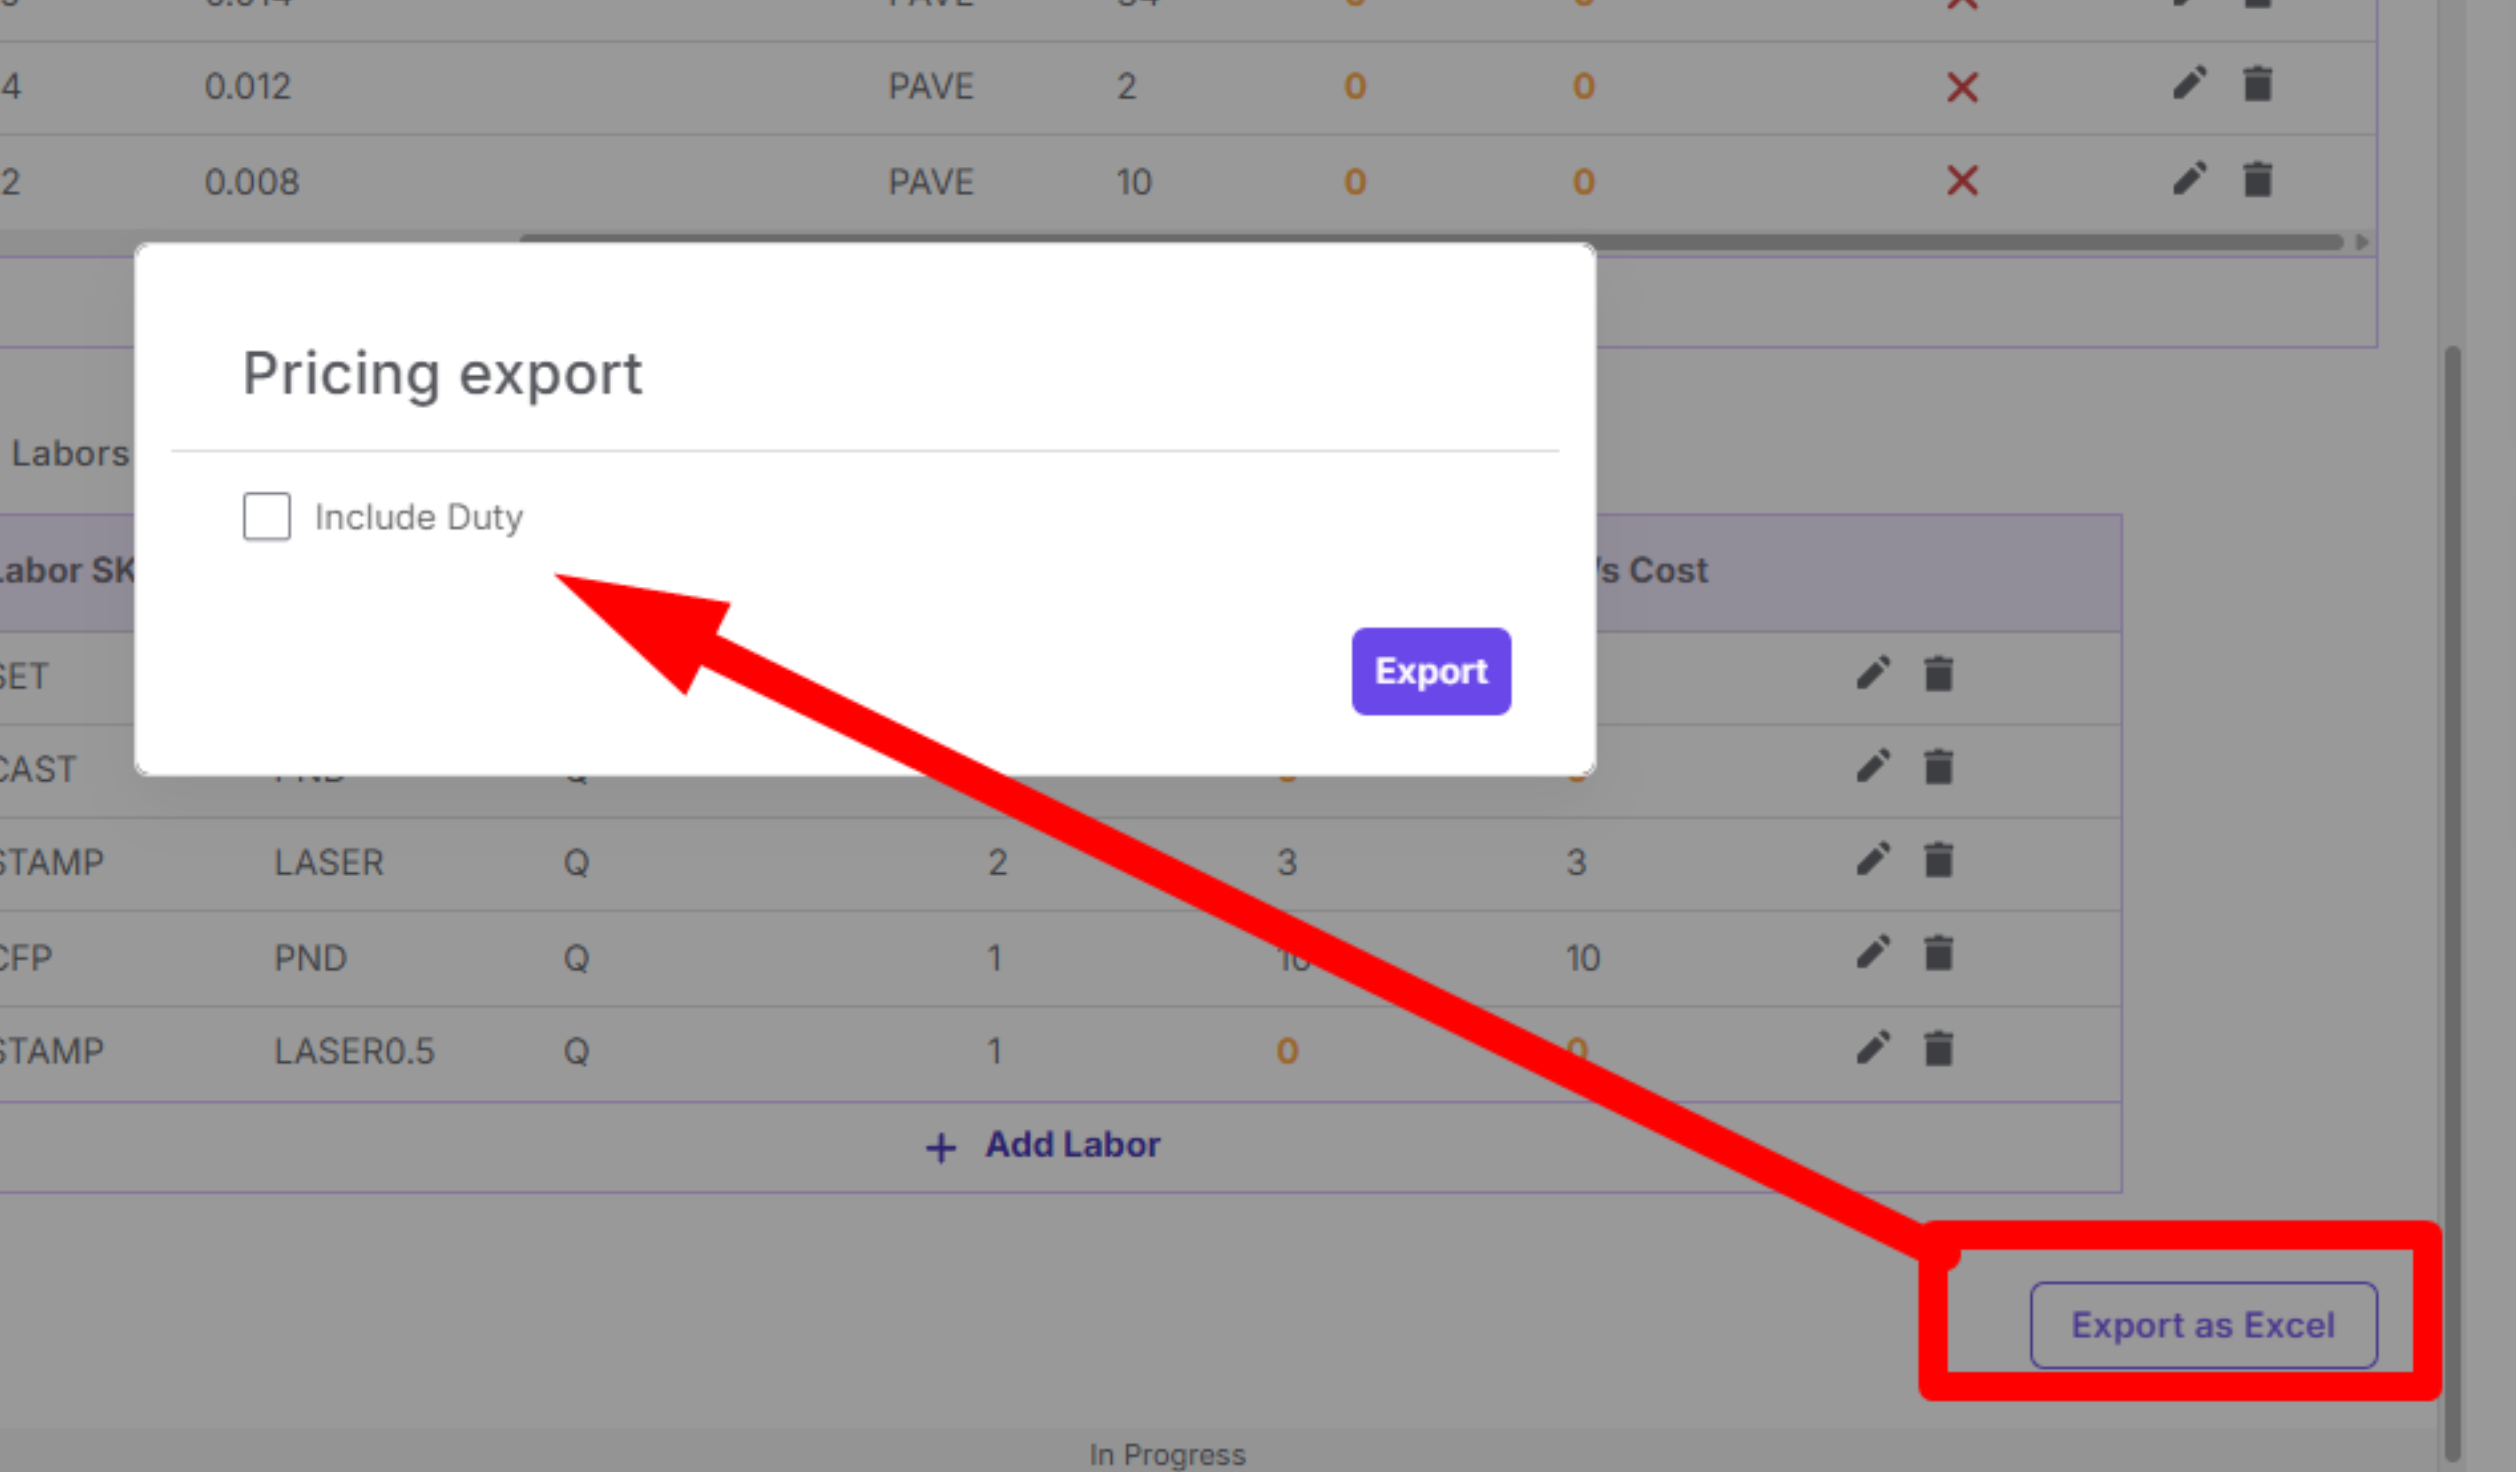
Default template sample:
Pricing versions
You can generate a new pricing version.

All previous pricing versions will be “Archived” and accessible at any point for inspection.